
I started restoring this dash last summer. It is now winter. That’s how motivated I was to keep going after I cracked the dash with my own repair process.

Craaaack!
So. This is where we were. A very clean and restored dash that lived for 20 years in an uncracked state. And then I cracked it.

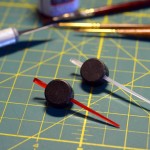
Brake fluid to clean off the vinyl treatment.
I used brake fluid to clean my dash in the last post. And I did it again when I needed to clean it this time. Brake fluid is just the most tremendous plastic cleaner imaginable. It cleans. It strips. It removes every spec of dirt and vinyl treatment. It then nourishes the plastic.
After this is done, a few wipes to remove any left over brake fluid is important. And then you’d normally apply more plastic treatment.
Unless you’re planning to take a dremel to your dash in the next few minutes.

Cracked all the way through.
The crack in my dash was very very fine. Very hard to see or photograph. But it did indeed go all the way through. It wasn’t just on the surface.
A little 220 grit sandpaper got the back side nice and rough. I wiped it clean with a wet towel, but nothing more. I needed a rough, clean surface for the next step.

Coroplast patches

Epoxied to the dash.
Last November, I went and… adopted… some coroplast from a nearby street corner. Coroplast is corrugated plastic. It’s very light and amazingly strong. And it can be found every 2 years here in the US on every major street corner with some politician’s name on it. Now, it’s BAD FORM to collect coroplast before election day. But the morning after? Free game.
I liberated a 16×8 sheet last election. And I did it with Sharka. Tin snips helped me get it all home. But I’m getting off topic.
A couple squares of this were just the thing to strengthen my dash on the cracked areas. I roughed up the surface and removed a good amount of the ink (top shot – pay no attention to the scrap black plastic that the coroplast squares are sitting on). Then it got plastic welded in place. It sat for 24 hours while the epoxy dried.

Another shot of the crack. Now with extra holes.
We call these stress relief holes. Or I do. The idea is to drill the end of the crack and stop it from growing any more. My crack was larger than I thought. I didn’t realize it curled all the way down the front lip.

Vee'd
Then I vee’d the crack with my Dremel and a burr attachment. This is so the glue can have a place to go and strengthen the dash.
Hacking the dash up like this felt great. Like paying it back for cracking on me and spoiling my day last summer.

Glued.

Sanded.
I used Plastic Welder again on the dash. It’s really the best plastic epoxy I’ve ever found. It works great on stuff like this. I just gooped it into the dash crack and then smoothed it out as much as possible with a putty knife. The next morning (and for the next few days) I sanded it flat. I wanted to get the surface as flat as possible so there wouldn’t be a bump visible through the leather.

None of those broke in 20 years.

Then I came along with my Dremel.
THIS hurt me to do. These little spars are always breaking. Or at least I read about them breaking on the various forums. None have ever broken on Sharka. And none broke on this old NA6 dash ever.
heh.
I sliced all of these out in preparation for the leather. My plan was to wrap the leather around the vent hole and use something to protect the defroster duct from stuff dropping into it. At this point, I wasn’t sure what to use, but I knew those little spars would be in the way.

Enter the leather.
I didn’t need a whole hide to do one tiny Miata dash, but I got a good deal for the whole thing on ebay. And now I have tons left over to cover various other interior parts.
The dash and a GALLON of contact cement are in the shot for scale. A whole hide of leather is A LOT.

First I traced the dash shape, allowing for plenty extra.

A last check before cutting.

Then I cut on the dotted line.

Finally, my assistant cut the excess off.
Even though I had a whole hide, I didn’t want to go crazy and cut the leather without measuring a dozen times first. I was very careful. The leather I chose to be my new dash top was the perfect piece. Not completely featureless (I wanted some natural wrinkles) and no bad nicks in the finish.
It took a couple cuts to get everything down to size and perfectly positioned. But it was well worth the work. And Beep, my adorable little assistant, didn’t mind all the work.

Outside for glue.
In part 1, I’ve got a pic of myself wearing my particle filtration mask. Imagine that being in this blog post as well. The glue (high strength contact cement) is very very very smelly. You can’t apply it in an enclosed room. Even a garage with the door open will get you high pretty quick. So, I went out to my backyard for the gluing.

Glue!
I used Weldwood spray grade headliner and dash contact cement. Good stuff, but it only comes in gallon buckets. I barely used 1/10th for my dash project.
My method was to apply the glue to one spot at a time and let it set up (5-10 minutes) on both surfaces. Then stick down the leather and smooth it out. Then continue to the next area. I started in the center and did a fairly large area. That’s fine due to the lack of features in that center area. When I got to the edges and defroster openings, I did only a foot or less per gluing.

That's a leather dash, baby!

Defroster vents ready to be sliced open.
Once I got started gluing, it was very quick work. A half hour from start to finish.
I then took the dash inside where it could cure in a warm environment. Last September, when I was gluing the dash, the outside temperature was in the high 50s. Not ideal for contact cement. Much nicer to cure in my 70 degree office. Plus, there wasn’t much glue smell with the leather covering it.

Defroster vent covers.

Formed to each vent hole.
A certain model of M2 Corp car came with a leather dash and used mesh to cover the defroster vents. The M2-1006? I can’t remember off the top of my head while writing this post. It was a model not as popular as the 1001 or 1028 and not many photos exist. But this was the general idea – fine metal mesh.
My mesh started out life as an office trash can sold by Target. Don’t laugh! That little trash can had just the right quality of meshiness that I was looking for. And it came in silver. I wasn’t sure if I wanted silver or black mesh at first, but one look at the silver mesh under that black dash had me certain. Silver was the winner.
So, I traced some patterns onto paper from the defroster openings and cut the trashcan apart. I left a healthy edge all around the new vent covers so that I could mold it to fit perfectly. I wanted the mesh to poke up out of the vents ever so slightly. I also needed it to conform to the bottom dash surface perfectly so that the defroster tubes would still line up.

Mesh glued into place.

Contoured to fit.
A little blob of glue on either end held down the mesh enough so that I could flatten it to fit the dash surface as close as possible. Then I just added more plastic welder blobs every few inches. Not too pretty, but it’s invisible from above. And the defroster vent tube still bolts on as before.

My finished leather dashboard.

Like a glove.

Defroster vents.

Defroster vents.
To say that I’m pleased with myself over this is an understatement. I’m overjoyed! The leather finish makes the old dash plastic surface look pretty poor. And the smell! This dashboard has been resting in my home office all winter. The smell of leather fills the room. I can’t wait to have this in Sharka.
That said, it’ll probably be spring before I get the dash installed.
There was one more difficult spot.

Side defroster detail.
I had a devil of a time getting these side defroster covers into place. Days of effort. The little clips were not strong enough to work with the thick leather I chose to for my restoration. I carefully hacked and dremeled (and even glued) but nothing worked. So I tried bolting the vents into place.
The bolts worked.
I’m not 100% certain about the bolts. They look decent and will match my interior nicely. But… well… I’m not certain. I have a few months to consider alternatives. I can easily get some new vent covers without holes and try again. Maybe glue. Maybe just fabricating something from scratch. But the little bolts have been growing on me for the couple of months I’ve been sharing my office with this dash.

Little bolts! And the leather edge.
I almost forgot to show off the leather edge. This is what I did. I just trimmed and glued. I could have covered the sides of the dash, but they’re barely visible. The back corner is covered by the A-pillar plastic and the sides are covered by the door panels. Instead of inviting squeaks between my door panels and a fresh covering of leather, I chose to just cut the leather at a nice angle and leave it. Some folks may disagree with this choice, but I’m happy with it.
And I have enough spare leather to re-cover the dash about 5 more times if I change my mind in the next couple of months.

Finished?
And so, it looks like I’m finished! My NA6 dashboard is finally restored. I just need some warm weather to put it in.
But wait. What about the front crash pad? It is curiously absent from the above shot.
That’s a story for another time.


Wow ! Looks great, and you make it look so simple as well.
I want to find a spare dash and give it a go.
Keep it up Adam, your blog & car are inspiring!
Thanks! You should definitely find a spare dash to work on. It’s not very hard and you can learn as you go like I did.
Would the mesh from the trash can work on the upper side vents to match the main defroster vents? Quality work as always!
I’ve considered that. I’d have to hack up the side defrosters completely to get the mesh to work, and I’d lose the little directional vanes. Plus, I’ve got that on Sharka’s NA8 side vents and am a little tired of it.
I can see myself putting in and taking out this dash a number of times over the coming years. heh
Hi Adam,
Nice post! The mesh on the defroster vents look similar to what M2 used on the M2-1002 dash (and on the Tokyo Ltd). See this pic from my old Tokyo Ltd:
http://dl.dropbox.com/u/15854148/mx5/P1010134.JPG
(4MB image in order to get the detail).
Jamie.
Yes! The 1002! Not the 1006. Not sure what I was thinking.
Your car is (was?) gorgeous.
*was* gorgeous as I sold it and had brief spell with an S2000. All good now as back with the M2-1001…
Black bolts would look good for the vents as they would ‘pop’ less
That’s pretty much my feelings too. I’ll be hitting those bolts with some paint if I ever get back to this dash project.
Adam,
That is bad ass looking. I’m planing on doing the same with alcantara. Could you have used the factory defroster vents?
Those ARE the factory defroster vents. I just added the bolts to keep them attached. I couldn’t get them to latch with just the little plastic tabs.
Great work Adam (as always) – can I ask what thickness leather you used. My own dash mod is finally reaching the stage where I need to wrap it and I’m not sure how thick/thin to order the hide to ensure its stretchy enough without tearing.
I just measured for you. With my calipers, it looks like the leather is 1mm thick when some force is applied. I’m not sure what that is in gauge or whatever they measure leather hide thickness. It’s not thin, but it’s not quite jacket material either. The stuff I bought was for automotive interiors, but I think more for seats. I certainly could have gotten away with thinner material.
lol – that’s precise enough for me! Sorry I missed your reply until now – I’ve been distracted of late in my quest to buy a tow car (Land Rover). Many thanks. I’ll order some hide and glue now.
What do the sides of the dash look like with the leather wrapped on them? how far down did you go on the sides?(Part on the side of the dash that meet with the door cards)
Is there anyway we can get pictures of that?
Also,
How much thinner would we have to go on the material to avoid clearance difficulty?
Like if I was to use a thinner pleather cloth?
Thanks,
Sorry for not seeing this comment.
You can see a shot of the dash side here.

Take a look at the very top, right near the crash pad. See the edge of the leather? You cannot really tell the edge is there unless you’re looking specifically for it.
I think my leather was about 1mm in thickness. Something .6mm or .8mm would be much easier to work with.
How do u remove contact cement from a dashboard?
Contact cement has interesting properties. It is designed to bond to itself, but just stick to other objects. It should remain somewhat gooey. Chances are you can just work at the glue with a finger and sort of roll it off the dash.
Good luck!
I’ve read brake fluid causes plastic to become brittle, is it possible the brake fluid caused the crack?
I’ve used brake fluid on plastics for years. Never had any problem. But it might be a possibility. You (or at least I) never know.
In my case, it was certainly the repair to those cracked posts. The dash crack was RIGHT at the post location. It had certainly settled and sagged over the years. When I repaired the posts and tried to force it back to factory shape, the dash gave up and cracked.
Any thoughts on a supplier for a similar type of leather? All I find is a bit too ‘grainy’…
[…] I guess I posted this a little early. I did some searching yesterday and found a blog post by revlimiter.net showing the fixing of a cracked dash and then covering it in leather. So I think that is what I'm going to do. NA6 Dash Restoration ? continued ? revlimiter.net […]
Adam, I find myself always getting distracted with every read by you. DO you think This would be worth doing on a LE dash, or just repaint it…
It would absolutely be worth doing on an LE dash! You’d never have to worry about sticky black paint again.
Appreciate it for this fantastic post, I am glad I detected this site on yahoo.
I’m also commenting to let you know of the really good discovery my friend’s daughter gained reading through the blog. She discovered too many details, not to mention how it is like to possess a great helping spirit to get the mediocre ones smoothly fully understand specific tortuous matters. You really surpassed our expected results. I appreciate you for rendering such useful, safe, revealing and also unique tips about that topic to Ethel.
[…] I did DIY this. I haven't done a write up, but my process was identical to revlimiter's write up on his site. Only difference is I used Alcantara and he used Leather. https://revlimiter.net/blog/2011/12/n…ion-continued/ […]
[…] Not hard at all. I used DAP contact cement and did about 6-8 inches at a time. Just take it slow and you won't have a problem. Revlimiter has a good write up on his site. He covered his 1.6 dash in leather, but it's still the same process. https://revlimiter.net/blog/2011/12/n…ion-continued/ […]
Rev,
I’m almost 2 years into my NA6 ground-up rebuild and I’ve you to credit for it. Today I wrapped my dash in leather and, thanks to your site, it went without a hitch. Just wanted to say thanks and I look forward to ordering a gauge set in the near future (winter project).
I am super excited about finding this post, because my NA6 has two gigantic cracks on the crash pad as well as a nasty spot where someone had installed and then removed an adhesive phone/GPS mount. It’ll be a lot of work to get the cracks filled and sanded down so unless I come across a cheap salvage I’ll be waiting til I have a garage, but I am SUPER excited about the idea of covering it in leather (and putting my OCD to rest about its state of ugly). For now I’m getting myself a bottle of brake fluid, some rags and going to town in situ.
In the meantime I’m planning to try and source the leather, and am wondering if with all the measuring you happen to recall the approximate square footage and/or measurement of the piece of leather you cut. I’m finding a lot of stuff on eBay that seems a little too small in the 8 sqft range, as they’re more rectangular than long. Your hide looked huge next to the dash – what was the “good price” you got it for? (I do realize this was several years ago).
Thanks much, I anticipate I’ll be using your site a lot more once I have the space to start taking apart and making sweet restoration love to my little Sita.
There are some interesting cut-off dates in this article however I don’t know if I see all of them middle to heart. There’s some validity but I will take maintain opinion till I look into it further. Good article , thanks and we wish more! Added to FeedBurner as effectively