

93LE tie rod kit! (Helpers not included)
This is one of those items that’s been on my to-do list for quite a few years – swapping out Sharka’s stock tie rod ends for the 93 LE / 94 R-package ends. They help address the bump steer issues on a lowered car and it’s one part of a Miata that I’ve never replaced. That second reason alone is enough to justify the job.
I fired up my browser and ordered two N021-32-280As from Mazdaspeed Motorsports (formerly MazdaComp) and and started trying to figure out exactly how to replace these rod ends. And I found, like… nothing! I found very very little on any Miata-related site on the internet. Just a couple of sentences here and there, a mention of something called a pickle fork, and the emphatic suggestion to get an alignment immediately after.
So. Here’s an in-depth how-to of changing a Miata tie rod end.
Seriously, it’s very easy. I kinda understand why I didn’t find anything on the internet. It’s two bolts and one threaded rod end.
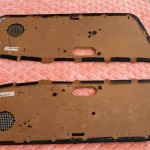
But first, a quick comparison of the differences!

Stock on the bottom, 93LE beside the Minifig.
Notice the depression in the rod end just after the ball joint. It is deeper on the 93LE model. Also, the threaded portion is ever so slightly taller. 71mm for the 93LE part vs 68mm for the stock part (off a 97 in this case).

Rod end height different (93LE on the right).
This was difficult to set up. Both rod ends are sitting flat on their ball joint. The minifigs are just there to keep that ball joint flat on the table. The 93LE model (with the square end) is ever so slightly taller than the stock tie rod end.
One final thing: that square head doesn’t mean anything. The stock rod ends on my 95 had square heads. The ones from my dead 97 had the round-ish head you see pictured above. Taking a quick look at your suspension and seeing a rod end with the square head doesn’t mean the previous owner upgraded it for you.
How to Swap Tie Rod Ends

Step 1: Paint the threads on your tie rod.
There are actually two things you can do. You can measure your toe before you jack your car up. I neglected to do that, so I painted the tie rod with some white model paint. Get the paint all the way up to your tie rod end. That will help you re-set your toe later after you’ve swapped the parts.
Oh, and you apply this paint after you loosen the nuts securing the tie rods. My tie rod required a 12mm wrench to hold it in place and a 17mm wrench to loosen the bolt.

Step 2: Remove the castle nuts.
The castellated nuts are held in place with cotter pins. You can cut them off or just bend them back and slide them out. The Mazda tie rod kit comes with new castle nuts and pins, so you don’t need to be careful with the old parts. For rusty suspensions, a little PB Blaster will help.
This shot does a poor job of comparing the nuts, however let me say this: They are identical! For years I’ve read that the 93LE rod ends used taller castle nuts. Nope. The replacements provided to me by Mazda were identical to the ones I pulled off of my 95.

Step 3: Enter the pickle fork.
This is a pickle fork. They help you remove ball joints. The idea is pretty obvious when you’re holding it. You slide it between the ball joint and the part holding it and you bang the end with a hammer. The ball joint pops out.
I found my set at my local Sears. I’m sure just about any automotive parts store would also sell these.
Pictured with my pickle fork is a tub of grease. This was prompted by an internet tip I read saying that if you grease up your pickle fork before you hammer, you will not destroy the rubber boots around the ball joint you’re trying to remove. That sounded pretty interesting to me, so I tried it.

The pickle fork in action.
It was much harder to take a photo of the pickle fork than it was to use it and break the rod end free. I hit it with my 2lb sledge and the rod end came free in about 10 seconds.
And the internet was right!!! The greased up fork didn’t destroy the boot on my 16 year old tie rod ends!

Step 4: Unscrew the rod end.
That’s just grease on the rod end, not a torn boot. It did puke out some of the stock grease, but that couldn’t be avoided.
And that’s it. The hard part is over. You just unscrew the old rod end and screw on your new 93LE part. Make note of the painted blob on your tie rod as you’re unscrewing the rod end. The paint might end perfectly on the right thread or it might have bled under the old part just a little. If you make note of it and carefully thread on your new part, your toe setting will be pretty close to how it was before you started this job.

Step 5: Install new parts.
It looks pretty spiffy, doesn’t it? And it works!!! I didn’t realize how much bump steer I was living with until it was suddenly gone. Or at least significantly reduced. It is seriously a night and day difference with my car. Well worth the cost and the half hour to swap parts over.
Many thanks to my buddy Ben for coming and lending a hand and input with this job.
Step 6: Go out and get your alignment reset!

Very useful post. Thanks.
Glad to help!
I poked around your blog a bit and found your MSM. Nice! Do I know you from one of the forums?
I think you do. I also have an Liquid Silver ’09 that I run in STR. My avatar on Miata.net is a photo of that car. I go by Skeeler on that and other forums.
I will also be bringing home a Laguna Blue ’95 in the next couple of days. I’m planning to build it into a track and autocross car taking inspiration from Sharka, the Targa Miata, and a few others. Thus, I expect you’ll see me around the NA sub-forum a bit more in the future.
Wow! That’s quite a flock of Roadsters. I didn’t delve into your blog enough.
The Laguna sounds particularly cool. I’m honored to be able to provide inspiration.
By the way, I love Lego and those Ferrari minifigs in particular. What set did they come in?
These came in a Ferrari F1 set they made a while back. It had 2 small cars and a whole pit wall and team.
Thanks. The Laguna arrived today. There’s much to do. This mod is certainly on the list.
Awesome writeup. Followed the advice a few weeks back to install R-package tie-rods. Used the greased fork method to re-de-install one tie rod end (when I discovered a torn steering boot later on after the install) and it worked great! Awesome photography also. Mind if I ask what sort of lens you’re using?
Sweet! I’m glad the grease trick worked for you. I didn’t mention above in the post… but this trick only worked for one of my stock end links. The other one came apart anyway. But then again, they were 16 years old.
Thanks for the photo complement! I use a 28mm for most of my car photos. I’ve got two, a Nikon 28/2.8 AF-D and a Vivitar Series 1 28/1.9 from the 70s. Both focus very close and have just the right width for working on the car. The Vivitar is my fav though.
Any chance you can know where I can order the tie rods at if I’m not part of the MazdaSpeed program?
Miata Roadster carries them.
http://miataroadster.com/steering_rack/tie_rod_end_ball_joints/c-10476.aspx
And Finishline
http://www.finishlineperformance.com/store/product.php?productid=18088&cat=328&page=2
Hope that helps!
Thanks! That def helped.
I just ordered my pair of TREs through Miata Roadster. After installing the Eibach Pro Kit and Bilsteins I could feel an increase in the amount of bumpsteer and hopefully these will cure that. Thanks for the link and the walkthrough above!
-Justin
I think you’ll be impressed. My bump steer really smoothed out. Well worth the money for those little hunks of metal.
Hey, rev. Love your site and you’re always very helpful on ClubRoadster. Great article, thanks!
No problem at all! I really enjoy writing this stuff.
[…] working and you need to get it apart use some grease to help reduce the damage. Info from here: Tie Rod End Swap — revlimiter.net Yes I know that is a tie rod end but it has a boot and its similar enough. __________________ – […]
Sorry if it’s a rookie question, but…i’m confused. Why grease the fork and worry about splitting the old boot if you’re replacing with a new one??? I plan to replace tie rod ends on my 95 Miata after discovering a split boot when i replaced cv boot.
You’ll laugh at the answer. “Because I could.” I found a how-to somewhere on the intartoobz about doing this, greasing the fork, and not destroying the boot and I wanted to see if I could do it.
And I did.
So I ordered these for my 94 B-package (that I bought completely unmodified) and was shocked to find the installed tie rod ends are IDENTICAL to the new LE/R-package ones I just received. Mine had severely torn boots and seem to be the original ones that Mazda installed since they have aged the same as the rest of the car. I urge everyone to really inspect/compare theirs to these pics to make sure they don’t spend an unnecessary $120, because it appears that some other Miatas also came with these improved tie rod ends.
Hey Rev, great post as always. Just wondering what width pickle fork did you ended up using? Just verifying before I go purchasing any random one.
I honestly think I just drove to NAPA and bought one. Mine is metal and has a few screw on heads. If you have a few days you probably can’t go wrong purchasing the one with the best reviews on Amazon.