
Airbox 3.0 with carbon fiber intake tube & real Monsterflow filter.
Everything you need to know about Miata intakes
I have multiple pages dealing with getting the air from outside of your engine bay into the engine. The page
you're looking at right now highlights the difficulty in isolating cold air from the hot engine bay and a few
generalities in making an NB (2nd gen Miata) intake fit on a first generation car. For info on NACA ducts, check
out the NACA duct page. For help on making your own NACA duct headlight lid, visit my
NACA duct install page. For instructions on creating
an intake from scratch, check out the Coldside intake page. And finally, for another look at making an
intake isolator box, check out the Coldside isolator box page. And finally, just incase your wondering, as of
December, 2005, I have removed the Coldside supercharger. It was fun, and the throttle response was nice, but
I wanted either a) a simple Miata, or b) WAY MORE POWER. While I save for an Ubercharger, I'll enjoy my simple, normally
aspirated Miata.
Fitting an NB intake to an NA Miata
When I began my quest for a cold air intake in 2002, nothing really existed like the Monsterflow intake. It was available for the NB, but not the 1st gen cars. With the current wide selection of intakes available for both generations (NC cars are still pretty untouched as of December, 05), the information in this section is a little dated, but judging by the hits this page still receives, the intake info is still useful.
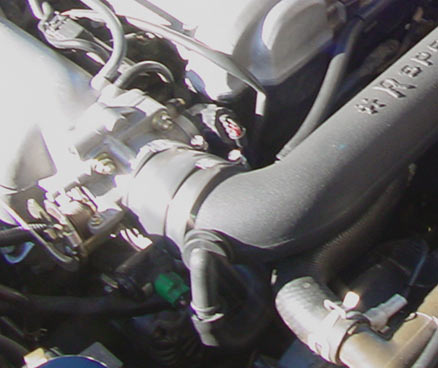
The fish tank part you need to make an NB intake fit the NA idle air controller.
Yes, you read right - a fish tank part is needed. Specifically, you need a 90 degree elbow and the associated rubber grommet. Drill a small hole in the side of your NB Monsterflow, and stick the elbow in. I had to trim the NA idle air hose slightly to make it fit on the end of the elbow. As odd as this looks, it seals very well. There is no air leak.
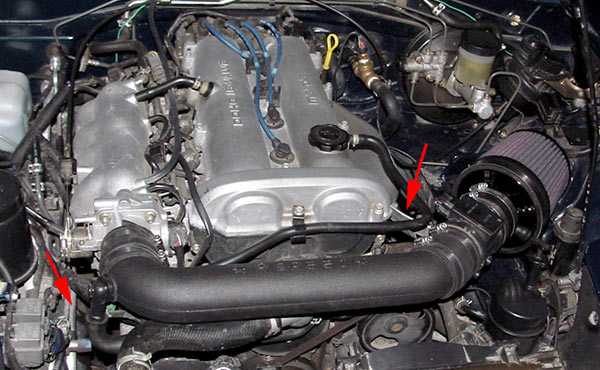
NB intake installed in the NA. Note the two arrows showing the parts you need.
The other little part you need to make is a small angle bracket for the MAF/filter. Without this little bracket, the filter will bang all around. A small piece of aluminum bolted to the engine hoist hook is all you'll need. Compared to making the airbox, fitting the NB Monsterflow intake is really quite simple.
Isolator box fabrication tips
You can find most of the materials needed to build one of these boxes at your local Lowe's. Most stores don't stock thick aluminum sheeting, so I bought two thinner (.016"?) sheets and used JB Weld to hold them together. The final sheet is nearly 1mm thick. That's pretty decent for forming a heat shield. Not too thin, and not too thick that it's impossible to cut. Also, ABS plastic is a possibility for building a coolbox. I used 1/8" thick ABS on my coldside airbox.
I then used tin snips and a dremel to cut the traced shape out of the big sheet. A bending brace will help make sharp edges to conform closely to your prototype. A shot of black Plasti-dip spray paint makes for a nice, durable, black finish. This stuff is also available at Lowe's. Remember to let it dry overnight. As for the ABS, I used the side of my workbench and my heat gun to do the bends on that. No painting was required. Overall, I was quite impressed by the ABS. For future air boxes, that's the material I'll use.
The black rubber insulation is from JC Whitney, the only source I found for such insulation. It was cheap at about $20 for 10', but JCW charged me over half the price of it for shipping. When is it necessary to charge $15 for 2 lbs of insulation?!?! You can find the insulation here. You want "type 5" which sells for $30 as of December, 2005. For a total of about $40 in parts, I have a very nice isolator box and a fun project that kept me busy for a couple weekends.
Photos of the airbox fabrication process
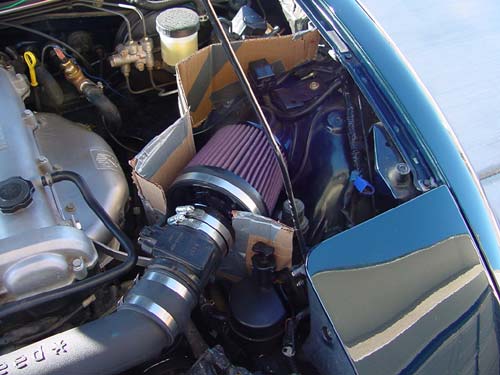
Cardboard intake isolator prototype
Originally, I had a long piece of aluminum that ran the length of the engine bay. It didn't look horrible, and it kept the intake very cool, but it made working on anything pretty difficult. I wanted a slightly smaller box that would make the rest of the engine bay a little more accessible. Out came the cardboard and duct tape!
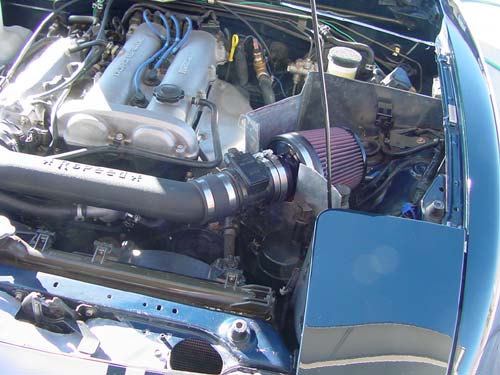
Test fitting 1 - nearly perfect!
I spent a little extra time on the cardboard mock-up stage to make sure all the measurements were as good as possible. Then I got out the aluminum sheet and did some cutting and bending. I guess I did well with the cardboard, because it fit as you see here on the first try. Yeah, I'm still proud.
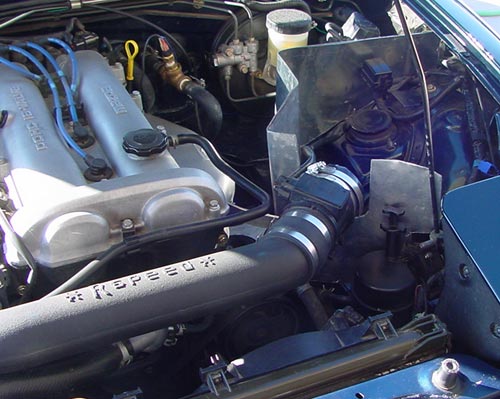
Test fitting 1 - the hood even latches
Yes, the hood even latches. It doesn't close all the way, but it does just barely latch in the "up" position. A little duct tape testing showed me the areas that needed to be trimmed (at the bend by the filter, and the shielding by the power steering reservoir). I was shocked at how much I had to cut from the small piece of shielding between the filter and the power steering fluid. That bit was nearly two inches too tall due to a large bump in the hood.
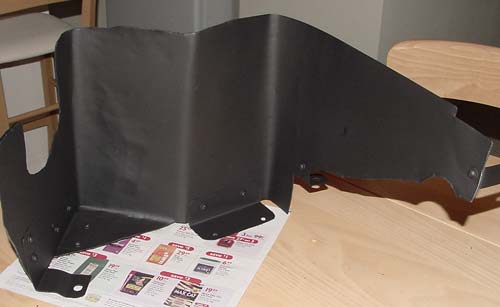
Airbox 1.0 - painted and trimmed
This is a shot without the insulation in place. It shows where dips occur on the hood and exactly what needs to be cut from where for anyone using these pix as a guide.
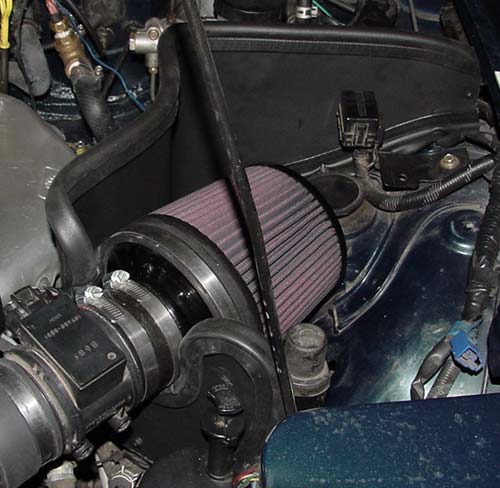
Version 1.0 of the coolbox (late 2002)
Here it is, sitting in place. The insulation makes it a good fit. There are a few places for improvement, but it's a good first effort. The box bolts in place using the stock airbox bolts (one by the power steering, two on the "straight back" section, one at the bend toward the left front wheel, and one bolt on a custom bracket I made at the termination of the box by the fender). In the top photos, you can see that I had to relocate the cruise control. This is very easy, but I did need a new, longer piece of vacuum line from Autozone.
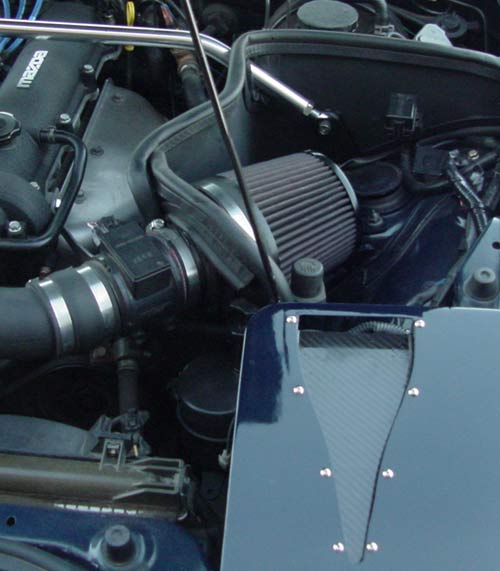
Version 2.0 of the coolbox (early 2003)
Here's version 2.0 of the coolbox with a slot for the old Ractive shock tower brace (insulated of course) and the insulated bridge over the tube behind the filter. The problem with version 1.0 was that a lot of hot air was getting inside the box when parked/idling. It was getting in through the gap above the tube, downstream of the filter. So I made a little bridge and insulated it. The result is the cool box staying cold for about 3 minutes longer than before as measured by my little probe. Also, you may have noticed the duct...
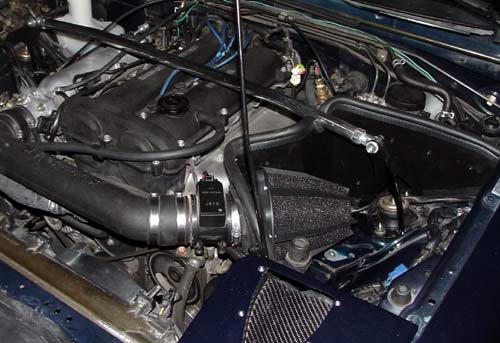
Version 3.0 of the coolbox (late 2003)
Version 3.0 of the coolbox called for a one-piece box with a real hole cut in the "front" shielding near the power steering (IE: no little bridge over the filter neck anymore). Now the box actually seals tightly against the hood in this section. Feature 2: the new airbox fits my Flyin Miata shock tower brace, which replaced my old ebay brace. Features 3: I changed my filter from a cotton/metal one to a real Monsterflow, which moved the wall between the AFM and the filter slightly. Feature 4: the box also forms a nearly perfect seal in the back wall (the one that points at the fender). There were low spots in the previous box.
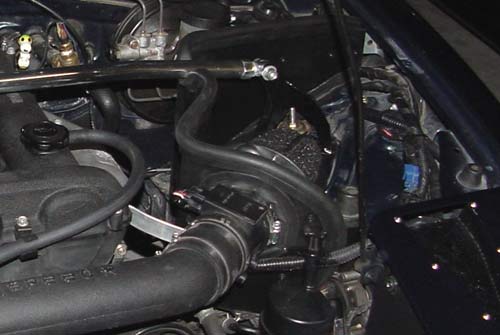
"Front" of airbox 3.0
Here you can see the flatness of the "front" section, directly behind the air filter. You can also nearly make out the little dip the hood makes right where the airbox bends. A nice seal with the hood is present. Also, note that there is no insulation between the hood and the FM STB. That brace has barely 1mm of clearance between it and the hood! It's an amazingly tight fit. Too tight to fit insulation between the two.

FINAL - Carbon fiber tube, Airbox 3.0 (early 2004)
I just can't leave well enough alone. I have again updated my intake setup, this time with a very seXy carbon fiber tube. Folks at autocrosses have been seen licking the duct/tube combo when they think I'm not looking. Women tear their clothes off. Cops ask for my autograph. Truly, the intake couldn't be any sexier.
Site Navigation
Latest Blog Posts
Where’s all the blog posts?!?!
Posted on Fri, 27 Jun 2025 19:59:51 +0000
 Why are you seeing 2013 blog posts in the "new posts" list? It's been a hard month for the revlimiter site.
Read more...
Mabel
Posted on Sat, 29 Jun 2024 03:42:43 +0000
 Who’s the dog that keeps showing up on the revlimiter Instagram? It’s Mabel, my ACD/Pomeranian service dog.
Read more...
CarbonMiata Vent Window Install/Review
Posted on Sun, 29 Jan 2023 14:57:01 +0000
 After waiting 23 years, there’s finally a pretty vent window kit on the market for the NA/NB Miata. Unfortunately, it doesn’t actually work well.
Read more...
NA Miata Ignition Switch Replacement / Refurbish
Posted on Fri, 12 Mar 2021 19:25:57 +0000
 Is your NA Miata not starting anymore? A bad ignition switch may be the problem.
Read more...
XIDA ND Suspension Install
Posted on Mon, 20 May 2019 20:01:01 +0000
 Mona dumps the soft GT suspension in favor of a set of XIDAs from Supermiata.
Read more...
