

revlimiter.net Center Indicators - installed!
Stuff Needed:
- The Center Indicator panel - Get yours at the revlimiter.net Store.
- Powder-free gloves - They come with the panel.
- A small flat-blade screwdriver - To pop open the wire connector and to remove the OEM dummy light overlay
- A very small hex key (1/16" or so) - To pop wires out of that OEM connector.
- Tools to remove your gauge cluster - It can be done with just a Phillips screwdriver.
Frequently Asked Questions
- So... I can touch the surface, right? These aren't as delicate as the gauges?
That is correct. The Center Indicator panel is pretty damn strong. It can hold up to finger prints. But the gauges that surround it cannot. This is the reason I include gloves with the part. You don't want to touch your gauges regardless of what brand they are. - Any tricks to the install?
Not really. You will have to remove your gauges from the car. That might not be immediately obvious. And that's really quite simple. You just need to be careful. And follow the first part of the gauge install how-to. - Where can I get the panel in these pix???
I sell it here on this site! Check out the revlimiter.net Store.
Gauge Cluster Removal
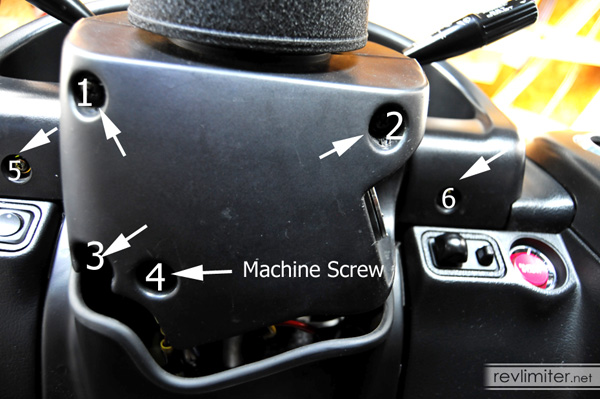
I've written up a huge installation document for the gauges. You only need to refer to the cluster removal part. It's quite simple. I probably have more practice than most folks, but I can get a cluster out of Sharka in less than 5 minutes.
Center Indicator Swap

Once you have the cluster out of the dash, you're ready to swap the panel. Note: you do not need a pristine, clean work area to do this. You can do it sitting in the driver's seat of your car. YOU SHOULD BE CAREFUL TO NOT DIRTY UP YOUR GAUGES, but you don't need to even remove them from the car if you don't want to.
Put on your gloves!
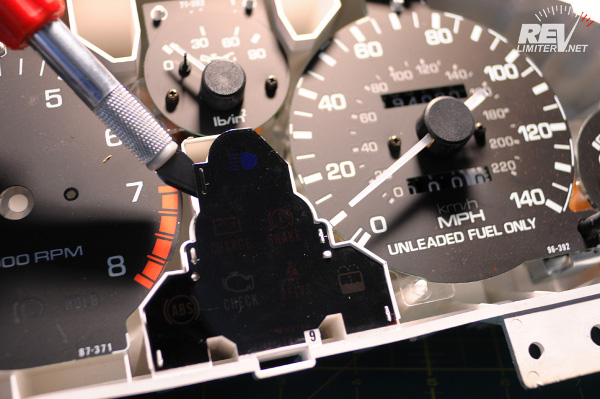
The stock panel pressure fits over the little light partitions. You just need something to slide under the edge to pop it free. I'm using an X-acto knife since I've got tons of them. A small, flat-blade screwdriver would work fine too.
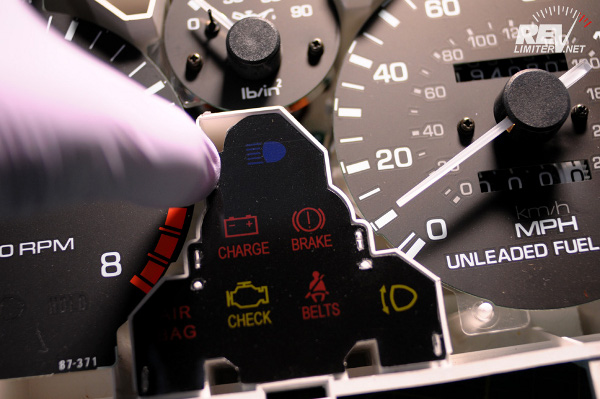
Just pop the replacement panel on in place of the stock one. Wear the gloves and press with your thumb over the plastic tabs. You'll feel the new panel pop into place.
Connector Wiring
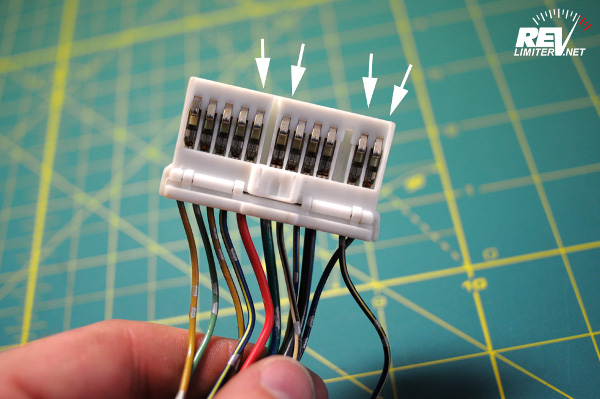
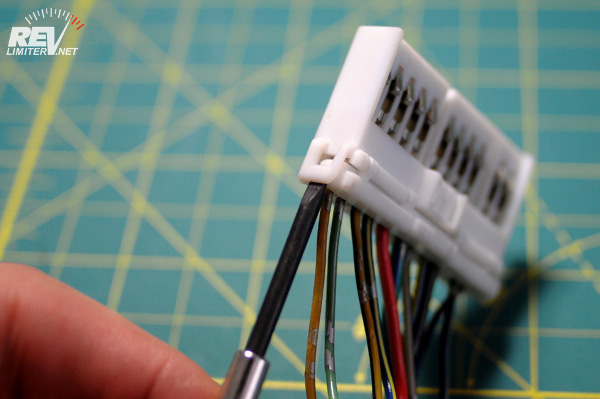
You will be modifying the left-hand side plug. This is the one that attaches right above (and behind) the tach. The four wires you're interested in are highlighted with arrows.
The connector pops open very easily. There's a small tab and slot on each side. A precision screwdriver can be jammed into the slot to press the tab down and open up the back of the connector. You have to do this for both sides. This can be ever so slightly tricky. When you move the screwdriver from one side to the other, the tab you just opened likes to pop closed again.
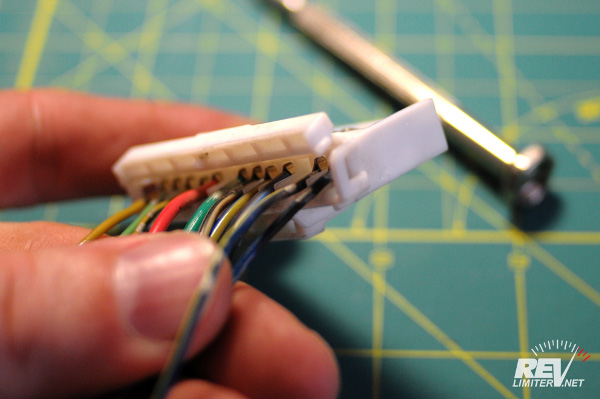
With the connector open, you are now able to slide the wires in and out of their slots.
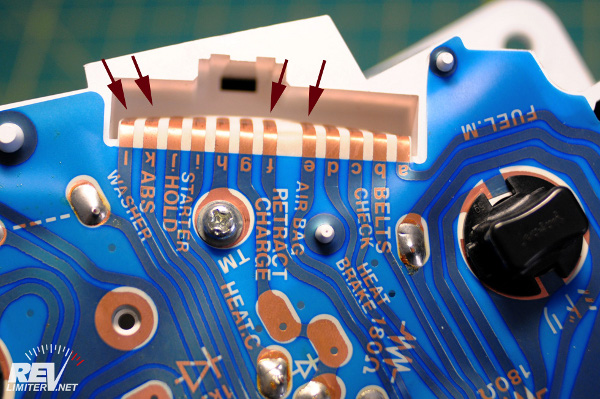
The back of your gauge cluster is helpful in identifying the wires to be changed. E and K get swapped. F and L get swapped.
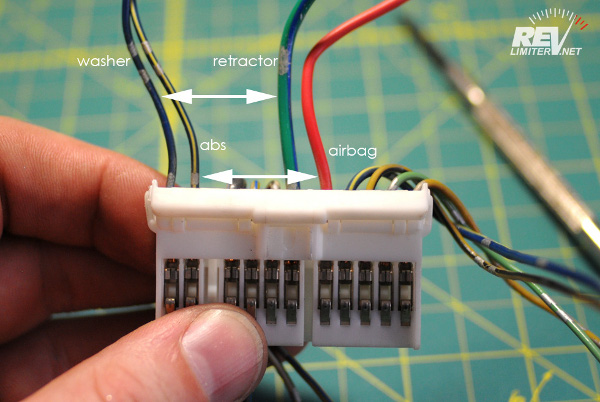
Just to make sure everything is perfectly clear: the red wire (airbag) gets swapped with the black/yellow (ABS) wire. The green/blue (retract) gets swapped with the blue/white (washer).
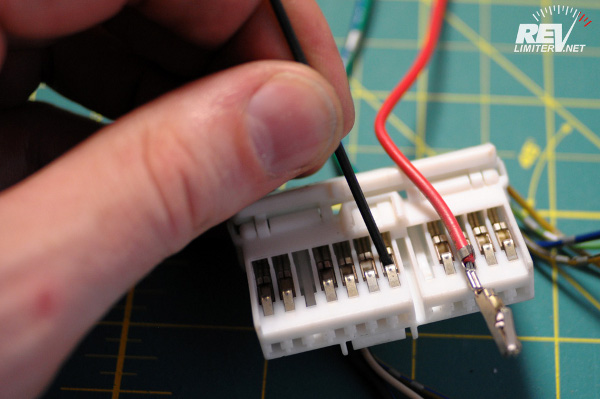
A very tiny tab holds each wire in place inside the connector. This tab can be pressed down so that the wire slides out. I used a very small hex key (1/16" I think) to do this.
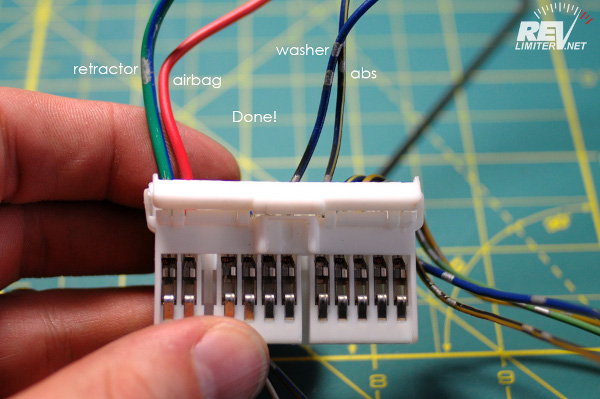
When you're done, the wiring will look like this.
This might look a little bit tricky, but it's really very very simple. I did this for the first time when I was taking these photos. Swapping the wires took all of 10 minutes' work. Nothing was difficult about it.
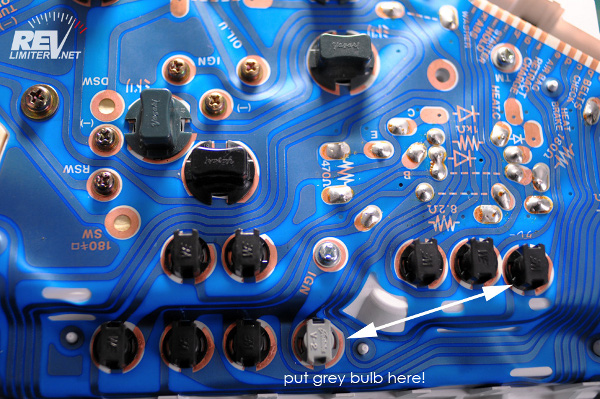
Swap the airbag bulb from the old location (far right) to the new location (pictured). It seems to be electrically different from the black bulb originally in this location. According to my multimeter, the black bulb has a resistance of 12.6 ohms. The grey one has zero resistance. So, in an effort to keep your airbag computer happy, I'd suggest swapping these bulbs.
Gauge Cluster Wiring
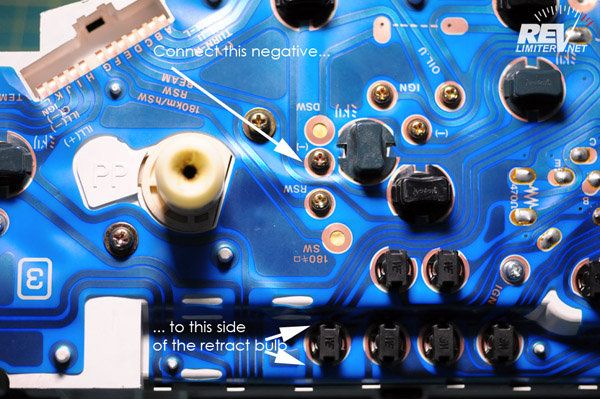
To move your pop-up / retractor bulb to the new location, you have to do one final wiring change. The RETRACT circuit has switched power (+12v). The spot we're moving that circuit (the unused washer bulb) is designed for a switched ground (-) like almost everything else on the car. So, we have to get a constant ground from elsewhere to make the pop-up bulb light up correctly.
The two items of interest are the screw with the little (-) next to it and the left hand side of our new RETRACT bulb. You don't have to worry about anything else.
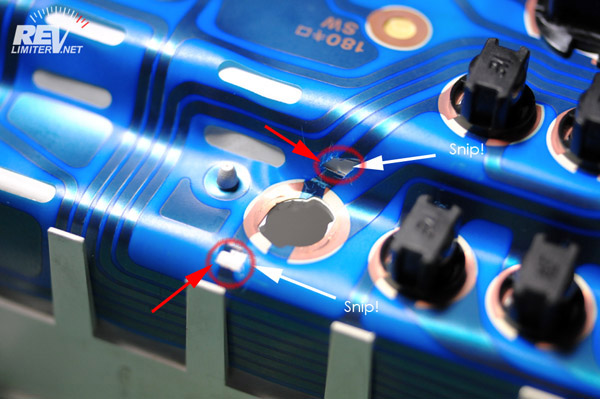
You have to cut the traces on the left hand side of the new pop-up bulb location. I did this with an X-acto knife. My cuts look very crude in the photo, but really they look quite precise in real life. The macro lens accentuates the flaws. Regardless, all you need is to keep electrons from flowing through the original paths. These are both above and below the bulb on that left hand side.
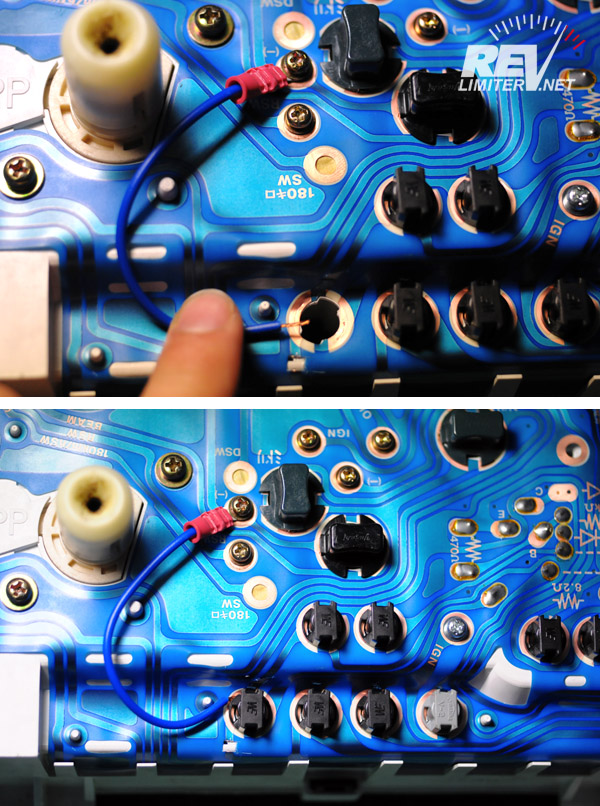
Connect a jumper wire from the - screw to the left hand side of the bulb. I used a 4" length of 22 gauge wire and a very small ring terminal. These are included with your revlimiter.net Center Indicator panel. Just slide the exposed end of the wire under the bulb and twist it in place. It will stay there firmly forever. The twist-on bulb really applies a lot of force on the flexy circuit board.
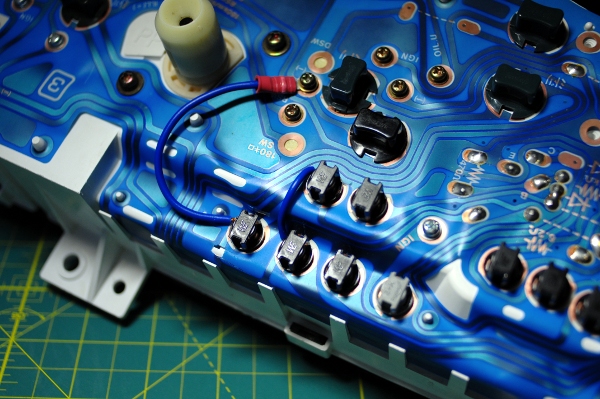
Notice the second jumper wire in this photo? Some cars will require this to keep the middle row of lights (Charge and handbrake) lighting up. This is just a small jumper wire connected to the left side of the belt and brake lights. It recreates the connection that we snipped above to give the popup bulb ground.
Notice I said "some cars." Sharka did not require this. However, I went ahead and installed this small wire and had no problems. In other words, nothing changed with or without it. To err on the side of caution, I'd suggest installing this wire. It's all of 30 seconds work anyway and it comes with the Center Indicator panel.
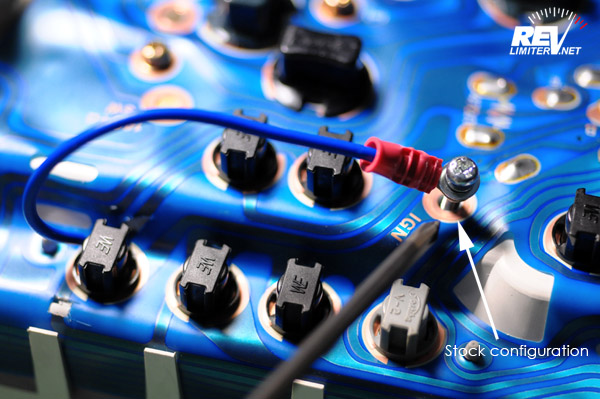
And if you ever wanted to go back to the stock configuration for whatever reason, you just run this jumper wire to one of the IGN screws. On my cluster, there's one of these right above the CEL bulb.
And that's it! Nothing else to do but put everything back in your car and see how it works.
Installed Photos

With bright studio lights facing my spare cluster, you can just barely make out the yellow indicators. Once they're installed in the car with the gauge hood above them, you're unlikely to notice anything is different from stock. Until you see the indicators in action.
Fully lit, the illumination is nearly identical to stock.
Site Navigation


Latest Blog Posts
FeLiNa
Posted on Fri, 04 Oct 2013 15:19:17 +0000
I had one more stop to make on my Breaking Bad photo tour.
Read more...
Product Review – Aero Detailing Products
Posted on Mon, 09 Sep 2013 23:49:16 +0000
Time for another revlimiter.net product review. This one is a bit unique. It's not some rare Japanese car part that I acquired after months of searching or a part in my store that I've spent months or years developing. This time, I'm reviewing some cleaning products that a company sent to me by International Aero for the purpose of reviewing.
Read more...
The Updated Door Panel Project
Posted on Mon, 26 Aug 2013 17:28:16 +0000
My old quilted vinyl door panels were starting to look rather cheap to me. Meanwhile, I had about 1/3 of a hide of leather sitting in my parts shed. A plan formed...
Read more...
Heisenberg’s Roadster
Posted on Sun, 11 Aug 2013 12:00:38 +0000
What if Walter White had a blue and white turbo Roadster?
Read more...
Robot Cut
Posted on Wed, 07 Aug 2013 03:19:18 +0000
I've been asked a few times "What does robot cut mean?" in reference to my gauges. And, for the first time, I'm lifting the curtain and showing how it's done.
Read more...

Products sold on this site are for Off-road and Competition use only. This website intended solely to provide general guidance on matters of interest for the personal use of the Reader of this Page, who accepts full responsibility for its use. All products as well as information provided "as is," with no guarantee of completeness, accuracy, or timeliness, and without warranty of any kind, express or implied, including, but not limited to, the warranties of performance, merchantability, and fitness for a particular purpose.