

This humble dash is about to get the star treatment.
This is a project that’s been in the back of my mind for a little while now. Ever since my CR.net buddy Cooper installed a 1600 dash (90-93) in his Roadster, I’ve been dreaming about this. The early dash just looks so… perfect. A great mix of 70s and 80s style. The NA8 dash (94-97) is absolutely decent and not-hideous, but that big passenger airbag takes a lot of style away. And all it seems to do is break windshields in the event of a collision or risk the lives of riders under 5 ft / 100 lbs.
And I got this fine dash for the outstanding price of zero dollars.

It needs some love.
This dash belonged to my buddy Soren who owns a Spec Miata shop. It was sitting in a crashed out car (a 91 according to the VIN) with a broken windshield, exposed to the elements. It had a very thick layer of dirt and dust over top and was amazingly not-cracked underneath. A half hour under the 105* desert sun and I had it harvested and in the back of my Mazda3 hatchback. Hot sun motivates you to work quickly.
Did I mention free? Thank you for the deal, Soren!

Crusty old duct work...

Clean and pliable ductwork!
I started my restoration from the back side and worked my way in. The first item to address was the defroster and eyeball vent duct work (duct works? ducts work?) tubes. I very carefully unscrewed them and massaged them free of the dash. They looked rough, but didn’t crack under my hands. A little soapy water followed by brake fluid followed by Meguiars Natural Shine had them back to factory fresh condition. They are extremely pliable and clean inside and out. I’m quite pleased.
Onto the frame…

The metal dash frame doesn't look too bad...

... until I got it out of the car.

Ugh. And it's a New Mexico car.
Looks like my work is cut out for me. There’s far more rust on this dash frame than I’ve ever seen on any part of a New Mexico car. It is in need of some serious love and care. It needed more than I could provide on the spot that first night of disassembly.
I’ll come back to the frame in a moment.

Cleaned and protected dash back.
The backside of the dashboard was also filthy. It got the same drill as the HVAC tubes – soap, brake fluid, Meguiars. And it polished up nicely! Only two small spots of breakage.

The Plastic Welder Experience.

The repaired screw holes.
Both of these little tabs were pre-broken. The screws were holding the broken plastic in place, but the dash was just resting on top. I had to grab them with pliers in order to undo the screws. Probably the dash sat like this for years. I bet it rattled.
Plastic welder is great stuff, especially for hidden repairs like the back of the dash. You can repair the break and then gob up the epoxy around the broken part to create a repair stronger than the original part. It may not look so pretty, but no one will ever see it.
Later, this repair would be my downfall.

POR15 enters the arena.
This is something I’ve read about, but have never had the chance to try – POR15. It’s a rust preventative / protection paint that just goes on right over top of rust. The guys on the Lotus forums love this stuff. Living in New Mexico, I rarely see even an OLD rusty car, let alone a newer one. (I still quantify my 15 year old Miata as “new”.) So, when the chance came to repair some rust, I was actually quite happy about it.
POR15 is a three step process. There’s a cleaner/degreaser, then a metal prep, then the actual paint itself. It really isn’t much more work than just painting a piece of metal, but you can’t just slop it on immediately. A quick google revealed this fact to be a bit of a bother for some car enthusiasts. I guess most just want to slop it on. Me? I like a long project.
This is just the starter kit that POR15 sells on their website. It’s more than enough to paint a rusty Miata dash and quite well priced.

Spray the Marine Clean on...

... then hose off.
Marine Clean is just a degreaser that you spray on and hose off. No rubbing or scrubbing necessary. It just frees surface rust and gets rid of any grease from hands, engines, etc. Notice how the frame is getting less rusty and my cardboard is getting more rusty.
YOU SHOULD WEAR GLOVES THROUGHOUT THE PROCESS.
None of these chemicals are extremely friendly to skin. My hands started to burn a few minutes into the degreasing. I immediately went inside to wash and apply rubber gloves.

Soaking the frame with Prep and Ready.

Ready for POR15 painting.
Step 2 is called “Prep and Ready” which they apparently used to call “Metal Prep”. It’s another water-based solution that you spray on like the Marine Clean. This one needs to stay wet on the prep surface for 20 minutes. That means constantly walking around your part and spraying the dry areas. Again, NO SCRUBBING! No scrubbing was ever done to my dash frame. Hell, if the frame looked this good at the beginning, I probably wouldn’t have done the POR15 treatment.
After 20 minutes, hose off the Prep and Ready and let your part dry. You’ll begin to see the whitish coating of zinc oxide forming over the top. Apparently POR15 really likes to adhere to zinc oxide.

You need a filter mask for the last step.
Seriously. Don’t trust your lungs to a little dust mask. Use a particle filtration mask like mine. It is worth having on hand for future projects. I’ve had this one for years and have changed filters a number of times. You can pick these up at any home improvement store.

Painting on the POR15.
You’ll forgive the lack of photos. I took quite a few. All of them were extremely boring. You just brush on the POR15, covering every nook and cranny. A minimum of 2 coats is needed. I was able to apply 3 coats to the entire frame with that tiny bottle of paint. I did the top side one evening and then flipped the frame over and did any parts I missed on the bottom the next evening. It hardens to a thick shell. It feels like the candy coating on an M&M.

The finished, protected dash frame.
Isn’t it a thing of beauty? Almost a shame to hide it under the 1600 dashboard.
A word to those using this as a POR15 guide and not as a dash restoration: you will need to top-coat this with some paint if your rusty part is to ever see daylight. POR15 doesn’t seem to like sun and will fade. Since mine is completely hidden, I don’t have to paint it.

Dash frame installed.
Not bad, eh? I’m quite pleased. No more rust problems for this frame. Sharka should be able to proudly wear this dash for a long while.

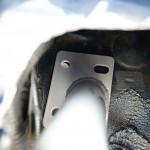
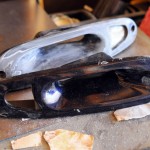
New NA6 gauge hood.

New JDM double-DIN center cluster.
Since I got the dash for free, I decided to not cheap out on these two consumables. Both like to break since they’re taken on and off more often than a whole dash is removed. The gauge hood (which is unique to the 1600 dash, by the way) cracks at the least provocation. It’s best to start off with a new one if you can afford it. I got this for $70 from Mazdaspeed Motorsports.
The tombstone (as the cluster is sometimes known) came from Japan. It’s ever so slightly different than the one we have in our USDM 90-93 dashboards. Those ones require an adapter to make a standard DIN radio fit in the opening. This JDM one does not. Just like the 97 tombstone in Sharka’s NA8 dash, a standard size radio slides right into place.
And so, I’m proud to present a completely restored 1600 Miata dashboard. Only 20 years young.

The restored NA6 dash.
I shot this photo and was just beside myself. I was so pleased with my week of work. I couldn’t wait to drop the new dash into my beloved MX-5.
And then…

Cracked.
Yes. It cracked. The dash cracked right before my eyes. I rubbed my hands over the crack and could feel a high spot where the dash was being pushed up from underneath. The small bit of stress caused a crack. I flipped the dash forward and saw that the source of the stress was that Plastic Welded stud that I repaired earlier. My guess is that the whole dash had sagged a bit over the years due to those plastic tabs not being connected. Now that they were repaired, I created a stress area.
I cracked the dash with my own repair process.
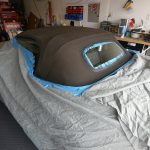
I guess I’ll just have to repair the crack and then cover the whole dash with leather. Darn. And I guess there will have to be a blog post about it!


Well done!
Thank you for steering clear of the garage while the noxious chemicals were being painted!
Wow, great job!
I too have an na6 dash, and tiny crack right where yours cracked. I’d love to see a write up of your repair.
(p.s. I’ve been long time reader of this site, first time commenting I think. I actually started reading your site before I bought my roadster. You helped fuel the desire )
)
wil..
Oh, I’ll definitely do the repair before covering it with leather. If I do a really good job on the leather but no repair, you’ll be able to see the crack THROUGH the leather. I will not have any of that.
And the idea of someone buying a Miata partially due to my site? That makes my whole evening. Thanks!
My NA6 dash has the same exact crack, more then just a coincidence?
Before I forget, What is the reason for using brake fluid as a cleaner?
I have seen it being used for stripping paint from R/C shells, but this is the first time I have seen it being used as a cleaner.
All the best,
Paul
Brake fluid is a great cleaner for plastic. It has a rejuvenatory effect on it as a bonus, but the main reason is the cleaning ability. Any oil, dirt, old tape, unseen repainting attempts, and anything else will be stripped off.
And I’ll be using it again before applying glue for the leather. Darn it….
Oh, that sounds like it might be right up my alley as the plastic of my 318IS airbox is looking rather dry, so I’ll certainly have to give brake fluid a go…and probably bleed my brakes while I’m at it.
Thanks again for the information and for running such a great website
Paul
Ditto on great website. You inspired me to buy Garage Vary tail lights for my 93LE from RSpeed. I did ask John about obtaining an extra set of lens. He said in all the years he has sold them no one ever asked that question.
On the soft top replacement I obtained top and frame from a 2004 with a glass window from Wes at Treasure Coast Miata, it dropped right in. You may be interested that according to Tommy at Rosenthal the set plates (the plates on the right and left side that clamps the bottom of the top against the rain rail and body) have been upgraded a number of time to prevent the top from wearing out when folded. Also the springs on the hoop above the rear glass have been upgraded to insure the hoop positions correctly. According to what I have read the original springs are the thickness of a shirt hanger. I not sure which I have.
I started to read your blog on installing a turbo. I thought I read somewhere that you removed a supercharger. Can you tell me why? The car is a blast but a few more ponies would be nice. Its also not easy keeping up with my bosses Carrera on the way home from work
A supercharger from what I have read is easier to install, a cold side has better response and no exhaust to fuss with.
Finally, on the dash repair, my LE is factory painted on the upper half with a flat paint. Maybe easier than covering with Leather. Just a though.
Regards,
David
Wow, that’s a long one.
GV tails: I’ve also considered some extra lights. I might actually try to hunt them down someday. But not today. Other stuff to collect!
Interesting about those top set plates. The ones on my 2001 are PLASTIC! This was a shock to me. I removed them and was amazed to be holding a piece of plastic in my hands. NA set plates are all metal.
Supercharger: I did indeed have a coldside. It was the original Coldside, made by BRP. It was very niche. Maybe 30 guys in the whole world were running them. It didn’t come with a real belt tensioner, it didn’t come with a real intake. It had a leaky fuel rail and a very poorly sealing “manifold” for that coldside blower. It was very basic. They left the end user to finish off the kit. And I did to my ability, but it was hard for a guy who’d never done engine that kind of work before.
Let me tell you, a year of being punished by that SC kit was enough to turn me into a very good mechanic. The manifold would expand and the seal on the bottom would break. The car would then suddenly stall. It sucked. It also ate belts like sandwiches. I changed belts every MONTH. It was the lowest time in my Miata driving career.
In contrast, the turbo is much easier to live with. No real problems except the broken oil feed, which I brought on myself by using ACE Hardware parts. Sure the routing of intercoolers and pipes is tough, but that’s a one time thing. Belts require a lot more attention.
And I can tell you that the throttle response argument is overrated. A turbo CAN have incredible response. You just have to shift. If you put your foot down at 2000, you’re gonna wait for maximum boost. But that’s the same with an N/A car. With both, you just have to shift into your power band. With an s/c car, you put your foot down and get some boost and torque. But you’d still get more if you’d shifted before doing so.
Just different ways of having fun with the same car. I still think blower whine is damn near the finest noise that can come out of an engine bay. I don’t dislike superchargers at all (mostly just the one I had), but I think turbos are more logical. Doubling an engine’s power output by better using the waste gases? I think that’s awesome.
wow thats a lot of work, i have a 1600 dash from a 1991 BRG sitting in my spare bedroom, this makes me want to start to work on mine. The prior owner had painted the top to cover up the infamous dash peeling they al get over time. Ill probably get the Nakamae cover or something, i would imagine it could hide your crack as well. Great photos as always Rev!
As nice as the Nakamae stuff is, I think the dash cover is a bit underwhelming. You should totally do the M2-style leather wrap treatment! Join me in the insanity.
If you want to do the work I’d probably let you swap dashes with my car.
WOW. That’s quite an offer. But I’ve never done a leather covering on anything like this, and I’ve got the hide in shipping right now. I’ll see how this one goes.
I’ll email begging for a 2nd set of hands to help me get it in the car.
I really dig the early NA dash as well. My first NA was a ’91 and I drove it for several years before wrecking it, and when I got my ’94 the one thing that took me forever to get used to was the redesigned dash. I actually think the ’94 looks more “refined” but the ’91’s style matched the personality of the car to a T. As much as I love my ’94, the ’91 was a better Miata.
The resto looks great, keep up the good work!
Thanks! The early dash has really grown on me. I’ve always liked the NA8 dash just fine, but there’s something about that early one. It just seems a little… more. You know? More.
I’ve taken a small break from it to allow leather time to ship and me time to get excited about it again. That crack took some wind out of my sails.
Wow! Absolutely wow. Here’s hoping the next one stays together for you.
I’ve just completed a dash swap in my car and while very happy I haven’t gone to half the effort you have here, hats off to you sir for making that dash look absolutely spectacular.
I wish I’d thought of half the stuff you have done here (I *know* you can clean plastic good with brake fluid why did I forget this??)
Very sorry to see it cracked after all that effort
ha! Thank you.
As for the “next one” it’ll be the same dash. I’ll just go to insane lengths to make it perfect before installing. Not sure how many weekends that’ll take…
Wow awesome write up! I read through your entire site! My gf is a designer, I’m going to get her to design a gauge for me!
I have one question, you say you can use the 97 tombstone, for a doubledin radio? Is the 94 tombstone the same as a 97 tombstone? I have a 94′ and wanted to see if it’ll fit. I searched and had problems finding on the forums.
Yes, all 94-97 (NA8) tombstones are compatible with each other. All 90-93 (NA6) tombstones are compatible with each other. But they’re not compatible across generations (NA6 in an NA8). You might be able to make it fit, but you’d have to do a lot of hacking and fabrication.
So yeah, go get yourself a 96.5-97 double-DIN model and you’ll be good.
I am in awe of your skills, man.
I picked up a somewhat neglected 91 about a month ago and have been trying to slowly breathe new life in to it. Your work is inspiring…and very informative.
While I’m spending money on deferred maintenance issues and deciding what to do with the interior, I’m setting for just cleaning the inside as best as possible. Is brake fluid safe for parts like the center console as well?
Thanks!
Probably? If the console is still the stock plastic, there’s no reason it shouldn’t be a fine cleaner.
I just rubbed my dash down with brake fluid last night. I’ve FINALLY started the process of repairing that stupid crack. Got it all glued up. Now to vee and fill.
I agree that the original NA6 dash belongs on the car. Interestingly, the Japanese Domestic Market (JDM) NA’s all had the original NA6-style dash 90~97.
Yeah, they never got the passenger airbag. You know… I think they never got a driver’s airbag in Japan either! I can’t recall seeing a single photo of that horrible Pizza-box steering wheel in one of their cars.
I’m loving my early dash.
I have to thank you for the efforts you’ve put in writing this website. It’s amazing.
I just bought a 90 Miata and there is so much work to do..I found your blog and found it very helpful. Thank you for sahring so much useful info. I also like long projects with great detailed results. Great job!.
Good luck with your new Miata! And thanks for the post.
Land time lurker, first time comment-er. I’m pulling the dash in my 96 to repair a nasty crack. I’ll be reinforcing with some coroplast and topping with suede black leather.
Anywho, any preference on brake fluid variety that you used for plastics rejuvenation? Regular old DOT 3 or the Silicon DOT 5? I’m sure my duct-work is just as crunchy after 20 years in the SoCal desert.
HA! good question.
Use standard brake fluid (DOT 3, 4, or 5.1). You don’t wanna use the silicone stuff. And you probably don’t wanna use expensive DOT 5.1 either… but if you had some old stuff laying around, it would be fine to use it.
After brake fluid, give it a good coat of plastic conditioner. I like Meguiar’s with the UV protectant in it.
Hey where exactly did you find the JDM true double din console cover (tombstone) ? I came across a link once upon researching modifications for my ’92 Black and Tan, and have since scoured the forums and the internet and haven’t come upon it again. Please help.
Btw, your blog, store and cars have been an inspiration, definitely going to be purchasing things from you and following the blog as long as it persists.
I got mine from MiataRoadster.
http://miataroadster.com/mazda/mazda-radio-bezels-2din-jdm/mzn04155210a00/i-411820.aspx
Thanks, that’s the exact website I came across, and couldn’t seem to find again. I appreciate it.
Hi, Adam,
Your work is brilliant! Bad luck with the crack. (Of course, that was many years ago-you’re surely over it by now.) LS1 Trans Ams always get a big crack in the door panels, and it was really because the plastic’s fastener holes weren’t in the right spot for the door’s mounts. When the factory fastened down the door panels, they came under tension. Eventually, of course, the panels would break. Your explanation at the end-why the crack appeared…If you did this again, would you do something different with the fastener holes to (maybe) prevent the dash crack? Or perhaps it would rattle if you did anything different?
My NA8 dash has just formed its first crack at the defroster vent and bulge right in the middle, so I’m wondering if I can find some thoughts how to fix and prevent. Great guide as usual, thank you so much!
Maybe I missed it, but the comments on Needing a proper NOISH mask for the POR-15 didn’t spec the exact cartridge necessary. Passive dust filters won’t save your lungs from serious chemical damage, unless you are favored by breezes outdoors, in a consistent direction taking the fumes away from your face. Which isn’t likely. You NEED Organic Vapor cartridges to protect lungs from corrosive and toxic chemicals like POR15. These are activated charcoal internals, which both binds to all organic molecules, and during ‘activation’, comes to have absolutely astounding total surface area to interact with organics. I’ve been wearing these masks over 2 generations working with epoxy and polyester resins w/fiberglass. We often get 6 months out of a set of cartridges. In extremes (If you can smell the product though the mask!), these ‘clean’ in an oven, expect letters from your soon to be ex-wife’s lawyer if you do this in the kitchen.