

Car maintenance as art. Click for a larger version.
I’m an NA Miata owner. For those not hip to the language, that’s the first generation of the cars. We have NA, NB, and NC so far. Anyway, I’m an NA Miata owner. I love pop up headlights. I love the simplicity. I love everything about them. They really appeal to me and I’ll likely always own one. I’ve done nearly everything you can with an NA Miata, maintenance-wise. I don’t need manuals anymore, except for torque specs. I’m one with the NA.
So when it came time to change the timing belt on Sarah’s new-fangled NB Miata, I started to research the differences and how to do it. See, there’s this wacky cam timing thing over the intake cam. A lot of searching on miata.net forums didn’t turn up a single how-to in easy language on changing a timing belt on an NB2. I *did* find a dozen little separate snippets of info and tried to piece them together. So here you go, an NB2-specific timing belt change.

The before shot.
You might notice the engine bay is a little yucky. Poor Bucky doesn’t get quite the obsessive treatment that Sharka does. But we’ll have a cleaner engine bay in just a few paragraphs…
Before you start, you’ll need an NB timing belt kit. Mine came with one smaller cam seals and one larger cam seal. The larger one goes on the intake cam. I also got a front crank seal, a timing belt, an NB2 valve cover gasket, and a timing belt tension spring. I also ordered the alternator and a/c accessory belts and a water pump kit that came with the pump and two gaskets.
Things that did NOT come with my kit that I didn’t need but was worried about: The little copper washers for the oil line on the back of the valve cover (pictured later) and any extra gaskets for the timing control system. Don’t worry about this stuff! You’re fine reusing parts.
I also did a fuel filter change. This way-annoying job did NOT get photographed, but here’s a few tips. Order two spare quick-connect clips. They’re Mazda part number T032-42-694 and don’t come with the replacement fuel filter (BP4W-13-4809U). Apply those to your new fuel filter before starting the job and you’ll not lose much fuel at all. If you have to switch the clips from the old filter to the new, you get a stream of fuel piddling out for how ever long it takes. But back to the timing belt change.

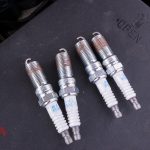
NB coil-over-plug spark packs
The first thing to take off is the cam cover. To do that, you have to remove the coil packs. They’re kinda difficult to mix up, but I labeled them anyway. Also remove the associated wires and small acorn bolts from around the cam cover.

Variable timing control oil supply
This is the only difference between the NA/NB and the NB2 cam cover removal. You have this bolt in the back with a 19mm head to remove and two copper washers on either side. It’s easy to drop one when you remove the bolt. Try not to.

Bolt in hand
There’s no need to remove any of the other timing control stuff from atop the intake cam. Just this one bolt. You *will* lose some oil when this comes off, so be prepared with a couple paper towels.

The 2-wrench timing belt trick
The intake cam has three Torx head screws of the T-25 size. Once you remove those, you have access to the 17mm bolt head holding that cam pulley on there. I fortunately had the correct size torx socket.
From here, you can follow the standard NA timing belt change instructions and have no problems. I’ll add a few tips that make life a little nicer. Above, we have the 2-wrench trick. Before taking off your old timing belt, put a wrench on each cam (there’s a spot on each that’s meant for this) and figure out a way to keep those wrenches together. I like my big C-clamp. Make sure to have your timing marks aligned and your crank at Top Dead Center before doing this, or it’s kind of pointless.

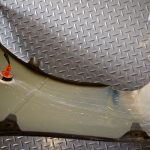
The FM Big Snout
Here’s another tool that makes life nice, the FM Big Snout. It sure beats trying to hammer the crank seal in with a cardboard tube or large bolt. You just pop this bad boy on there and screw down the center crank bolt until it bottoms out. Ta-da! Seal installed. Also, dropping the swaybar really helps.

Water Pumpless
Every time I change a Miata water pump, I always forget exactly how much stuff you have to remove, so I shot a photo this time. You can remove basically everything. Power steering? Yes. Outlet neck? Yes. It’s not so bad, but it is annoying when you think everything’s out and there’s still *one* more part to unbolt.

Timing belt alignment – you can click on all of these pix for larger versions, but this one really benefits from the larger view.
It’s really hard to take a shot of good timing belt alignment. If you’re too high, the marks on the back plate look unaligned. If you’re too low, you can’t see the 19 teeth between the two marks on the top of the cam pulleys (note that the NB intake cam has no upper mark and barely any bottom mark). You shouldn’t have too much slack in the belt between the cams. If you have some, grab that intake cam with your big wrench and rotate it backwards just a bit to eat up the slack and then tighten the idler pulley below the intake cam. Spin the crank around twice and re-check belt alignment and tension.

Shiny.
While the cam cover was off, I took the time to polish it up a bit with a poly brush. It’s not exactly “polished” but it does look very clean and purposeful now. The rest of the engine bay got a good cleaning as well.
Don’t forget to burp your radiators!


Adam,
This is EXACTLY what I was looking for before I do The Tick’s TB next year. Thanks!
Glad to help, Bryan!
YOU took the time to polish the cam cover? You did the easy part with power tools. I donated elbow grease to that thing.
(Also thank you for doing the timing belt! You’re the bestest.)
This is an extremely high-quality guide, I am impressed. And I’m sure her elbow grease didn’t hurt
You mention the VVT bolt on the back of the NB valve cover but you never mention what torque spec is should be set to. ??? Help anyone? For future reference at least I’m sure someone down the road would read this and be enlightened. Thanks.
Hmmm… I honestly don’t know. Banjo bolts don’t require a ton of torque. I used a 3/8″ ratchet and just tightened it till it was “tight”.
I’m not sure a torque wrench COULD fit back there anyway.
Great info – very helpful. Other sites did not reveal the cam gear alignment as well as you. Since its a non interference motor I’m not going to worry so much about moving the cams around, particularly with your description. Wouldn’t mind knowing any tricks about removing the lower crank timing gear as mine is stuck on pretty good & I want to change the crank seal & fix a loose crank pulley. Same timing gear as you pictured (I have a 91 1/2 and the crank pulley sheared off ’cause the guy before me didn’t torque it down right). Cant get a puller on it….
Lower crank timing gear you say? I’m trying to come up with something, but I can’t really imagine anything that would take care of it. I’ve never had one of those get stuck. Woodruff key? Yes. But not the crank timing belt pulley.
Perhaps search the NA forum on Miata.net for an answer? Someone there must have had this same problem. http://forum.miata.net/vb/forumdisplay.php?f=14
Did you use a OEM timing belt? I saw a Gates racing belt is this worth the additional cost or just stick with a OEM one?
Thanks
Yeah, unless I was running exposed cam gears and an engine theme that required one of those special belts, I think I’d always choose Mazda OEM.
That was what I thought found Med Center Mazda on Miata.net selling the mazda parts prices are not bad and free shipping.
I used the information on your site to help with changing the timing belt, idlers and water pump on my 99 Miata excellent information and the site is well done. I also used the Miata factory manual to guide me through. This was a first for me with a dual cam engine.
So I thought I’d share a problem I ran into to maybe save some one time and money. I changed out everything, by following instructions , but car would not start and sounded like it was out of time. I took it apart and rechecked everything with the same results. After a day of contemplation and research, I took the front of the engine a part for a third time looking for what was wrong rechecked everything again. I re-assembled the engine with the same results, researched the internet again for more clues to no avail. Bewildered, I had the car towed to a garage to have them look at it. The mechanic got it running the next day.
One hundred and sixty eight dollars later, I found out the problem was the crankshaft position sensor plate. I had installed it backwards not knowing it had anything to do with the crank position sensor simply because since I could not find it because, the crank sensor was covered with heavy grease from the leaking cam seal, nowhere in the manual does it give the location, and the blow up page from the manual labels the crank position plate as just plate, which could have given me a clue. I had assumed since I had not come across it and had no idea it was in the area it was not an issue.
One more thing, I noticed oil spots on the garage floor, the valve cover gasket was leaking along the rear in front of the coil packs. You could see the oil on the edge of the head where it was not sealing. I removed the valve cover and used some hi-temp silicone along the back between the gasket and the head. I have not seen any leak as of now. It would not hurt to seal it when putting it back together.
So anyway everything is working fine and the car runs better than before. Hope this helps someone.
Ouch. heh.
Yeah, the little plate behind the crank damper is directional. Miatas have worn these little plates since 1996. I got one backwards once years ago. Took me a little head scratching to figure out. Ever since, I’ve placed those parts (crank pulley, sensor plate, crank damper) in a very careful pile.
Thanks for the comment! I’m sure it’ll help someone.
WOW!!! this has been the most helpful link I have come across in the 8 collective hours of internet searching I have spent on this problem trying my dambdest not to pay someone to set my timing after my rebuild (which I did myself minus block boring and crank balancing to properly weighted pistons and rods) first time rebuilding a motor and I was not going to let the timing push me into a mechanics shop THANK YOU!!! the picture on the cam position setting IS ACE!! PROPS MY NEWLY FOUND UNCONFIRMED FRIEND.
Why cant this be the first link that BING claims they will produce minus all the BS you dont want or need?!
once again THANKS 1,000,000!
Comments like THIS are why I do this. Well, one of the reasons. The pure joy in your comment came across so clearly. I’m very glad to have helped!
Thanks again for the writeup and excellent pictures. I’ve got the factory manual for my car (2004 Mazdaspeed Miata) and the Fanatics guide…neither of which go into much detail about tensioning and aligning the belt, so your picture of the two cam pulleys was invaluable.
Thanks again!
Mike
Glad to help!!
Fanatics guide? I’ve not heard of that one. Gonna hit amazon right now and check it out.
when does a timing belt need to be changed? I have a 2000 with 117,000 miles. what do mechanics charge?
Timing belts are 60,000 mile items. Except in California where they’re 100,000 mile items. So, you’re coming up on a change.
No idea what you might be charged. I’ve not visited a mechanic for this sort of work in 15 years.
When you said you used an NB timing belt kit, where did you purchase this kit? I was looking at the FM kit but I doubt they use OEM equipment.
On my previous cars I went 60k on the belts and 120k on the pumps. Is this fine for the miata’s as well? I don’t mind a bit of labor but I am cheap.
FYI this for for a 2002 non turbo. Thanks for all your help!
Miata torque specs: http://www.miata.net/garage/torque.html
Hi,
I was wondering if you could help me. I wanted to know what size the 3 Torx screws are that are used to secure the cover plate on the VVT cam.
Thanks,
D
Can someone tell me how the round plate plate that goes in front of the boss pulley on the crankshaft has little dimple that triggers a signal. its not flat and is either closer to the engine or farther because it has an offset.
finished time belt replacement. used ebay kit, the left cam seal came from mazda because the ebay kit is not for VVT. everything else fit just fine.
replaced thermostat and hoses.
the crankshaft bolt required an impact wrench to take off
Most of what you assert is supprisingly precise and it makes me wonder the reason why I had not looked at this with this light before. This article truly did switch the light on for me as far as this specific topic goes. However there is actually 1 factor I am not necessarily too comfortable with and while I attempt to reconcile that with the central theme of your point, permit me see just what the rest of your subscribers have to point out.Nicely done.
[…] плановый ремонт часть 2 * также перед разборкой двигателя промыл систему смазки, для этого потребовался ранее купленый Engine Flush от Bardahl. залил его в нагретый двигатель, прокрутил минут 25 на холостых >> затем слил всю жижу, была очень черная, несмотря на то, что в движке было довольно свежее масло, посколько приходилось каждый 1,5к /км доливать почти литр свежего масла. * затем начал разбирать движок, снимал с него все по ступенькам, что мешалось друг-другу, все снятые детали сортировал, чтобы было легче собрать обратно, весь процесс проходил довольно шустро, * когда разобрал все, что требовалось, начались работы по очистке старых деталей, посадочных мест под прокладки и прочего, что и заняло больше всего времени. * после очистки всего, началось самое интересное, установка новых деталей, На все про все, неспеша ушло 2 дня, причина этого ремонта, была прокладка головки цилиндров. и за одно заменил >>> болты головки прокладки коллекторов термостат ремень ГРМ ролики пружину натяжки ролика помпу ремни агрегатов свечи маслосъемные колпачки сальники валов прокладку крышки клапанов все остальные маленькие прокладки все фильтра масло + Bardahl Full Metall жидкость охлаждения очень порадовало то, что на стенках цилиндров не было задир, в масле не оказалось стружки и металлической пыли, проделанной работой доволен, заменил все, что планировал, устранил неполадки, после ремонта движок работает ровно, по дороге домой на протяжении 2000 км все было четко. сорри за качество фото и то что их так мало, небыло времени особо фоткать, хотелось скорей все сделать чтобы на душе спокойно было и можно было бы отдыхать. Крутящие моменты затяжки: Крышка клапана (комплект) 5 — 9 Nm Натяжной ролик зубчатого ремня 38 — 51 Nm Направляющий ролик зубчатого ремня привода распредвала 38 — 51 Nm Кожух зубчатого ремня 8 — 11 Nm Болты крепления головки блока цилиндров Ступень 01 26 — 31 Nm / Ступень 02 56 — 61 Nm / Ступень 03 76 — 81 Nm Впускной коллектор 20 — 25 Nm Выпускной коллектор 40 — 45 Nm Свечи зажигания 15 — 23 Nm Ременный шкив — насоса охлажд. средств 8 — 11 Nm Ременный шкив коленчатого вала 12 — 17 Nm Центральный винт коленчатого вала 157 — 166 Nm Винт(ы) спуска масла 30 — 40Nm Thermostat cover — 2 bolts 19-25Nm Water inlet pipe — 2 bolts to water pump 19-25Nm Water pump — 4 bolts to block 19-25Nm если вдруг у кого либо будут вопросы, смело пишите что смогу то расскажу! Тут будет пару мануалов >>> Timing Belt Change MX-5 Unleashed – Changing of the timing belt ( cambelt ), water pump, and shaft seals in Eunos or miata How To: Change The Cambelt – Guides: General servicing – MX5Nutz Forum NB Miata timing belt change — revlimiter.net […]
THANK YOU!!! This filled in the gaps that were missing in the original write-up, and the pics are surprisingly useful and high-quality. Stuff like this is what makes Miatas so great… the support community!
Could you shed a little more light on how you “polished” the cover? I’d like to do this as well. Thank you again for taking the time to do this
A drill and a wire wheel I believe. Then take steel wool to the areas you can’t get into. It’s not really polished, but it still looks about the same as it did at the time of this post.
I remember reading this post at one time and thinking – ‘great info if were ever in that spot, but…’ Here we are. Last NA timing belt change I did after work and after dinner – still done way before bedtime. My first ’99 NB1 TB Change coming up <- Feel sure I just jinxed this
“Nice Post with information regarding great use! The ways you have illustrated the information is impressive. Thanks!
“Really appreciate you sharing this article. Much thanks again. Great.
Always so interesting to visit your site. What a great info, thank you for sharing.
What a great info, thank you for sharing. this will help me so much in my learning. When your website or blog goes live for the first time, it is exciting. That is until you realize no one but you and your.
I’m constantly searching on the internet for posts that will help me. Too much is clearly to learn about this. I believe you created good quality items in Functions also. Keep working, congrats!
Good answer back in return of this matter with genuine arguments and explaining the whole
thing about that.
The weather is so nice today. Have a nice day today too.
There is so much good information on this blog!
Thank you for the great writing!
Thank you for the good writing!
If you have time, come and see my website!
Really nice article and helpful me
Thank you and best of luck.
I really appreciate the kind of topics you post here.
I looked on the net for more information
I have learned lot of things from it regarding blogging. thanks.
I request you warmly, please, don’t ever stop writing
hello. The homepage is very nice and looks good.
I searched and found it. Please visit often in the future.
Have a nice day today!
Hello^^ I searched and found you. Have a nice day today and please visit my blog. This is a place with various game information.
i was just browsing along and came upon your blog. just wanted to say good blog and this article really helped me
Thank you for providing good information.