
Yeah. You want this for your commute.
There’s a particular time of year when the sun is juuuuust right on both directions of my commute. It’s shining right in through the corner of the side window a hand width or so from the A pillar. The standard NA/NB visors (which are semi-worthless and many folks remove) do great at blocking the sun at this angle. Further to the side and it’s not much of a bother since it’s not right in my eye. But right by the A pillar, it really sucks.
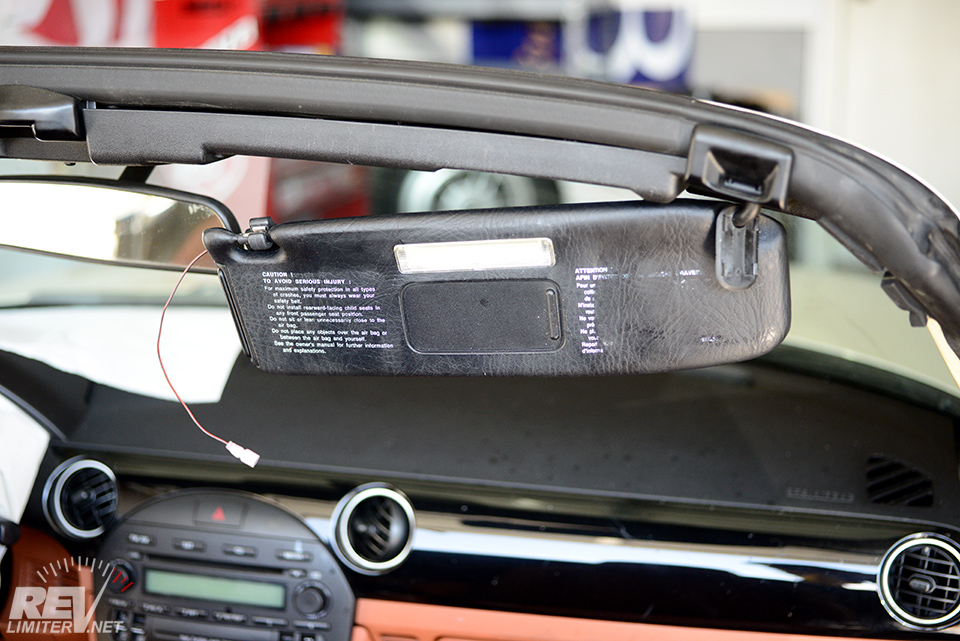
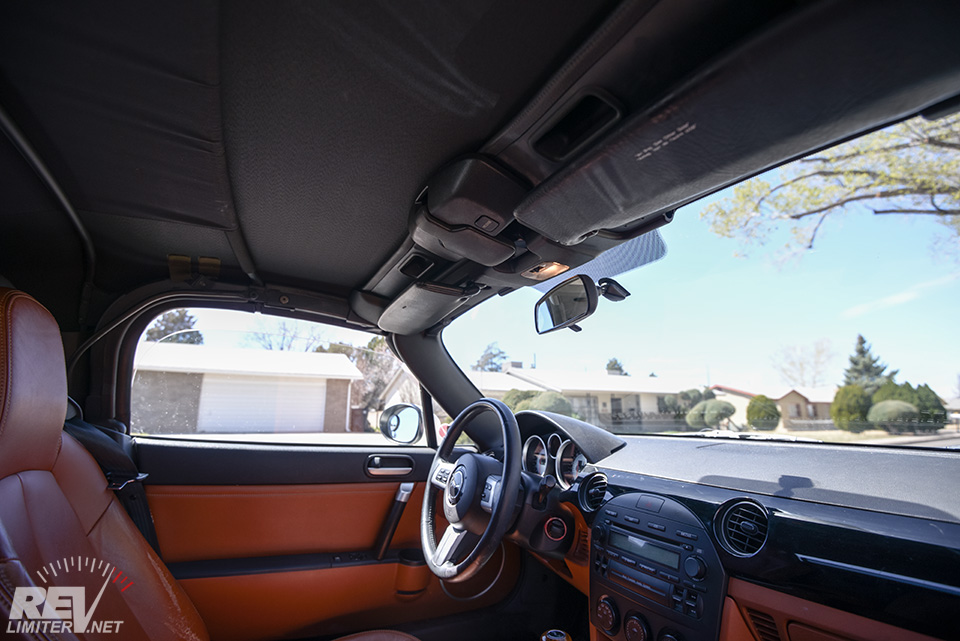
The factory NC visors do NOTHING to help here. It’s clearly a driving condition the car wasn’t meant to experience. Best to take some other vehicle on those days, right? The NC is only a fair weather and sun-straight-ahead car, right?
UGH. Sorry for going towards ranting. The NC visors are just worthless.
For those unaware, the NC visors are not able to pivot. They are, in fact, hollow plastic. They don’t even have a method to fold all the way forward against the windshield. Once a visor is all the way in the down position, it stops. You can’t fold it farther. Basically a binary visor – it’s on or off.
So awful.
Audi to the rescue.
A very smart individual on the NC area of the Miata.net forum figured out that you can install Audi visors in an NC. He had a huge write up and a few very useful photos… that all disappeared when photobucket took a dump and started demanding money to host pix. I would link to his thread, but I’ve lost it in the months since I did this mod. Sorry. If you are the genius responsible for this idea, please post in the comments below.
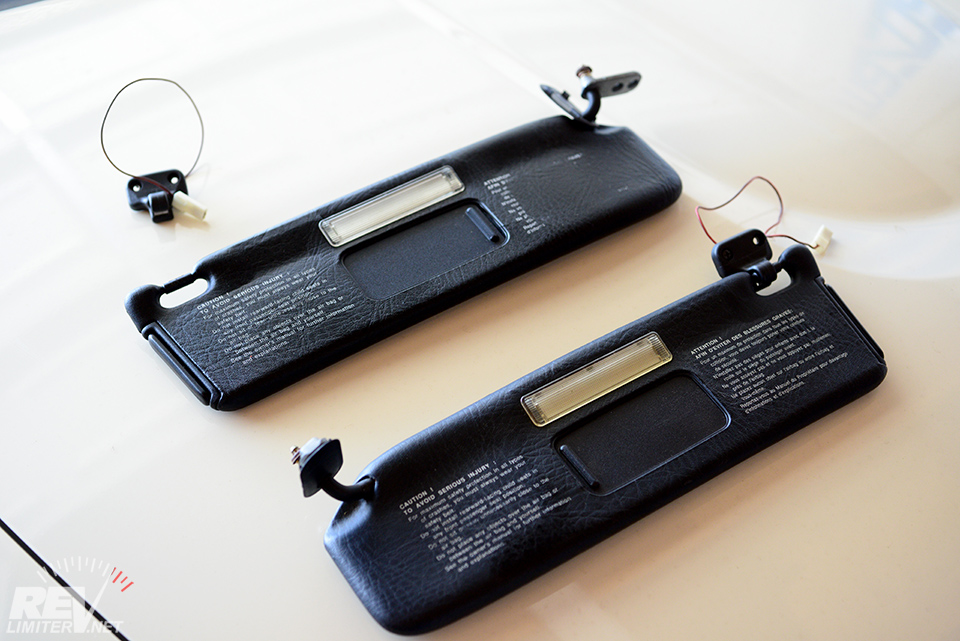
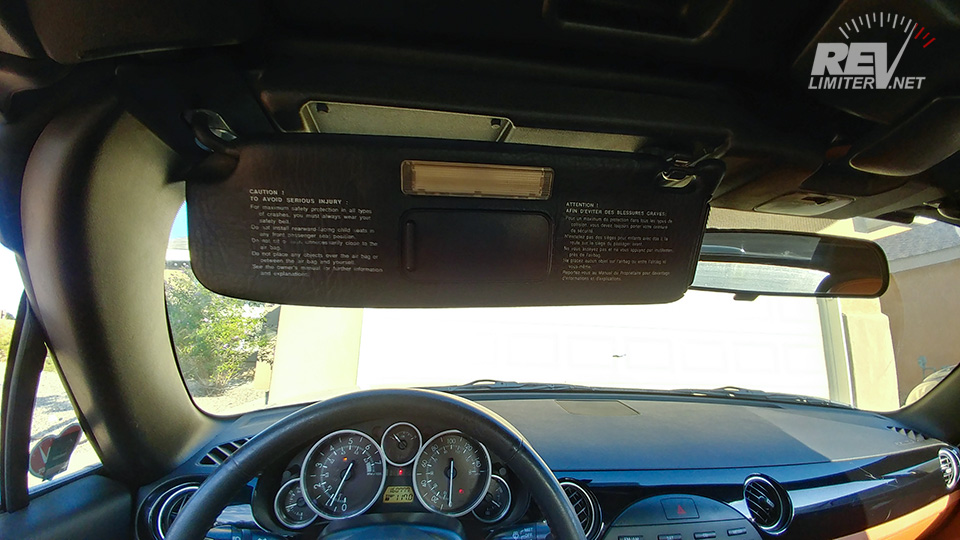
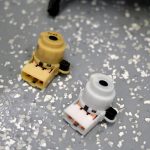
Above are the visors for a 95-97 (possibly 94-98 depending on various ebay sellers) Audi Cabriolet Convertible. You need all that you see in the photo above – both visors AND the receiver pieces.
And – hold onto your seat – you’re looking at about $200 minimum to finish this project. Yes, two hundred US dollars. The visors are old and not plentiful, Audi parts are expensive, and I had no personal luck in junk yards. Each visor sells for $50-80 and the receivers are $20-50 each. If you’re lucky, you can get them together. And please note that the visors are sided. You need a left and a right. The receivers work for either side.
This mod is also not very reversible. I mean… anything can be reversed with some welding skills and replacement parts, but once you decide to go forward with this, you have to go all the way.
But it’s worth it. The visors from the factory are a joke. An afternoon and some old Audi parts fix things up.
Lighted mirror!

Power!
Here’s some more detailed pix of the visors to help you choose the right ones on ebay. There’s a bunch of variations out there. Only one has the exact type of pivot mount that can be massaged into working with the NC, and it’s the most expensive.
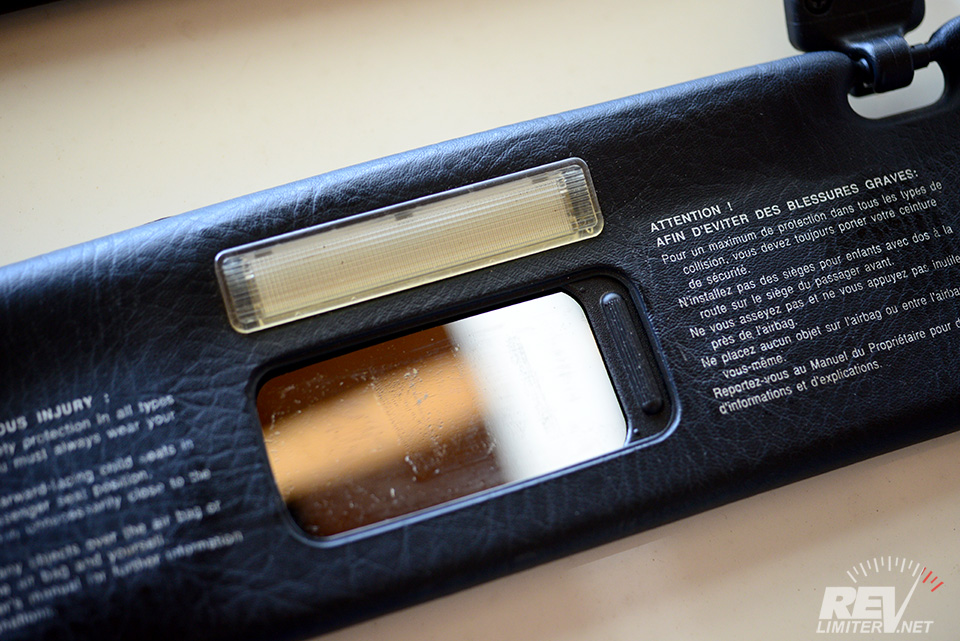
The good ones come with a lighted mirror that’s activated by sliding the little cover open and shut. The receiver has a wire integrated into it that gives power to the light. It grounds through the other end of the visor (the pivot mount) and only functions at a certain angle.
The visors also have a telescoping section to fully blank out the side view. They’re vinyl coated. I half expected them to be leather to be honest. They have every other possible bell and whistle.
I’m really impressed by the engineering behind these visors. They’re crazy expensive, but at least you get something for the money.
Visor mount.
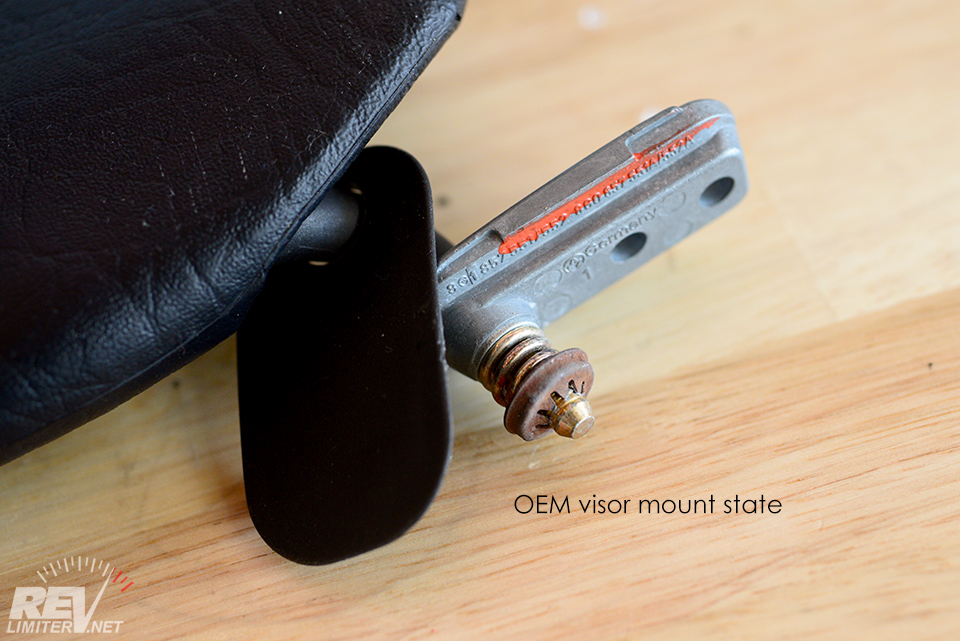
Visor mount.
These photos helped me massively while doing the project. I’d refer to them on the back of the camera quite a bit before becoming intimately familiar with the parts.
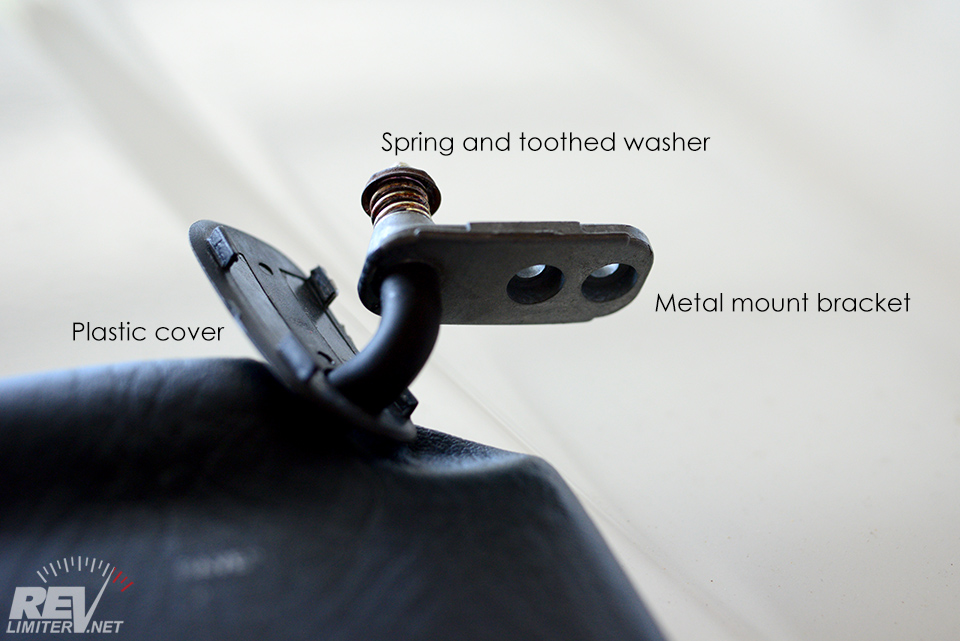
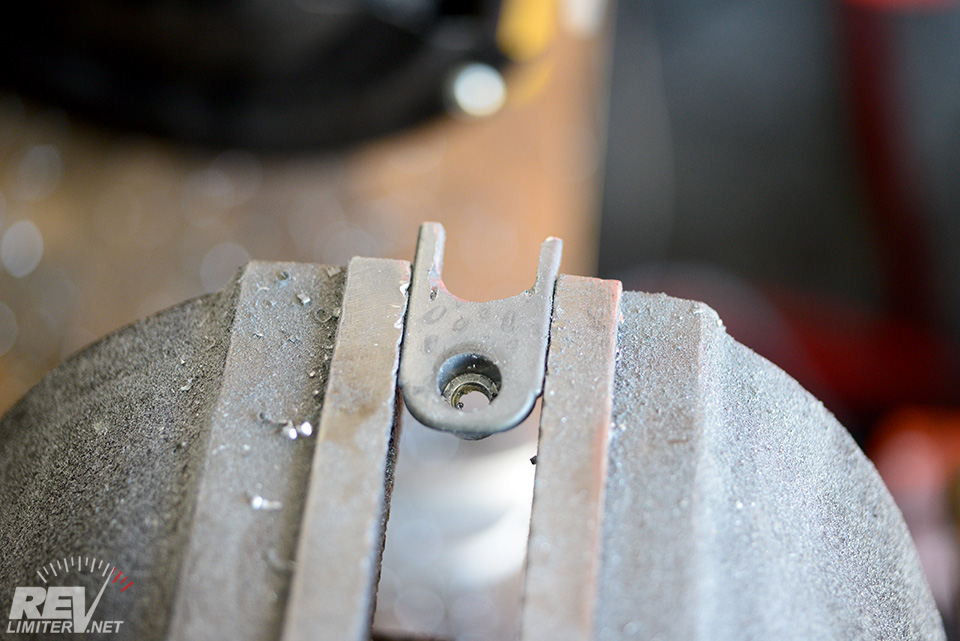
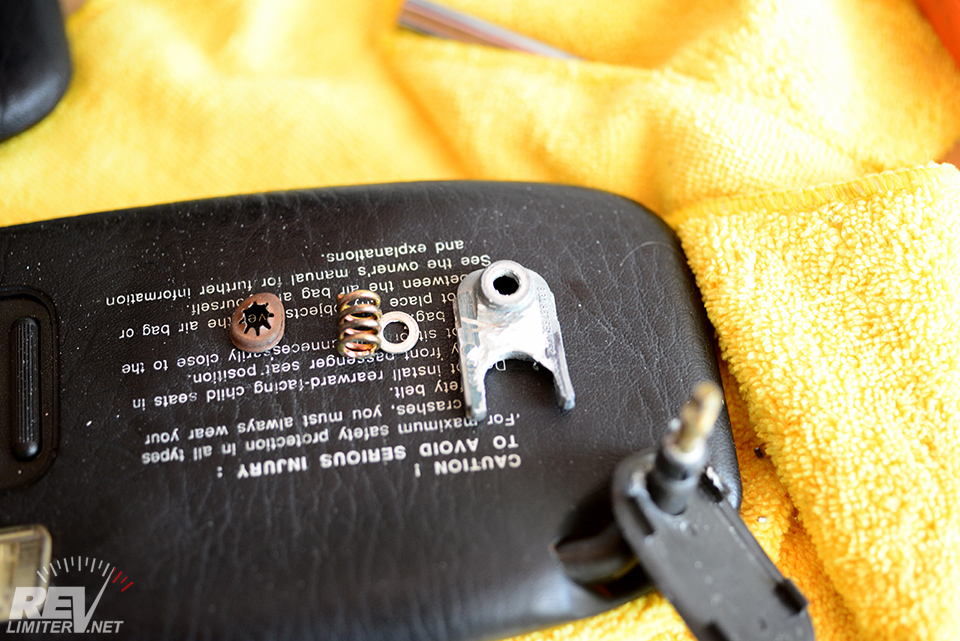
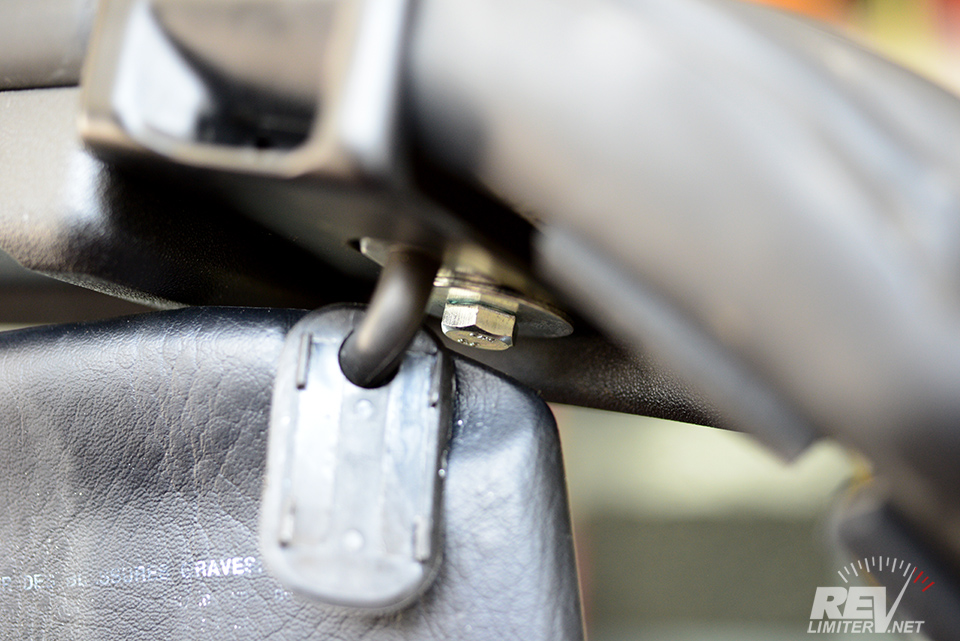
The visor swing mount is held together by the internal tooth washer/grabber thing. It is easily removed with a small vise grip pliers. Squish the washer a bit and it will pop off. Before you re-install, hammer the teeth back to flat and make the washer round again. I’ll remind you of this again.
Once you have the lock washer out, the flat washer, spring, and metal mount come out. There’s also a plastic mount cover attached to everything. You may as well remove that. I wasn’t able to figure out a way to make it work or look at all good. An exposed large bolt isn’t necessarily a bad thing in the NC interior.

In the vise.
U hole cut
Back side flattened.
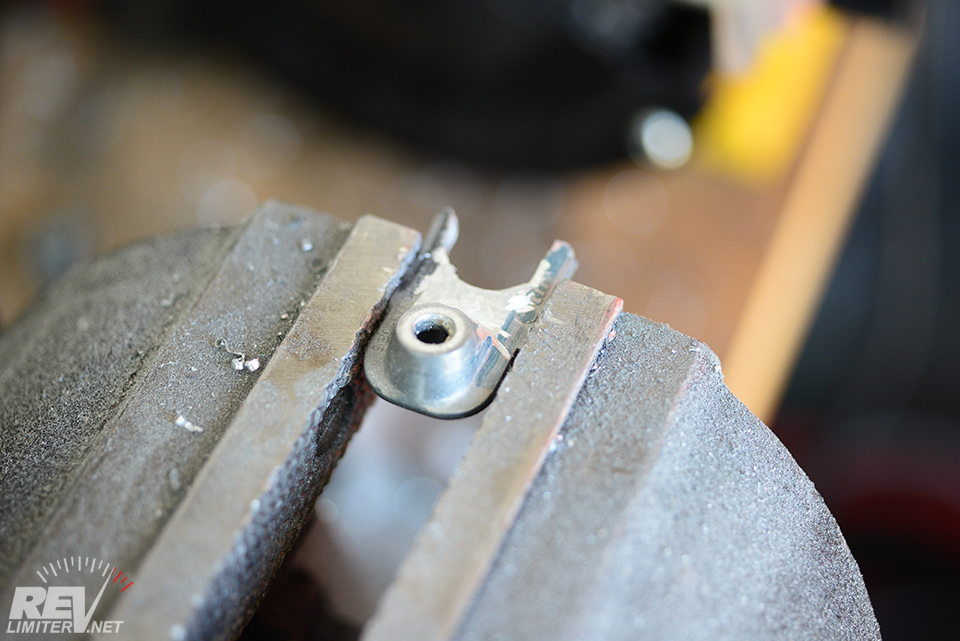
The metal mount needs modification to work with the NC. It will be attaching via the side latch mounts. You need to remove a ton of material to do this.
This is about 40% of the work of the entire project right here – modifying the pivot mounts. Work slow. I used an electric dremel to do this. Use safety glasses and gloves. I think the first one took me about 20 minutes of slow grinding. The second took about half that.
Flattening the back side was not something done on the original Miata.net post and I seem to remember the visor mount not sitting flat because of it. It was an easy extra bit of work to do and allows the pivot to sit flush inside the side latch mount.
Ready for reassembly.
Hammered in place.
Putting things back together is a chore. The tooth lock washer won’t want to really keep everything in place again. Make sure to massage it back to round and flatten out those teeth to give it maximum grabbing power.
Everything can be hammered back into place with the right sized socket and a hammer. I think it was 8 or 9 mm on the socket size. Just experiment until you find the right one. A single blow will get everything locked together, but it will take many small blows to figure out exactly how to do it.
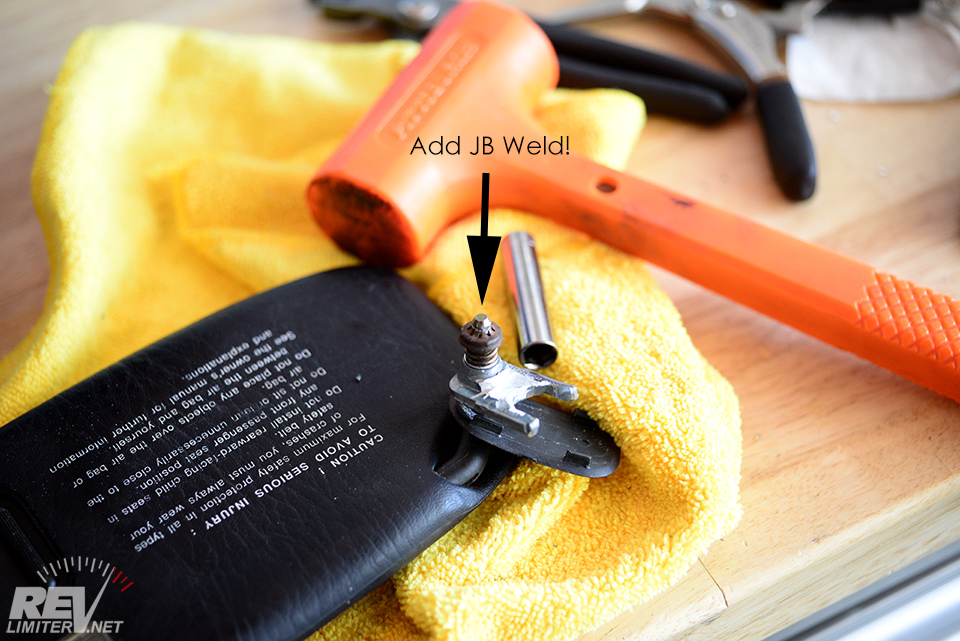
Once everything is back in place, consider adding a blob of JB Weld to the end of the visor to help strengthen that lock washer. I did not do this originally… and lost a lock washer in the depths of Stormy’s windshield header. A week of shopping every hardware store in town did not find me anything that would hold the visor in place and I had to buy a THIRD expensive Audi sunvisor. So learn from my mistake and make sure to lock those pieces in place.
Take it all apart.
Power wires
It’s actually a better idea to take everything apart far before now if you’re following along, but it makes the most narrative sense to put this pic in now.
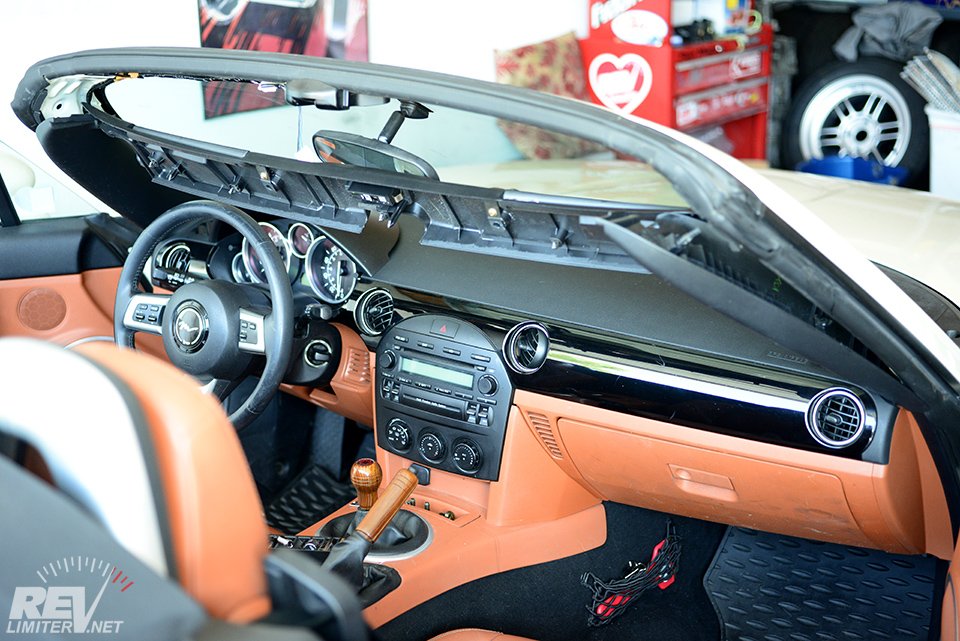
You need full access to the NC windshield header. That means removing the plastic covering it. There’s no trick to this. The screws are easy to see and everything pops off without argument.
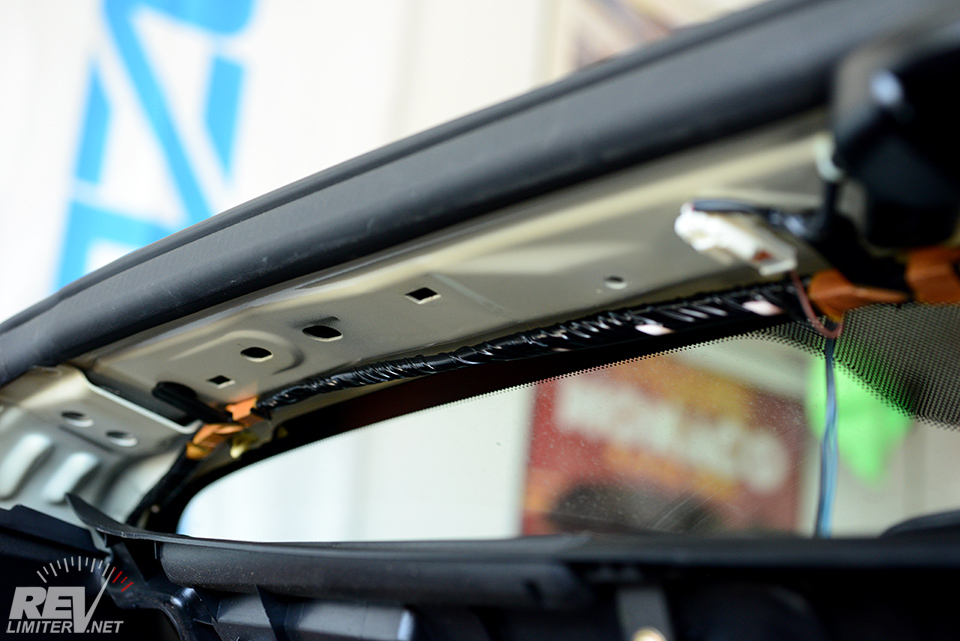
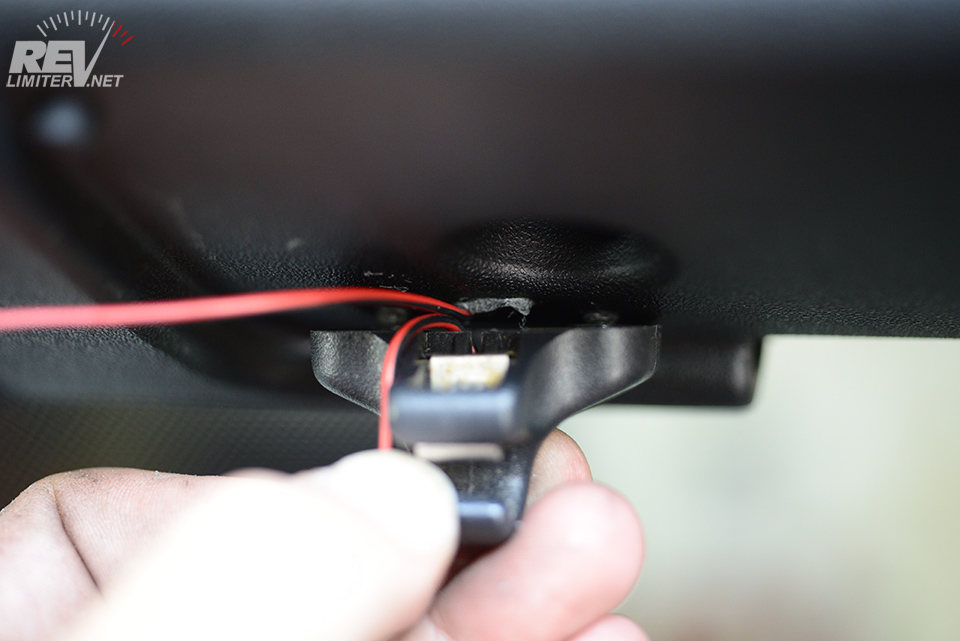
And there’s already a dome light in the NC with wires hiding under the plastic. It’s like it was made to have these visors!
While you have things apart, go ahead and remove the NC factory visors. You won’t need them anymore. The recess areas won’t be noticed when the Audi visors are folded up and they don’t look bad when the visors are down and in use. You won’t even have a gap between the Mazda plastic and the Audi vinyl.
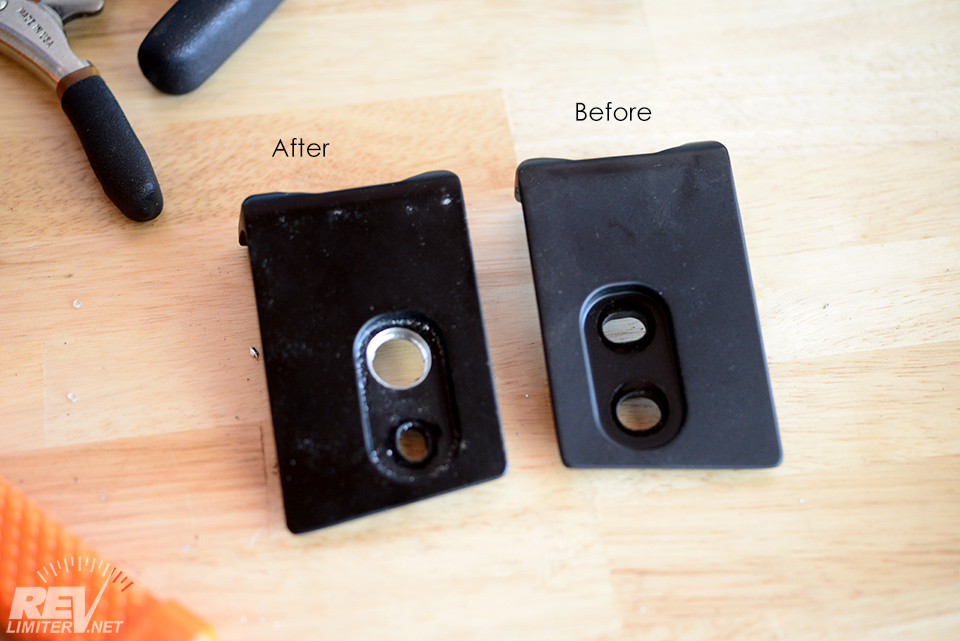
Side strikers
Each side striker needs one hole embiggened a lot. I used cheap Harbor Freight step drill bits (unibits) to do this for all holes. They worked perfectly. Be warned that they will throw lots of tiny, sharp, hot bits of metal while cutting. Lubricate the unibits and wear PLENTY of eye protection. A face shield plus protective glasses is not necessarily overkill in this circumstance.

The car side gets drilled too.
This is what I meant earlier about not being reversible. This is a lot of metal to remove from the windshield frame.
Note that the other side of this metal is the painted outer windshield frame. You don’t want to drill through that.
This hole needs to be large enough for the whole end of the visor (containing the toothy lock washer and pivot) to poke through. It’s more metal than you would think. That hole needs to be rather large.
Drilling these two holes is another ~40% of the work of this project.
Mount it up!!
How it looks bolted up.
YES!! Finally it’s time to test mount.
The visors hang at about this angle without support. That is normal. You can bend the pivot arm a bit, but rotating the visor toward a side window will re-bend it to the angle you see here. Don’t worry about this angle. With the support connected, the visor will be flat against the windshield header.
Note – you’ll test fit this in and out quite a few times. And also, make sure to remove the plastic cover you see dangling in the above photo.
Find a good place for the support.
Screwed in.
Figuring out exactly where the supports need to live is a bit of trial and error. Mark things and test fit quite a few times before you actually drill the holes.
I’m using sheet metal screws to hold the mounts in place. They go through the plastic and into some aluminum brackets I fabbed up for the other side. They’re not pretty and nothing special, but they are strong. The sheet metal screws and aluminum have held without a single problem for the last six months just fine.
Yeah, I did this mod six months ago as of the date of this blog. I’m that far behind in my blogging…
Wire up the lights by attaching the two support pigtails to the NC’s factory wire for that dome light. I’m not sure of the wire color and am very sure the factory changed it a few times. Use a multimeter and figure out which of the two wires going to the dome light is the 12v and wire into that one. Don’t zap yourself.
Installed!

Installed!
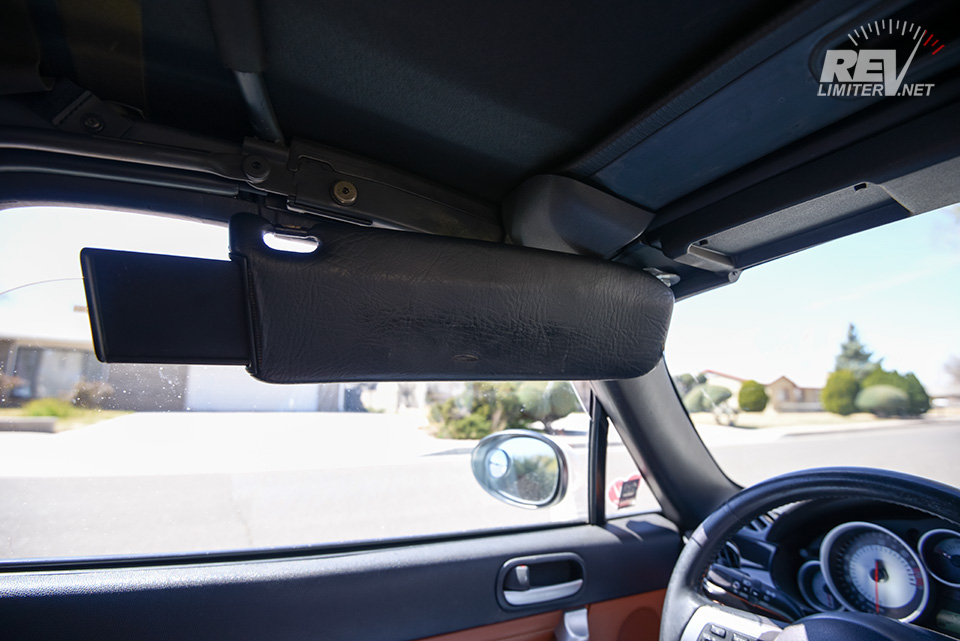
They look quite OEM when installed. A non-NC driver wouldn’t even know anything was different.
The visors hang down ever so slightly lower than the factory header-integrated hollow-things did, but it’s barely worth mentioning. They angle up a bit and are not at all in the way.
Folded down.
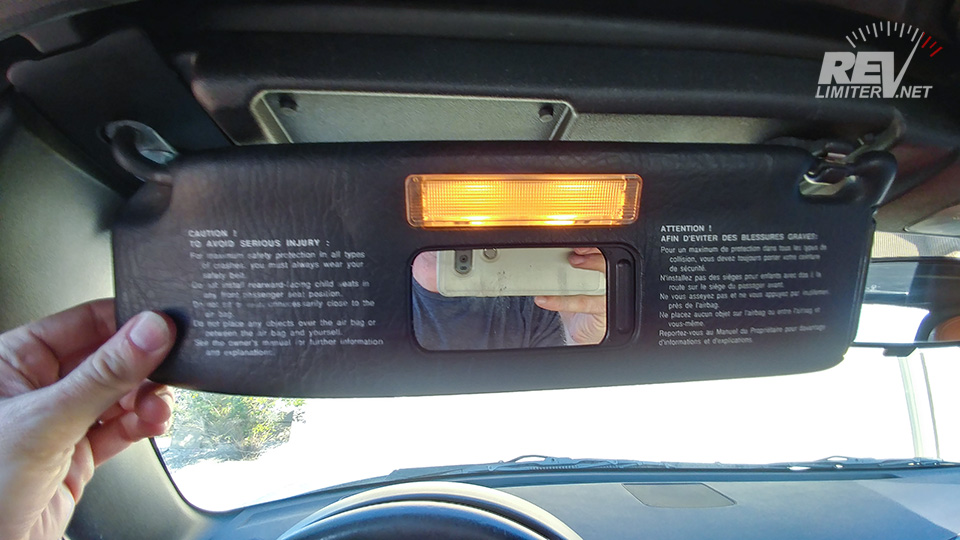
Light!
The light is so cool. My daughter likes to use hers for a personal light so that she can read or play in the seat next to me on night drives.
As a lighted mirror… they’re not bad. It’s kind of a gimmick, but the light and mirror both function. Can’t say much more about it than that.
In action.
So awesome!
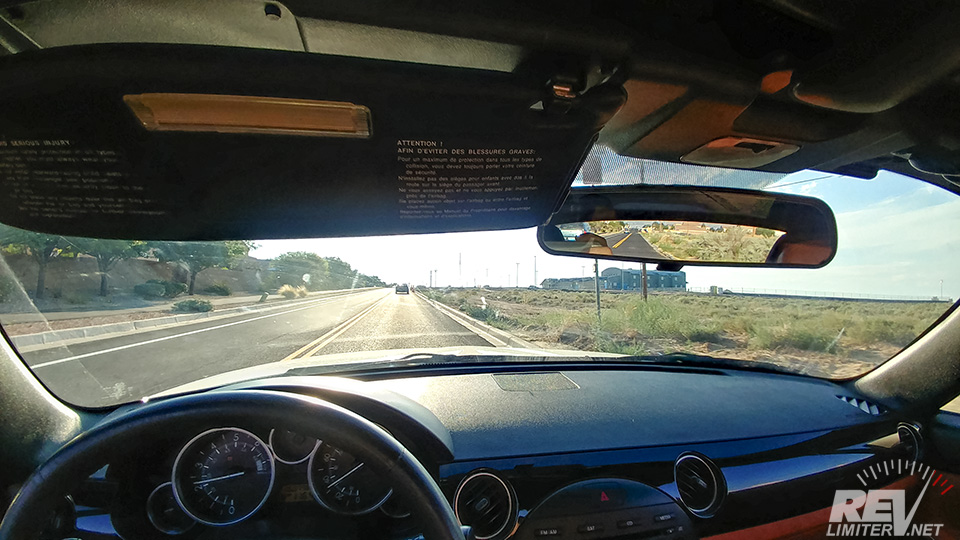
THESE are the two money shots right here. These two photos are the whole reason for spending an afternoon and $200 on your NC’s comfort.
The visors work GREAT. The driving shot shows you exactly what I see while driving with a low sun angle. The sun is blocked, I can angle the visor forward against the glass, and there’s no gap above. The visor also does not hit the rearview mirror. It gets close, but doesn’t hit.
And the side angle… yeah. That’s the other part. The photo tells the whole story. It’s amazing to have this much side visor coverage. The sun literally cannot get to my eyes from the side.
So there it is. More than you ever wanted to know on upgrading NC sun visors.
Good luck! Hope this post doesn’t drive visor prices up on ebay…


Oh man, I was really hoping the ol’ Revlimiter magic had found an alternative to those pricy Audi visors when I saw this article…I have the same “sun at the worst angle right in me eyes” part of my commute and have been debating tinting the windows or ponying up for those unicorn visors—which are probably going to be 300 in Canadian bucks. Woof.
Oh well, when I inevitably bite the bullet for the Audi parts, I’ll be glad there’s another invaluable Rev guide to help!
Sadly…. no. I found no magic bullet, just the spendy Audi parts. But they’re GOOD spendy Audi parts!
so after a year are you still happy with this mod ? no droop ?
i am thinking of this mod but am a little concerned about the female wedge piece that currently has two mounting holes having one mounting hole after the mod
excellent write up
I wouldn’t expect you would see this after all it posted in 2019 but to answer the question for anyone else debating this, the metal piece you are referring too is merely a guide plate to help align the top and it still functions just fine in that operation, I have had zero problems with the top working as normal and have had zero noise issues relating to it.
Love it! Has anyone looked at the newer visors to see if they’re usable? I see a ton of 2002 and newer Cabriolet visors on Ebay, but none of the ’90s visors.
Hi Jay, did you ever get an answer to your question…”Has anyone looked at the newer visors to see if they’re usable?…”
I’m embarking on this quest atm as I just hate the sun on the side :/
Cheers,
Bohdan
I originally came on to order some custom gauges but orders are on hold for now during the sale so while checking other things out I came across this and wondered what was up. I had a good chuckle and a little shock when I saw this as I am the original guy that did this mod and posted up on Miata.net on how to do it.
As stated, the original pics were lost due to Photobucket but I had sent them over to another member who was going to repair the post, never happened.
Anyway’s, I am happy to report that I use these visors literally every day to one degree or other and sometimes forget it was a mod because they simply work that well and seem like they were designed to be in our cars from the start…to bad Mazda didn’t think so.
I had bought used parts from a salvage car on Ebay so my visors are showing the wear you would expect but still work just fine, I bought them cheap because I wasn’t sure if I could even make it work, amazingly they are still the same ones.