
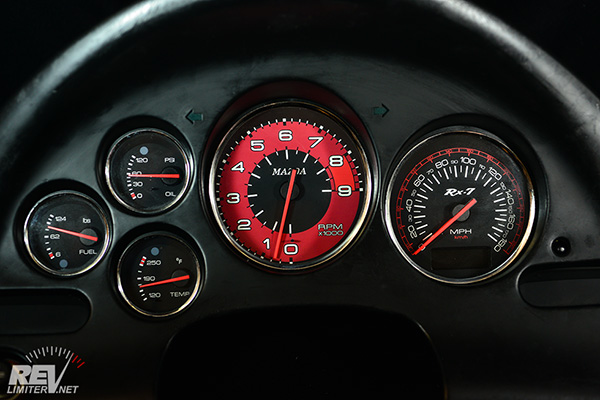
revlimiter Gauges in an RX7 cluster
Your Shopping List
- A set of genuine revlimiter Gauges. - You can buy them right here on this site! Check out the revlimiter.net Store. Other gauges may be of lesser quality or not compatible with the steps below. Don't settle for anything but the best!
- Powder-free gloves - These come with your gauges. Because you'll never be able to wipe off finger prints from most gauges, including your old stock ones.
- Pry tools - These come with your gauges. This is to remove your gauge needles without damaging the old gauge faces.
- Needle Stoppers - These come with your gauges. If you have an old set of gauges before I started shipping needle stoppers, you can follow the steps below to liberate the stoppers from your OEM gauges.
- Dry dust cloth - This comes with your gauges. It's normal for gauges to become a bit dusty while you work on them. This cloth gets them looking good before sealing up your cluster.
- Dremel with Sanding Drum
- 2 Phillips screwdrivers, one fine (#0) and one regular (#2).
Frequently Asked Questions
- How do I install the needles?
Whoa whoa whoa. Getting a little ahead of things! That section is at the bottom of this document, under Setting the Needles. - I got a smudge on my gauge. Can I clean it off?
With Gen3 revlimiter Gauges - sorta. Don't use rubbing alcohol, but a damp rag/microfiber/paper towel is fine. Gen3 gauges are waterproof and easy to clean up. You can also remove dust from them with blue painters tape. - Where can I get the gauges in these pix???
I sell them here on this site! Check out the revlimiter.net Store. - What's the deal with those funky gauges with non-stock zero positions?
Miatas are quite blessed from the factory in that the tach and speedometer are round with the needle in the middle. The RX7 tach is no different. You can set the zero on the tach anywhere you want. Some RX7s have a Cruise indicator at 6:00 on the tach, but it is easily removed. When done, the gauges have absolutely no idea where o'clock the needle is pointing. - How do I know the tach is accurate after doing this?
There are a few tricks, the best of which is using an OBDII scanner with live view to check your gauges against the ECU. Really, a fine way to assure yourself of yourself of tachometer (and speedometer) accuracy is to take some readings before you crack anything open. For example, an NB with the 5 speed and 4.3 diff will have 2500 rpm as the sweet spot. 2500 in 3rd = 30 mph. 2500 in 4th = 40 mph. 2500 in 5th is just a hair over 50 mph. An RX7 will have different readings, but you can still make a table of data for yourself. After you're finished with the gauge face install, check your speed and gearing against your own notes. - Will this make my odometer read wrong?
No. The odometer is not affected by this job. Removing and reinstalling will not change it. But your trip odometer will be reset. Some folks use that to track their mileage (including me) and this fact is nice to know before you put the cluster back in only to see 0 on the trip meter. - Some other shop sent me to this page. Is it cool if I use the info here?
Well, sure! The thing I enjoy most is helping out my fellow Miata enthusiast. However, I'd greatly appreciate it if you would drop me a note and tell me about these other manufacturers who are ripping off my hard work.
Gauge Cluster Removal
I do not own an RX-7. I have an ebay gauge cluster to show you the method on and take photos of. Please refer to google or the forums for help in removing the gauge cluster from your car.
Gauge Face Installation
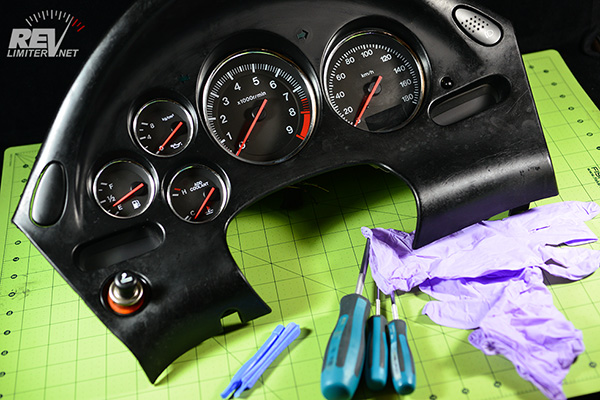
Take the cluster out of the car and to a comfortable, dust-free work area. You might consider putting on your gloves now. No gauge face I've ever seen is able to have finger prints or skin oils wiped clean, not even the stock ones. If you think you'll ever want to go back to stock faces, put those gloves on now.
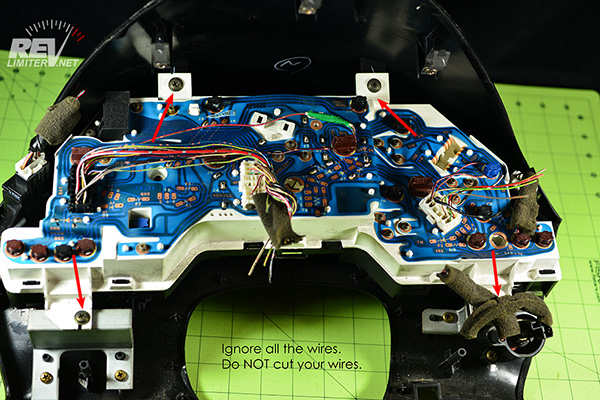
Unscrew the four corner screws from the back. This will separate the cluster from the housing. And please ignore the wires on the back of mine. Do NOT cut the wires on your own car. This is an ebay cluster that will never go in a car again.
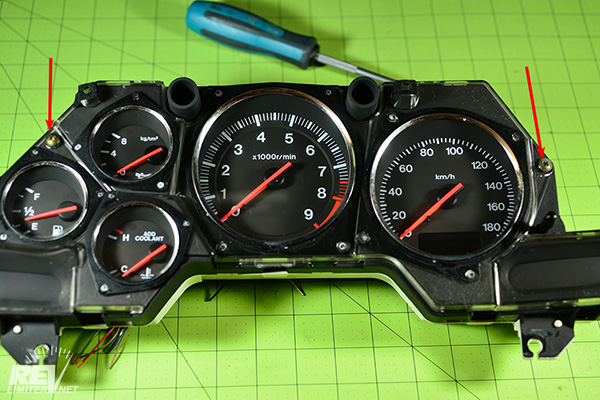
Remove the two front screws holding the glass/plexi to the housing.
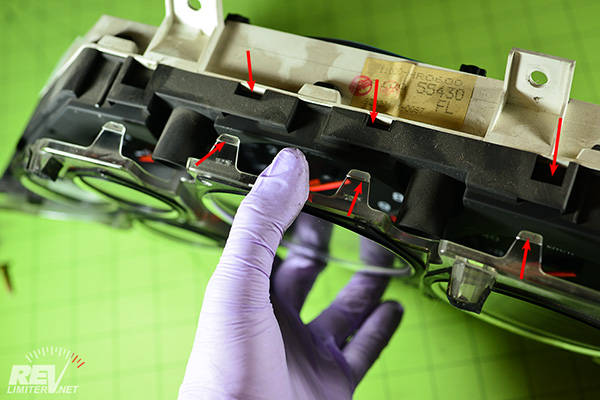
FD clusters have two steps to get the front cover off. You remove the "glass" and then you can remove the plastic gauge bezel.
Just take your thumb and press a tab inward. Then sorta hold the bezel up with the other hand and move your thumb to the next nearest tab. Once you get two popped free, you're good. The rest come out easily.

Remove the black bezel the same way as you did the glass. Pop one of the tabs free and move to the next one and pop it free as well. Continue around the bezel.
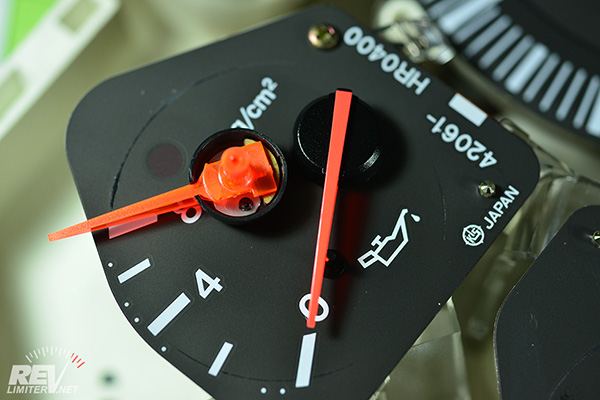
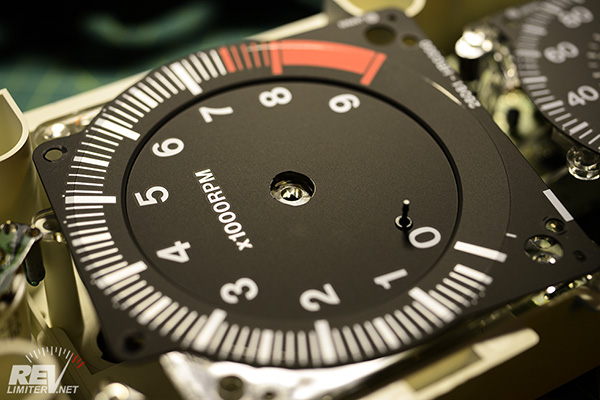
Next, it's time to remove your needles. Inspect the pic above. You can see that the black needle center is hollow. You do NOT want to pry by the sides of the needle.
You can remove a needle like this with your fingers on the needle and one pry tool under the back of it. You won't crack the needle center doing this, but you might bend the shaft.
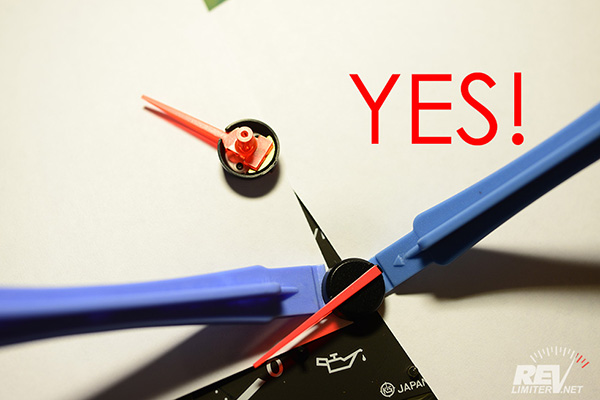
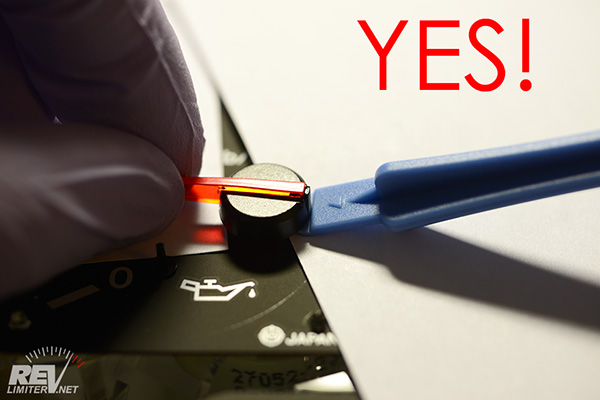
You can remove the needles like this with two pry tools working on the needle itself. This is my favorite way to get them off.
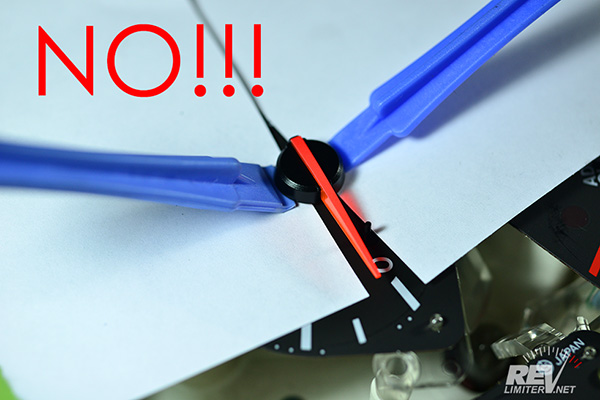
Prying on the needle center like this will break it. Do not do it. (But at least I had paper down to protect the gauge face.)
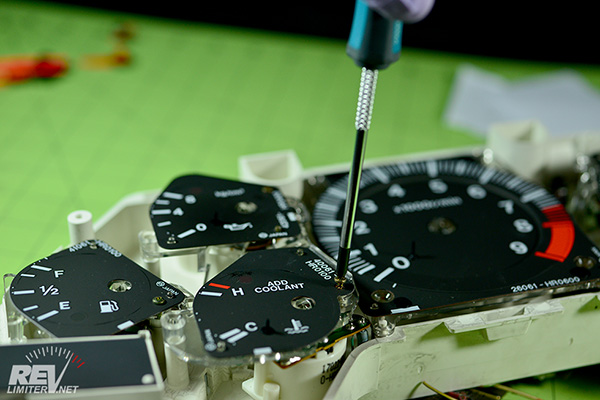
Once you have ALL FIVE needles removed, it's time to remove the stock faces. Unscrew the single screw from each of the three small gauges. Set them aside.
The speedometer is held in place by tape on the light diffuser. Gently slide something underneath the face and gently pry it off. The tape will be pretty stuck on there.
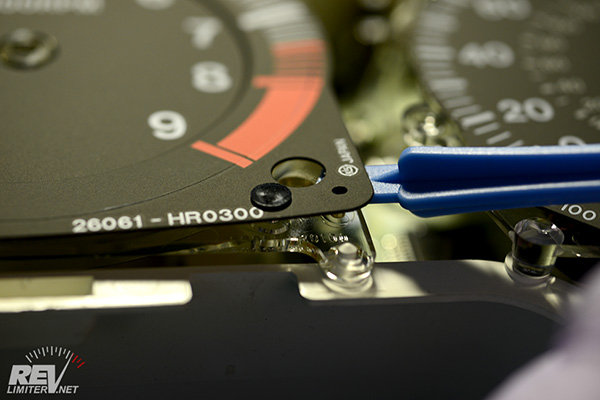
The tach face is held on by four plastic rivets - one on each corner. Slide something under the tach face (like the needle pry tool) and coax each rivet out of place.
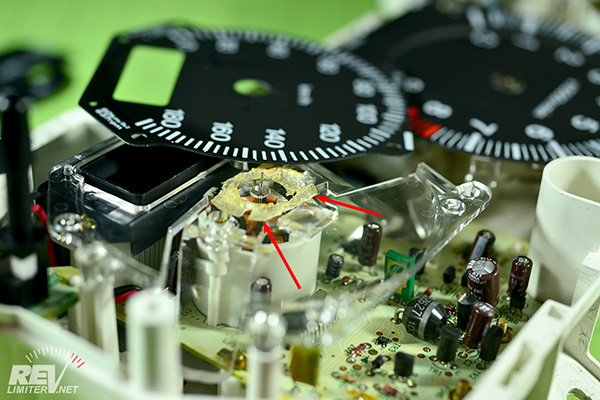
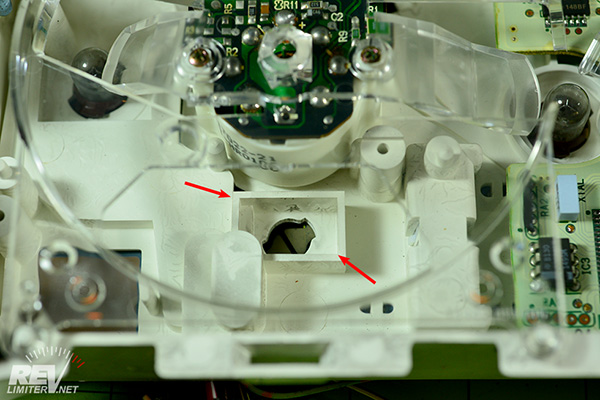
The tach face is also held on by the plastic center. If you rotate the entire tach face by 90 degrees in one direction or the other, you'll be able to remove it.
If your cluster has a CRUISE indicator on the tach at the 6:00 position, you'll need to remove it. Fortunately, it's not held in by anything and just pops free. Sorry to not have a photo of it in place. Once the box is removed, the cluster will look like the shot above.
Tach Needle Trimming
- Why doesn't my tach needle move?
You need to follow the steps below. Your revlimiter tach face is flat. The OEM tach face was concave shaped. To allow a flat face to work on the cluster, you need to modify the tach needle a bit.
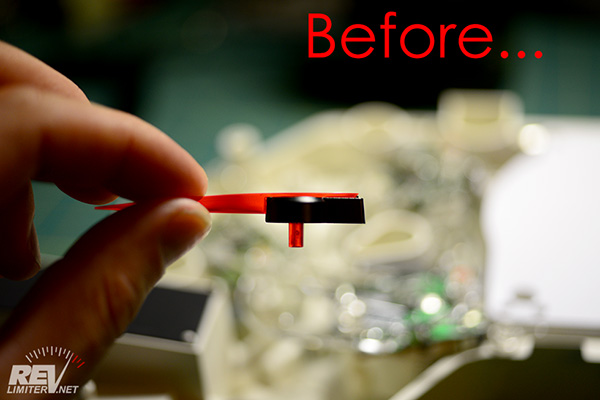
The black needle center is what you'll be modifying. You need a dremel with a sanding drum or some other gentle way of removing plastic.

This shows the tach needle after modification. Just sand off as much of the black base as possible. You honestly cannot sand off too much of it. You might need to remove more at the front (long side) of the needle base than I have shown here.
Needle Stopper Install - Poke Through
PUT YOUR GLOVES ON. You will working with your new gauge faces a lot now. Treat them like they would self-destruct the moment anything touches the front side. A few minutes of extra care here will be worth it. Would you like to stare at an oily (or even dusty if using powdered gloves) finger print for the rest of your car's life?

Hold the gauge face by the edges. Hold the needle stopper with your free hand. Poke the stopper through the face.
Note: Pix are of an NA oil gauge face. That's fine as the procedure is the same for your FD.

If it's hard to get the stopper through the tiny hole, twist the stopper while you insert it. A drilling motion will let the stopper get through the face without much pressure.
If you can't get the stopper through, put one gloved finger over the center hole of the gauge face front side. That will limit your contact with the actual gauge face, but still reinforce the face to let you press the stopper hard enough to poke it through the back.

IF NEEDED, apply a small square of tape to the back to hold the stopper in place. Black electrical tape works best, but clear "Magic" tape is fine too. If you use black tape, make sure none of the numbers or tick marks are blocked by it.

Ta-da! Nothing to it. The gauge is now ready to be installed.
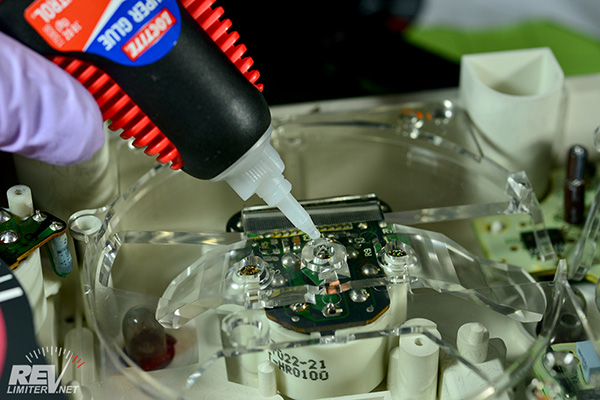
This is a bit delicate, but it might need to be done. If your tach face is standing off from the cluster center, you'll need to stick it down. A bit of double sided tape works great, but I didn't have any around for photos. A tiny drop of super glue will work too. Just make sure it does not get on the face.
Setting the Needles
There is no good way to photograph each step of this. Sorry, but this involves a lot of reading. I'll try to make it as easy to understand as possible.
Do not use a lot of force to press the needles into place. If the black needle center contacts the gauge face, it will not be able to spin. A little shove is all that you need.
Oil Pressure: Start the car. With the car on and the engine cold, your oil pressure gauge will read pretty high, usually between the 60 and 90 mark. Point the needle to that spot and gently press it on. Not too hard! Rev the engine a bit and verify that the needle goes to (or slightly past) 90 PSI / 6 BAR. If you get it wrong and it starts showing low oil pressure when the engine is hot, you'll want to remove this needle and try again.
Tachometer: ext, rev up to your rev limit. Verify that the needle points to this value. I say "this value" since many cars have aftermarket ECUs with non-stock rev limits. For stock ECU FDs, it is 8300.
If you have an aftermarket ECU, it is very easy to set the tach needle. Just plug in your laptop and monitor the engine speed. If you see the needle is grossly incorrect, pop it off and try again.
Water Temp: Once you've finished messing around with the tach needle, your engine should be warm enough to put the water needle in place. The stock position is approximately 11:30 o'clock. Put the needle in place and then press it down firmly.
Test drive time. On this test drive, you'll get your speedometer accurate. I suggest driving around in a pretty deserted area for this. You're going to be quite distracted. And you should try to plan it so that you end up at a gas station at the end.
Speedometer: The best way to calibrate your speedometer is probably with a GPS (dedicated device or phone app). Get up to an even speed and have your co-driver read from your GPS. On the Miata, factory calibration is a couple MPH slower than your real speed. In other words, it will read 40 mph when you're moving around 38 mph. If the FD is the same (I have no idea) you'd want to calibrate your needle the same way. Otherwise, it's far too easy to drive faster than you're used to and get tickets. Been there, done that.
Fuel: Last but not least, the gas gauge. Once your speed is decent, drive to a gas station. Fill your tank. Then go home and set your gas needle as close to the F as you like. I like to give it a few minutes between filling the tank and setting the needle on the gauge. It takes most old cars like the FD a few minutes to register a full tank.
And that's it. All that's left to do is snap the cluster glass back on and reinstall the gauges into your car. Of course, there's the celebratory test drive (much longer than the needle setting test drive) followed by the celebratory beer, celebratory photos, and celebratory posting to your favorite internet forum.
The After-Install FAQ
- My (speedo/tach/etc) needle seems to get stuck. What's going on?
99% of the time, the problem is too much force being used when you installed the gauges. If the black needle center comes into contact with the gauge face, it won't be able to spin. You don't need Hulk-levels of force to install the needles. Just place it on the needle boss (the metal pin) gently and verify that the gauge is reading right. After that, give it a small extra nudge to seat it. Then look at the gauge at an angle to verify there's space between the face and the needle center. - My fuel gauge needle doesn't go back to zero after the gauge install?
On NA and NB Miatas, the fuel needle stays reading whatever it's reading when the car is off. I'm not sure if the FD is the same, but most 80s and 90s cars functioned that way. If the FD is like this, then it's supposed to work like that. You just never noticed it before the gauge install. - Why does the bottom part of my tach stay dark at night?
You forgot to remove the partition for the Cruise Control light.
Site Navigation


Latest Blog Posts
Where’s all the blog posts?!?!
Posted on Fri, 27 Jun 2025 19:59:51 +0000
 Why are you seeing 2013 blog posts in the "new posts" list? It's been a hard month for the revlimiter site.
Read more...
Mabel
Posted on Sat, 29 Jun 2024 03:42:43 +0000
 Who’s the dog that keeps showing up on the revlimiter Instagram? It’s Mabel, my ACD/Pomeranian service dog.
Read more...
CarbonMiata Vent Window Install/Review
Posted on Sun, 29 Jan 2023 14:57:01 +0000
 After waiting 23 years, there’s finally a pretty vent window kit on the market for the NA/NB Miata. Unfortunately, it doesn’t actually work well.
Read more...
NA Miata Ignition Switch Replacement / Refurbish
Posted on Fri, 12 Mar 2021 19:25:57 +0000
 Is your NA Miata not starting anymore? A bad ignition switch may be the problem.
Read more...
XIDA ND Suspension Install
Posted on Mon, 20 May 2019 20:01:01 +0000
 Mona dumps the soft GT suspension in favor of a set of XIDAs from Supermiata.
Read more...

Products sold on this site are for Off-road and Competition use only. This website intended solely to provide general guidance on matters of interest for the personal use of the Reader of this Page, who accepts full responsibility for its use. All products as well as information provided "as is," with no guarantee of completeness, accuracy, or timeliness, and without warranty of any kind, express or implied, including, but not limited to, the warranties of performance, merchantability, and fitness for a particular purpose.