
Continuing from my last post, here’s the full, finished interior.
Sorry for breaking this up into two posts. I really don’t like when sites do that. There were just too many pix for one by itself. I try to limit a post to about 30 photos. Total, there are 56 pix of my new dash…
I was not shy with the shutter button.
I am going to be shy with the text here. This post is all about the photos. I’ll add a few thoughts at the end of each section. Really, it’s just me gushing about how happy I am. And that’s not very interesting blogging, is it, precious? No, precious, it isn’t.
The Dash

Sharka’s interior. It’s not subtle.

From the passenger side.

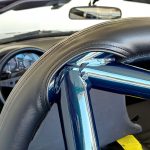
The rollbar-cam shot.

Almost a driver’s eye view.

Soft Corinthian Leather

View through the windshield.

I love my meshie defroster.
Thoughts: It’s as good as it looks. The fit is dead on and all of my work carving tiny bits out of the leather to get all of the panels to fit right was worth it. Not one rattle, not one squeak. Now, that may change with the weather, but for right now, it’s incredible.
In my many years with Miatas, I’ve never really paid much attention to the subtle differences between the NA8 dash (all I’ve ever known) and the NA6 dash (pictured above). When I’d look at interior photos, I just saw an NA Miata interior. Now that I’ve spent a year getting to know the details intimately, I can’t believe I didn’t notice them before.
And the leather. OMG, the leather! It’s incredibly rich and decadent. And not at all shiny. I only have a reflection from the gauge cowl hood now. Well, and a tiny one from the defroster mesh.
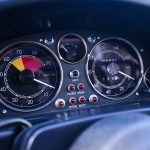
The Crash Pad / Gauge Pod

Not quite a driver’s eye view.
This is close to the view I have. I sit a bit farther back and lower. The only gauge that is somewhat obscured by the bezel is the voltmeter. A sliver of the dial is hidden to my eyes in my driving position.
I’m rather embarrassed that I didn’t get a good angle of the gauges as I see them while driving. I sure shot every other angle.

From the passenger seat.

Notice the glove box bling?

Driver’s side small pad detail.
The angle of this photo makes the seam look like it’s going down the middle of that small pad. It’s not. It’s going around the edge that touches the door. I couldn’t get a decent pic of the stitching. Alas.
Thoughts: I’ve been looking down by my radio to see my auxiliary gauges for a long time. 8 years? 10 years? A long time. It’s gonna be hard to get used to looking over toward the crash pad to see them.
I was worried they would be farther from my field of vision way over there, but they’re really not. They are in a better location than down by the radio. I can glance over and back faster than I can glance down and up. But it’s still not perfect. The best place would be either mounted on the gauge cowl or in an A-pillar gauge pod. However, I don’t like either of those mounting styles, so I did this.
Did I mention the leather? I’m so pleased I got the crash pad covered. I think I need to do my door toppers next.
The Center Console / Tombstone

The result of a whole lot of planning.

The radio area.

It’s the rare JDM double-din NA6 tombstone, btw.

My new HVAC control.

Chrome and stainless steel living happily together.

A lighter in the lighter socket. Far out!
Thoughts: I’ve already pressed that lighter in once while trying to start the car. That habit won’t be easy to break. My starter button has been there for 10 years.
This whole cluster required some planning. It is the reason my dash swap post is showing up in September rather than last May. I got those crash pad gauge cups and was suddenly left with no idea of what to put above or below my radio. 3 more gauges? A cubby box? A flat panel? Some transforming robots? I thought about this for MONTHS before the starter button and clock idea hit me. And I’m really happy I didn’t just throw in the dash and leave this zone as an afterthought to be finished later. Doing everything at once was way satisfying.
The radio is pretty sweet. It’s sufficiently loud and looks better than anything modern. It’s a little more blingy than I expected. The photos on the Retrosound site make it look a lot more subtle. But it’s okay. And if I get sick of the chrome, I can just buy another surround and different knobs and swap them out. The radio is very customizable.
Everything Else

Elise seats.

My back loves this seat. Really.

The Gauges.

Version Stirling from revlimiter.net if you were curious.

M2-1001 steering wheel

Can’t forget the door panels.

Helicopter shot
Update!!!

Chrome radio? What chrome radio?

Nostalgic Roadster
The chrome radio bothered me. It didn’t take me a week to rip into Sharka’s interior again and start working on making things right. Check out what I did. It’s a small change, but very worth the effort.

Great to see the whole thing wrapped up, it was certainly worth the wait. There aren’t really too many more things that could be improved but I dare not utter the F* word…
I was going to comment about the start button and how you couldn’t bump start the car with the handbrake on. then remembered how the start button isn’t used at all in that scenario, so it isn’t an issue.
*Finished, not the other F word >_<
Never say the F word!!! Though, I agree… it’s getting rather F’d.
I need a 2nd project car so that I’m not tempted to F-up Sharka. =)
WOW, this is some of the best interior work I’ve seen! Very tasteful and well done, very elegant as well! I love reading and looking at all you’ve done, keep up the great work!!
Another project!!!!!!!!!!!??????????
Thanks for the kind words! And yeah, another project. Something old. Something I could restore. Sadly, I need more garage space before I can really commit to that.
Almost perfect ! I would only add retro warning / pop up switch, leather straps door pulls, and a chrome fire extinguisher ideally (though the main concern is more to have a good one).
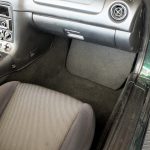
By the way, I’m very interested in what you have done with the power mirrors switch since I have a fugly big square where you installed the start button and I’m wondering what king of switch you have.
Agreed 100% on the toggles for the popup and hazard. That never seemed like it would flow well before. Now, the factory buttons seem like an eyesore.
However, I’ve never liked chrome fire bottles. They always look rather… rice? Boy racer? A fire bottle should be red and easy to retrieve, not something shiny for looks.
Power mirror switch: You can see it with the small dash pad.

I just extended the harness so that it would mount with the other switches.
The toggles really change the interior for the better. I thought they would look out of place in a mostly stock interior, but they didn’t. They looked right at home in my honest opinion. Granted I have the RSP toggles with the black cover. They’d also be a nice compelment to your window and dash switches.
Hmmmmmm… now I’m really thinking about them.
I was also thinking to put mine here but my actual switch is way bigger (right now I have this : http://memimage.cardomain.com/ride_images/1/2945/1301/7360650056_large.jpg), and I didn’t know if I could find something to fit there. Now I know what to look for.
Anyway, thanks a lot for the close up pic 😉
Do you happen to know what gauge wire I should use for extending the harness like this or other harness-related work?
Thanks.
Rule of thumb: always use at least OEM wire gauge or above. If OEM used 14 gauge, you’d better use at least that.
As nice as the gauge work, radio and extra bits are (I’d love to steal them for my car), I think the leather work is what has me gushing. It looks fantastic and adds that perfect touch to the interior. Sharka will always be one of the classiest cars on the road.
Thank you for the very kind words! I was a little worried the richness of the leather wouldn’t come across in the photos. It really outshines all the chrome bobbles and shiny whoozits, at least in person.
NICE!
I’ve been saving a Blaupunkt Europa II radio for my Miata – I’ll get it in there someday.
The “eyeball vent” rings seem a bit too thick – is there anything thinner?
The eyeball vents are more flush in the 1600 dash than they are in the 1800 or NB dashboards. In those, they sit quite recessed. In this one, they’re just right out there. It makes the vent rings more pronounced. But I could never get rid of them. Besides the fact that I sell them here, I just love them. That set has been in Sharka for 12 years. I couldn’t imagine putting something else in.
ooops! I meant Becker Europa – it’s been in a box too long!
I had to google some photos. That’s an amazing radio! I’m jealous.
I’ve told you this before but I feel compelled to tell you again. Best Miata out there. Hands down.
Thank you! 🙂
Bravo Adam !!!
I personally would have left more space between the KGW gauges,on my crshpad, after various tests I have done so
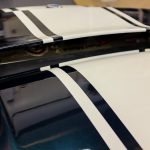
Top work for the leather on the top
you did the clock panel under the stereo ?
Thanks!
I actually wish I had put a bit less room between the gauges. At least between the tombstone and the first one. They could be a bit closer to the driver that way. The far one could be at least 2 cm closer.
And yeah, I made the clock panel. It was a pain. I didn’t photograph any of the steps.
I see from your photo feed that you’ve sorted the radio 😉
Looks waaaaaaaay better without the ‘bling’. I’m tempted now having seen that photo
The new radio surround is WAY superior to the above photos. I need to add at least one updated pic to this post and write a new one. 🙂
And thanks!
How do you do the printing of the decals for your aerial and fan switches? I have a couple switches that I would like to actually label but I haven’t come up with anything that looks as professional as yours. Your cars are inspiration to us all, great work!
[…] dire need of gauges. And lots of them! An awesome write-up on the crash pad gauge pod can be found here. Seems pointless to have the eyeballs in the vent holes when they're the perfect size for gauges. […]
Hello man first off I wanted to say so so so damn beautiful!! You make miata owners lustfull. Second I was just curious as to what the actual black cups on the crash pad guages were made of? I would love to do this to my miata just cannot for the life of me figure out that one part of it lol!
Hey just wondering what kind of instrument cluster is that? (By this i’m referring to the plastic bits surrounding the gauge faces, not sure if i’m using the correct terms, still new at this business)
overall amazing job!!
quick question – does the tombstone and dash hood from NA8 fit NA6 dash or did you have to use the NA6 hood and tombstone?