

There's a monster at the end of this post.
Space under the Miata hood can be pretty hard to come by. When you start adding forced induction parts like turbos and intercoolers, space under the hood goes away rather quickly. It seems like there’s always some new part (catch can, wideband controller, etc) wanting to use the space of some unloved stock piece. And that stock washer fluid bottle uses a LOT of space.
The star of this blog post aims to take care of that problem.
This little washer bottle comes from a Suzuki Cappuccino. It is re-branded as a Nopro washer bottle and sold for right-hand-drive Roadsters in Japan and other places with the wheel on the starboard side. I think Nopro includes some hardware to make it easy to mount on RHD Miatas, but I’m not totally sure. I do know they charge a lot for this little bottle. I also know their mounting hardware wouldn’t be very helpful for a left-hand-drive car. So, I cut out the middle man and got an OEM Suzuki bottle.

Eddie approves of OEM Suzuki parts.
Oh yeah. This is Eddie. He’s also known as Eduardo. This curious little guy may or may not be a 7-foot-tall imaginary monster. Imaginary or not, he wanted to help out with my adorable Cappuccino washer bottle install. Who am I to say no?
That part number, by the way, is 38450-80F00. And it might not be able to be ordered from a US-based Suzuki parts counter. But that’s why we have the internet and overnight parts from Japan.

Miata bottle vs. Cappuccino bottle.
Despite the different shapes, these two bottles have a very similar fluid volume. My full Mazda bottle worth of fluid was transferred to the Suzuki bottle with a little bit of room to spare.

That's the stock Miata washer pump.
The stock washer pump from your Miata/MX-5/Roadster fits perfectly in the Cappuccino bottle. It snaps in and everything. There’s even a little slot for the electrical connection.

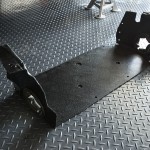
A wild guess at the hardware needed.
This photo shows my guess at what sort of hardware I might need to mount the bottle. It was pretty close to what I actually ended up using. All of this just came out of my parts bins in my garage, so I can’t supply a list of what you need from the hardware store. But I do have a list of my final hardware used below.
The little metal brackets came from my Hella Supertone horns. The bolts came from the dead 97 body. And the little spacers came from the abandoned AT&SF Railyard here in Albuquerque.
No drilling required!

Locate this bolt in the firewall. Right beside the brake booster.
That’s right. No drilling. Mazda put two holes in the firewall in almost exactly the locations we need to make this Suzuki bottle fit. You just have to find them. One has a bolt through it and the other is a hole way at the corner of the firewall.
You’ll remove the bolt above and replace it with a just-slightly longer one. Thread pitch is m6x1.0. Mine extends 7mm beyond the firewall. It’s the only bolt that really goes through and into the cowl area, so you’ll not have too difficult a time finding it.

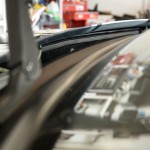
Hole at the firewall edge.
This is the other area on the firewall you’ll need to locate. This small hole lets RHD cars pass washer fluid through the firewall. You’ll use it for a similar purpose.
Hardware and Mounting

Hardware installed on the Suzuki bottle.

My finished hardware collection.
Here’s what I ended up with.
Pump-side hardware:
- A 35mm bracket, measured center-to-center of both holes.
- One spacer cut down to 8mm thick (mine is brown).
- One 20mm long bolt and matching nut. Thread pitch is unimportant since it goes through the bottle.
- One M6x1.0 bolt to replace the stock one going through the firewall. Mine extends 7mm.
Filler-side hardware:
- A 45mm bracket, measured on the center of each drilled hole.
- One 24mm spacer.
- One 35mm long bolt and matching nut. This goes through the firewall.
- A fender washer to fit that 35mm bolt.
- A short bolt and matching nut to attach the 45mm bracket to the washer bottle.
There’s really a lot of room for adjustment. I made my brackets as long as I did in an effort to make the bottle lay as flat as possible. Moving the whole bottle toward the center of the car gave me a little more room under the fluid pump.
The only real requirement with mounting this bottle is to have some sort of small bracket on the far outboard (filler) side. If you try to put a bolt straight through the firewall and mount the bottle, it will hit the hood. You need a short bracket to space the whole bottle down a ways. And then you’ll need a short bracket to let the other side (the pump side) connect to that long bolt sticking through the firewall.

Connect the pump before mounting the bottle.
Let me say that again. Connect the pump before mounting the bottle! It is nearly impossible to reach the pump after mounting the bottle. So do it while you can.
You also need to extend the washer pump wiring to the driver’s side. It’s not much work. Just an extra 4′ of wire spliced in. I ran mine along the top of the firewall where some sensor wires were already running.
Finally, you need to reverse your washer fluid lines. On LHD cars, they all go toward the passenger side. You’ll now need to send them to the driver side.

Filler side hardware installed.

Hoses routed to the driver side.
You can see how I routed my fluid hose. It goes down the side of the hood and into the bump rubber on the corner. I had my 97’s hose routed like this for 8 years due to some missing OEM hardware and never had any kinks.
NB Installation

NB mounting - photo courtesy ACBlessing

NB mounting - photo courtesy ACBlessing
And here’s how the bottle looks mounted in an NB! Very similar. You can see there’s a slight tilt to the bottle, but it’s not that bad. It still holds a lot of fluid. More than I’d use in several years.
Incidentally, this whole installation method comes from the owner of the yellow 2002 pictured above. I’m doing nothing but riding coat tails with this particular blog entry. Thanks for sharing your install and your pix, Alex!

The whole engine bay.

Ready to wash some windows.
That’s pretty much it. The real trick to this whole install is measuring and modifying your mounting hardware. Installing it into the car only takes a few minutes. I’ve had mine in and out a half dozen times getting it just right.

Edwardo says "Gracias y buenas noches!"
And, as promised, there was a monster at the end of this post.


Nice! I was anxious to see how this mounted. Having no washer function on mine I didn’t get one of these aka I fail. Seeing this now, I should have jumped on it and plumbed my car for washer fluid. Awesome piece and update!
Thanks! It’s a really great piece. I admit, I mostly bought it just because it fits so well. No holes drilled and the pump fits perfectly? Too much of a coincidence not to add it to Sharka.
When I went to test it, I had completely forgotten how to activate the washer. It’s been that long since I sprayed the windows on a Miata.
Hi Rev, like the site a lot! One question where did you find the Suzuki part? My internet searches have proved fruitless. Can you toss this confused dog a bone? Again, GREAT site you have made.
I lucked out and got one on a CR.net classified sale. That’s not something that happens very often though.
A quick google with the part number I provided above revealed this.
http://www.onlinesuzukiparts.com/section/store/action/product_view/id/2924/ which is not a bad price at all.
What else can I say that’s not obvious already? Excellent site, excellent write-up and excellent work. Not enough room for more accolades here nor need. Thanks for the great work. The site speaks for itself.
Oh, about that link. Check with them by phone before ordering because they’re out of stock but won’t indicate that when you’re ordering. They’re used and not a permanent item in inventory. Keep your eyes on the For Sale section on CR as these might pop up for sale again but be fast.
Thank you, sir! And thanks again for the use of your photos. That’s a pretty yellow car you’ve got there.
A fine mod, always wondered what the big deal with nopro was. Now I see.
The only problem is that it seems to spit out some fluid in high-gee turns. And I’m sure stock Cappuccinos have that problem. All the fluid is just right there next to the filler cap rather than down in a reservoir with a long neck between the cap and fluid.
Alas.
Is this the same as the Nopro on Rev9?
As far as I know, it’s the exact same.
[…] "Nopro" (Suzuki) Washer Bottle tank I have for sale a brand new "Nopro" (Suzuki cappuccino) washer bottle tank. It is just the tank, no hardware, but it can be easily sourced for a few bucks. $100 shipped Install: https://revlimiter.net/blog/2011/02/nopro-washer-bottle/ […]
Hi I would like to know the dimensions of this reservoir tank, its not for a miata or cappucino but for a honda. I’m fabricating a custom fog setup on my vehicle and would like to relocate it to my vehicle’s fender. Cheers!
Hello Again,
How much did that bottle cost you shipped from japan?
Sorry, I have no idea. I don’t recall the cost of something purchased 5 years ago. I can barely keep straight what I paid my various suppliers THIS WEEK for parts.
I believe Flyin’ Miata sells these currently.
Flyin Miata is selling them for $80 which is almost a ripoff in my opinion when they can still be found on eBay for $40-50
[…] Re: 95 Mx-5. How to Hey bud, I'm not sure if there's a write-up for installing a factory windshield washer reservoir. But, there is plenty of info for relocating and/or replacing it with the ever so popular Suzuki Cappuccino reservoir. Revlimiter has an awesome write-up on his blog about it. This is the most common solution I've seen and it looks 100X better than the factory setup. Hope this helps. https://revlimiter.net/blog/2011/02/nopro-washer-bottle/ […]
Just heard about this bottle a couple of weeks ago when I wanted to install remote filter with larger capacity filter. Didn’t want to spend a fortune so sourced it in Japan. Under $40 delivered. Shipped and arrived in Los Angeles in about a week.
Thanks for the great article on fitting as it does not come with brackets etc.
Link to store https://www.amayama.com/en/part/suzuki/3845080f00
I designed a 3d printed bracket after ordering one of my own and reading this article. Follow the link to print your own, or send me a message on social media and i can print one for you.
https://www.thingiverse.com/thing:4003290/
instagram.com/everythingissocoldhere
Thanks Ryan for the stl. I m going to print it 😉
Adam, it’s been 9 years or so since I first saw this post, and thought, “I’ll never get around to that.”
Well…today, I did.
Capp. bottle installed with much ease thanks to your article.
I turned an old Spec Miata HT bracket into the two little brackets needed for the bolts.
If anyone doesn’t have a combo square or rule with millimeters, just drill your holes at a heavy 1-3/8″ (on center) and a heavy 1-3/4″ (on center). Worked like a charm for me.
Thanks again man!