
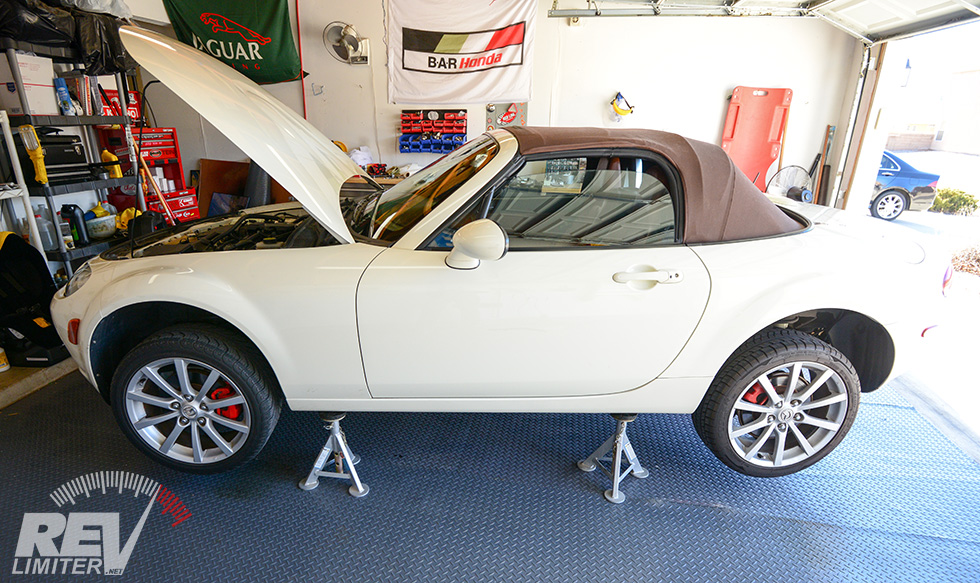
Ready for some maintenance!
Howdy NC Miata (or MX-5, whichever you prefer) owner!! Got a new-to-you car and want to do some maintenance? I found myself in that situation not long ago. I had to hunt all over the net for fluid and torque specs and then find out where everything went.
This is my attempt to put it all in one place to help you.
Step 0: Put the car securely on jack stands. And use the best jack stands you can find. Years ago, I did a multipart blog post about different jack stand types. Check it out if your stands are getting a bit old.
I feel perfectly safe laying under my car and having my little girl laying next to me. Can you claim that about your jack stands?
NC MX-5 Oil Change
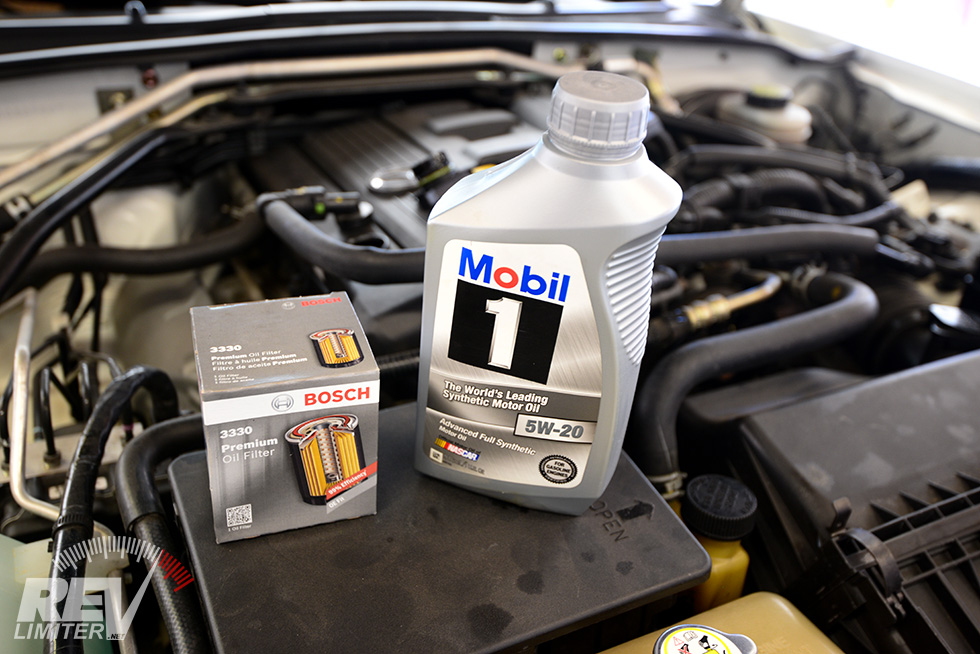
NC Miata oil and filter.
What you need:
- Oil – The factory calls for 5w20 oil and the engine takes 4.9 quarts when dry. You will need somewhat less than 4.9 quarts.
- A filter – I’m a fan of Purolator, Mobil1, and Wix. The parts store had none of these, so I’ve got a Bosch in the pic.
- A new crush washer. You need one for an M14 bolt. So 14.2mm inside diameter, 20mm outside diameter.
- Used oil containment – I’ve got a pic coming in a moment. Recycle your used oil!
- Wrenches, paper towels, rags, gloves, and any other stuff you usually use.
- The previously-mentioned jack stands. Ramps or a lift work too.
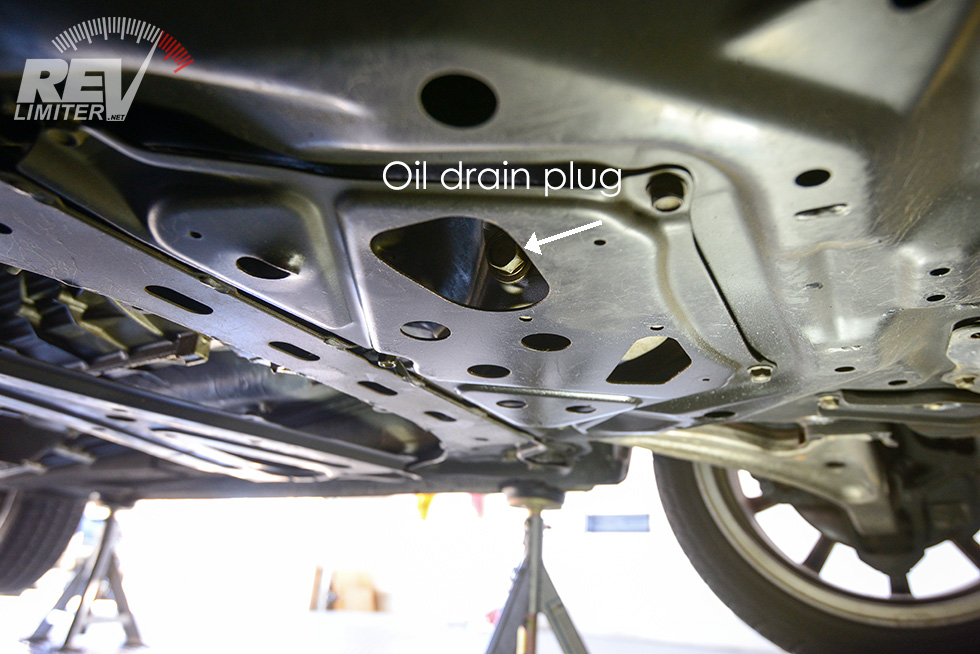
Oil Drain Plug location.
The drain plug is about where you’d expect it. Roughly the center of the car under the engine. In the photo above, the car’s nose is to the right and the driver’s side (US LHD) tire is visible in the lower right.
There’s a protective metal belly pan, but it doesn’t need to be removed for the oil to come out. No oil got on mine when I changed it this way.
The filter is another matter…

Oil filter location.
The filter is rather hidden. If you lay under the car near the driver’s seat (again, left hand drive), you can see it when looking toward the nose of the car.
It’s also got lots of metal under it and the oil gushes free when you remove the filter. I learned this after my NC’s undercarriage was coated in oil. I would highly suggest some kind of small oil containment device like a cut-down milk carton. Something short but wide that can fit between the filter and the metal bits.
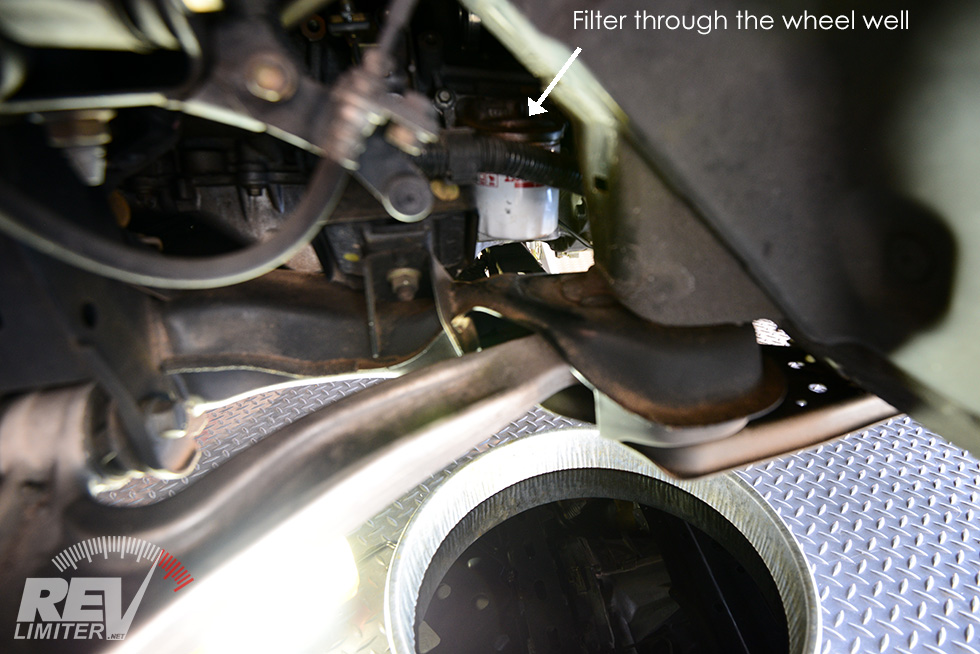
View from the wheel well.
It’s much easier to remove the front left tire than to struggle with the filter underneath the car. There’s a lot of room to get the filter out with the tire removed. I used my ancient filter wrench and had no problems freeing the filter.

Out comes the black stuff.
- Remove oil filler cap on the top of the engine.
- Remove oil drain plug. You need either a 17mm socket or a 19mm socket for this.
- Drain the oil. It’s always nice to do this with a warm engine. Let the oil drain as long as you like.
- Put a new crush washer on your drain plug and install it back in the sump. Torque the drain plug to 23-30 ft/lbs.
- Deal with the oil filter. Get it out and try to keep the mess to a minimum.
- Pre-oil your new filter with some fresh stuff and install it on the engine.
- Add oil to your engine. It’ll take somewhat more than 4 quarts. Reinstall the cap.
- Start engine and verify oil pressure. Turn it off, let oil drain back into the pan and read the dip stick. Add more oil to get it up to full.
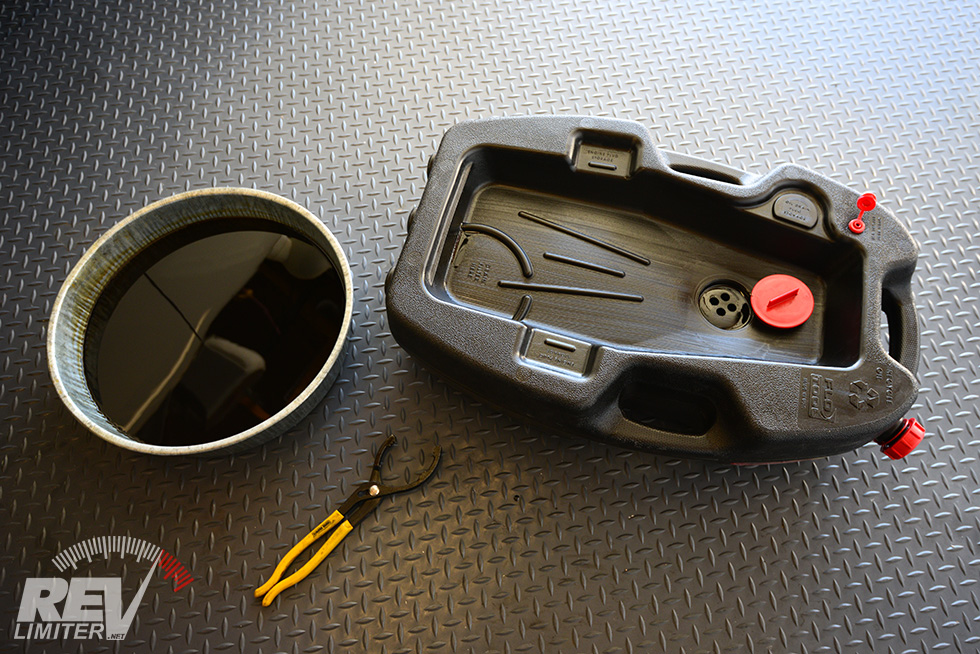
Oil containment.
I bought this fancy oil container at the local O’Reilly’s last year. It’s enormous and can take something like 16 quarts of oil. It stands on the end so it doesn’t take up a lot of space. It has special spots to let many different kinds of filter drain. And it has really nice caps to prevent leaks.
I highly recommend something like this. It makes oil transport and recycling a breeze.
And that’s all there is to an NC oil change. Very simple stuff.
NC Miata Transmission Fluid Change (MT)
Transmission Fluid Change
What you need:
- Oil – You need a GL-4 75w90 fluid. The Motorcraft stuff (also known as XT-M5-QS) gets rave reviews. I used it in mine. You’ll need 2.2 quarts.
- A fluid pump. Dear NC owner, please invest in a nice fluid pump and a lot of hose to fit it.
- A new pair of crush washers for a M18 bolt. The fill and drain plug take the same size.
- Used oil containment.
- Wrenches, paper towels, rags, gloves. I believe both plugs are 24mm.
- Four jack stands to get the car up and level. Or a lift.
This is not a hard job. You can make it hard if you don’t have a nice fluid pump. But this should not take you very long with a decent fluid transportation device.

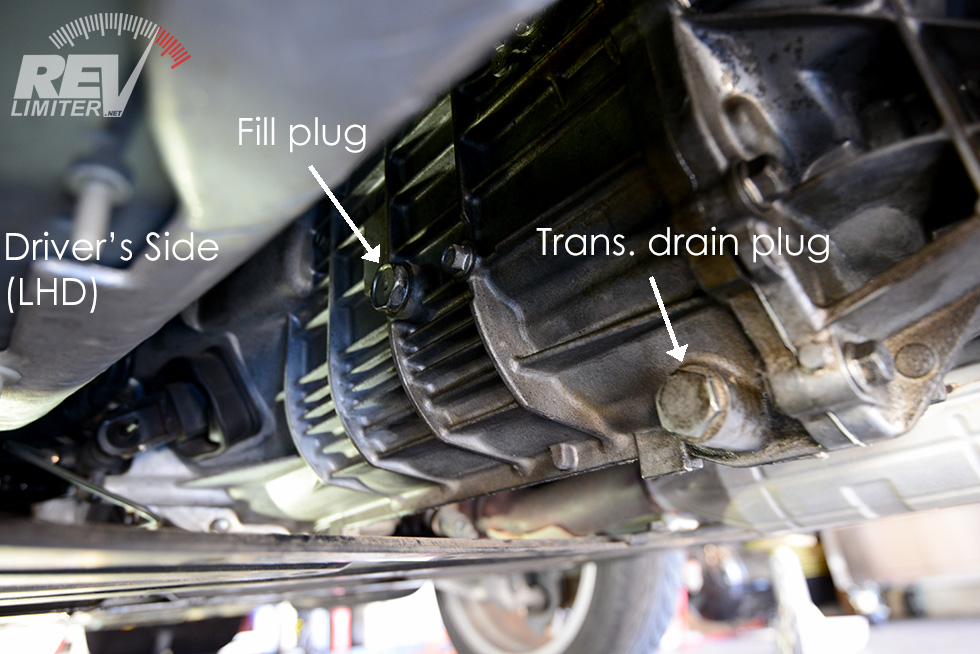
Remove the fill plug first.
Remove the fill plug first. I’ve read horror stories on the internet of guys getting their cars in the air and transmissions drained only to find that the fill plug was pretty much welded to the case. Do not let that be you. Work on the fill plug first. Once you get it off, then remove the drain plug and drain the trans lube.
Both plugs are easily accessible. Both take an 18mm crush washer. Both used the same socket, which I believe was a 24mm.
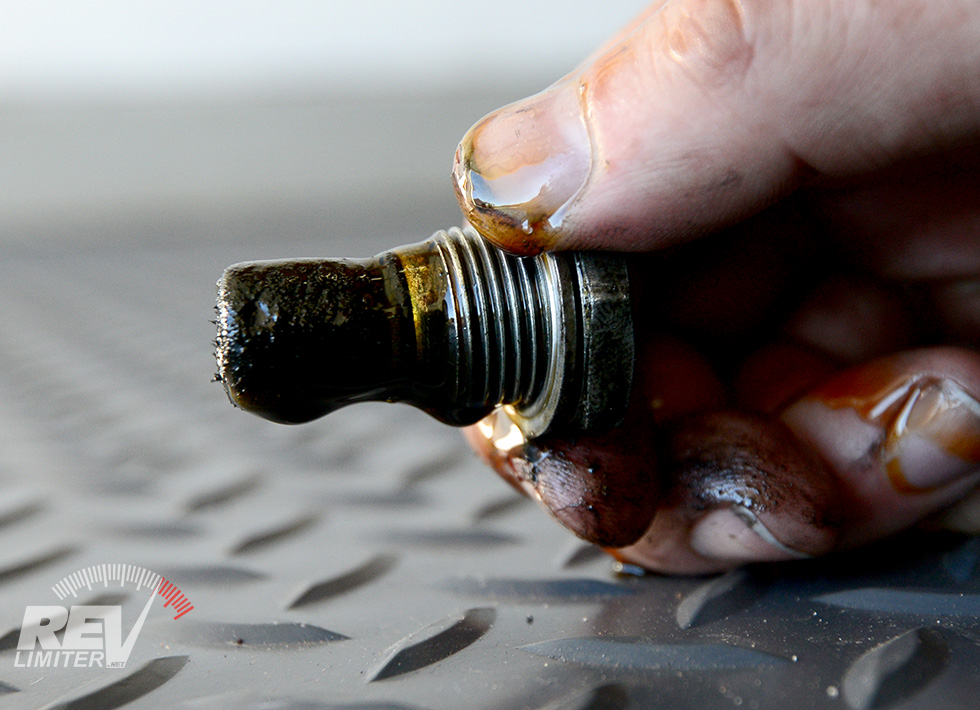
Oil drain plug.
Yuck.
The drain plug is magnetic and will (hopefully) trap metal bits. Mine was pretty much coated. I snapped this with my left hand because I didn’t wanna touch my camera with the oily right one. ha!
Clean off the drain plug and reinstall it. Torque the drain plug to 29-42 ft/lbs.
Insert the fill hose into the side of your tranny and weave it up to the engine.
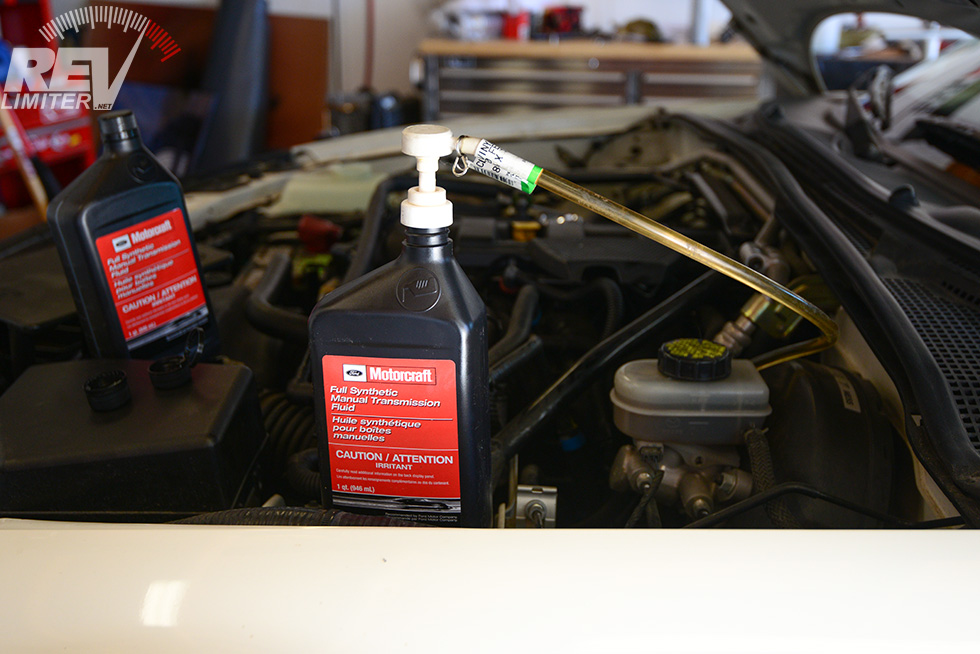
Pump!
This is where a nice fluid pump saves the day. Would you rather lay under the car with a tiny hand pump on your chest? Or would you like to stand comfortably and fill the transmission without getting crap in your eyes?
Yeah. Me too. It’s nice to stand and pump fluid.
You’ll be left with roughly .8 of a quart once you’re done. Fill until the fluid comes out the fill hole and then cap it up. Nothing else to it. Torque the fill plug to 19-28 ft/lbs.
If you want to grease the shifter turret, you’ll be using some of that extra transmission oil in just a few minutes…
NC Miata Differential Fluid Change
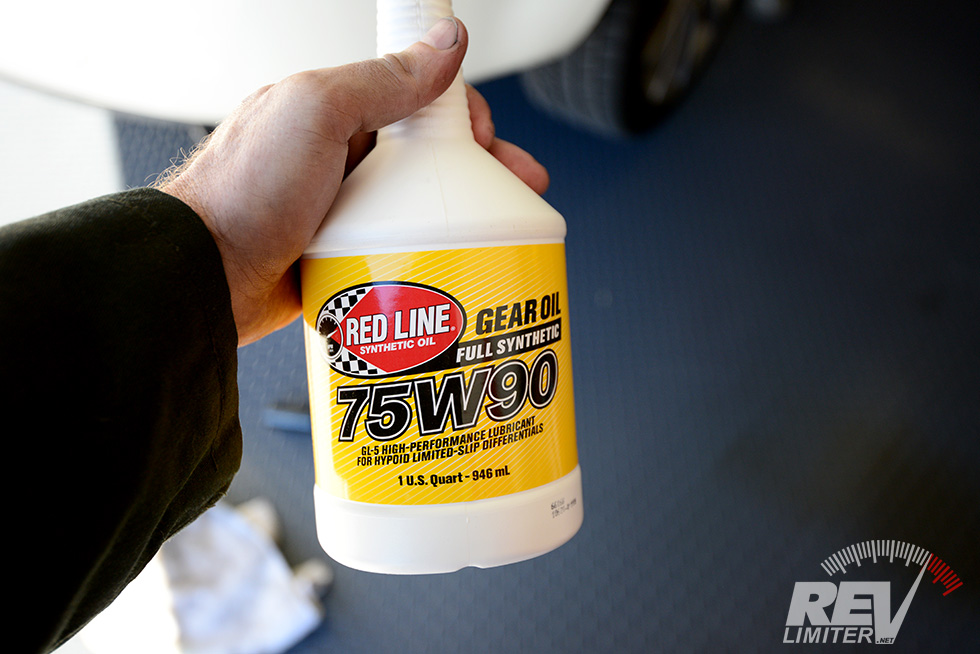
Diff fluid.
What you need:
- Oil – You need a GL-5 75w90 fluid. I’m a huge Redline fan. You’ll need just under 1 quart.
- A fluid pump.
- A new pair of crush washers for a M18 bolt. The fill and drain plug take the same size.
- Used oil containment.
- Wrenches, paper towels, rags, gloves. I believe both plugs are 24mm.
- Four jack stands to get the car up and level. Or a lift.
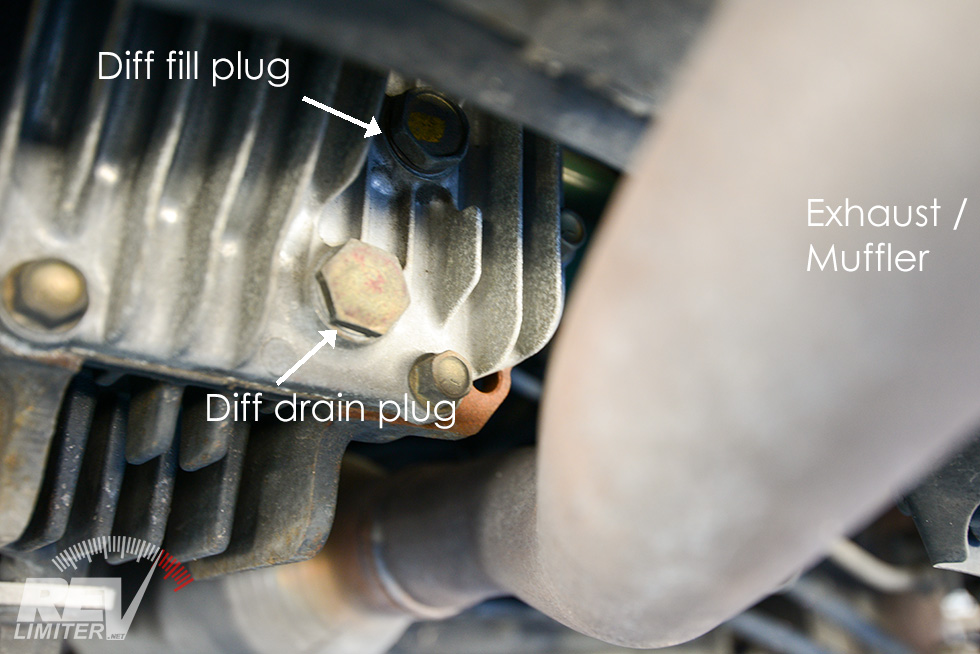
Diff fill and drain plugs.
This is roughly the exact same job as changing the transmission fluid. The diff uses less fluid, but I could not figure out a way to add fluid from on top. There’s no good drain plug in my NC’s trunk. That means laying under the car and pumping fluid. Ugh.
Remove the fill plug first. It needs a 23mm socket. Don’t be that guy who can’t get the fill plug off and doesn’t have any lube left in his diff!
Remove the drain plug next. It needs a 24mm socket as I recall. Let the fluid drain out. Don’t get any on your shirt because GL-5 gear oil is smelly stuff.
Once the fluid is out, install a new 18mm crush washer and torque the drain plug to 29-39 ft/lbs. Then pump in the new fluid. Once you’ve got most of the quart empty and fluid is coming out the fill hole, torque the fill plug to the same spec, 29-39 ft-lbs.
Remove the jack stands and drive the car around in glory. Nothing like the after-maintenance test drive to give you a sense of accomplishment. Well done!
NC Miata Shifter Turret Grease (MT)
There’s some discussion on miata.net as to whether this is needed or not. One camp seems to believe that the turret greases itself. The old guys who had NA and NB cars believe it needs lube.
I don’t wanna cause a debate. I’m just here to show you how to lube the shifter turret if you so desire.
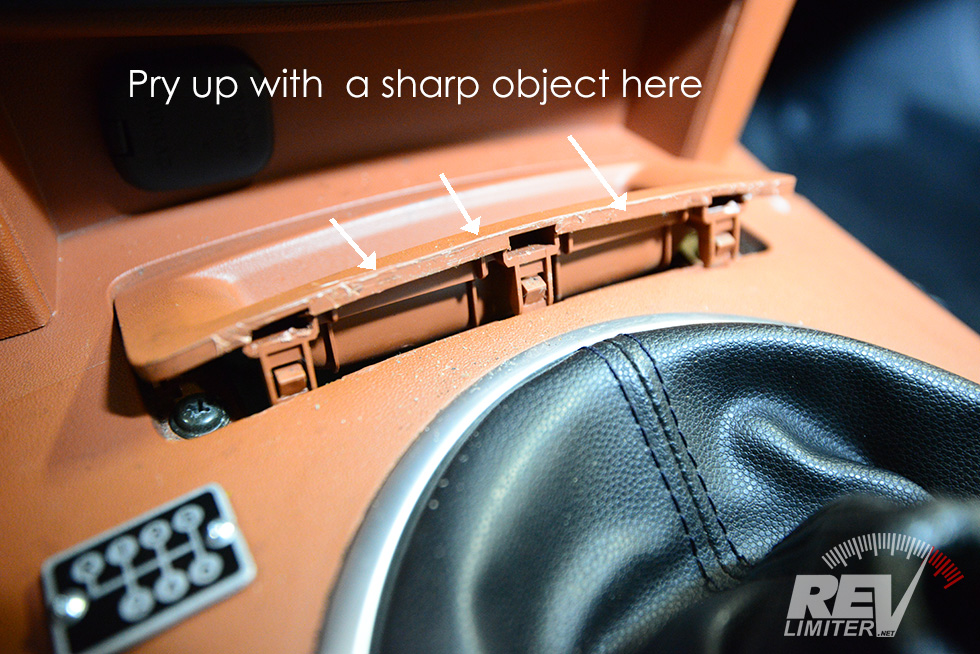
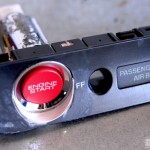
Remove the change tray.
You have to remove the NC armrest / center console. Compared to the NA or NB this is a bear. Lots of plastic clips and chances to break stuff. But if you go slow, you can do it.
I used a rigid putty knife to pry out the change tray. I’ve read of folks using a razor blade, but that seems hazardous to eyes. No matter what you use, be careful. Pry on the front edge and slowly work around to get all the clips popped free. It will hinge up as shown in the photo above.
There’s 2 screws under the change tray.
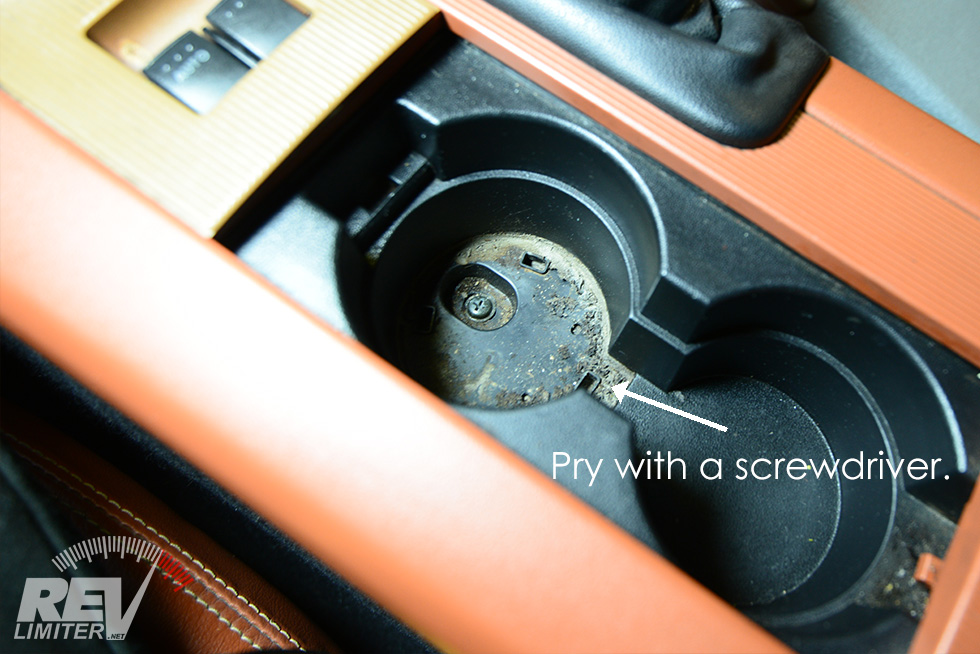
Cup holder screw.
The center screw is under the cup holder base. Just pry that little black plastic piece free and get access to the screw. This is the easiest one to access.
Mine had mold underneath. It was horrible. Wear gloves and decontaminate your NC interior if required.
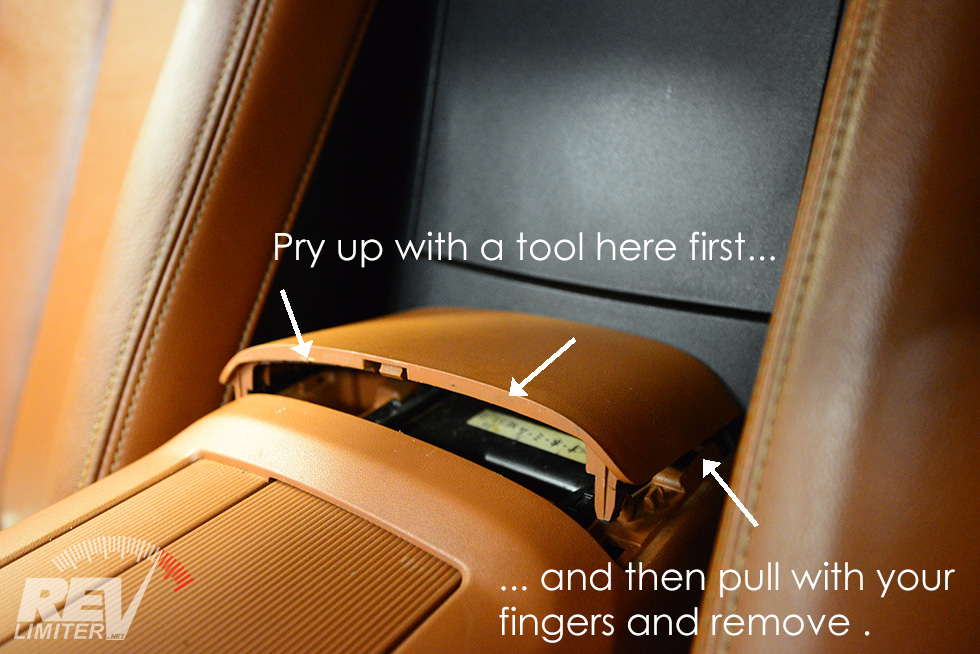
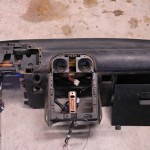
Rear cover removal.
This seemed like the most complex piece, but it was very easy to remove. Insert a pry tool at the edge shown and pop it free. Then work your fingers under the sides to remove the rest of the cover.
There’s 2 more screws under that rear piece. Once those are gone, you’re in the green.
You also need to remove the shift knob (it unscrews) and the hand brake boot. I didn’t take photos of these. They’re quite easy to remove. The brake boot is held in by a plastic ring that just pops free with the slightest bit of pressure.

Upper shift boot.
Remove the upper shift boot. It has 4 nuts holding it in place. A deep 10mm socket does the job.
Underneath this boot is a stick-on rubber boot. Like a dust cover or noise barrier. It just peels off.

Lower shift boot.
The lower shift boot is held on by 3 bolts. Remove them. Note the orientation of the shifter, lower plastic ring, and boot as you remove the stick itself.
Have a towel ready to lay the shifter on. If yours still has fluid in it, you don’t wanna get said fluid on your car’s carpet.
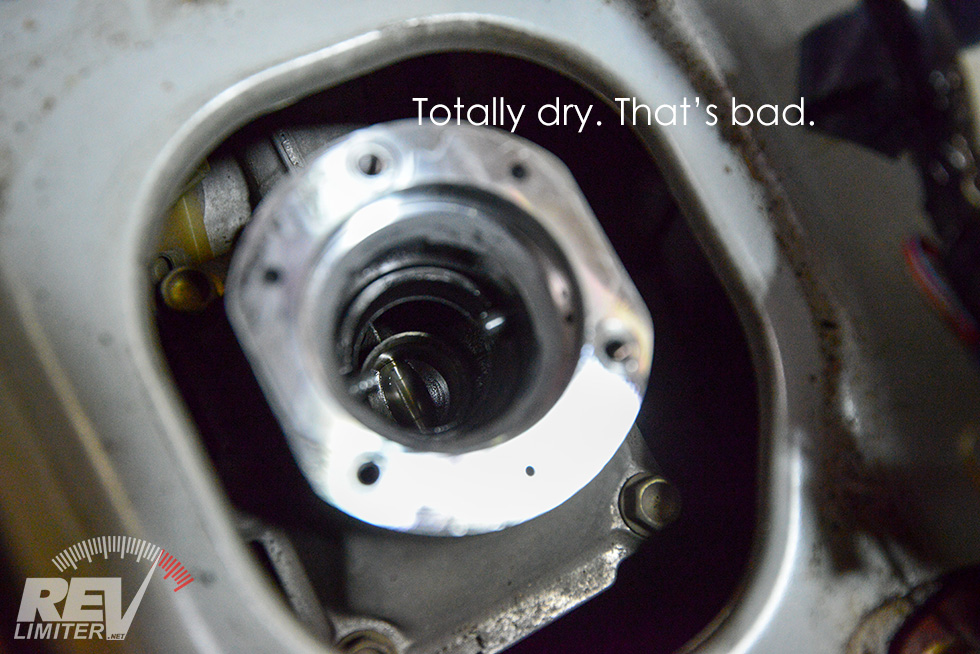
So empty.
After 156,000 miles, The Stormtrooper’s shifter turret was totally dry. No lube anywhere. Nothing was even slightly wet.
No wonder the car randomly couldn’t go into 1st gear…
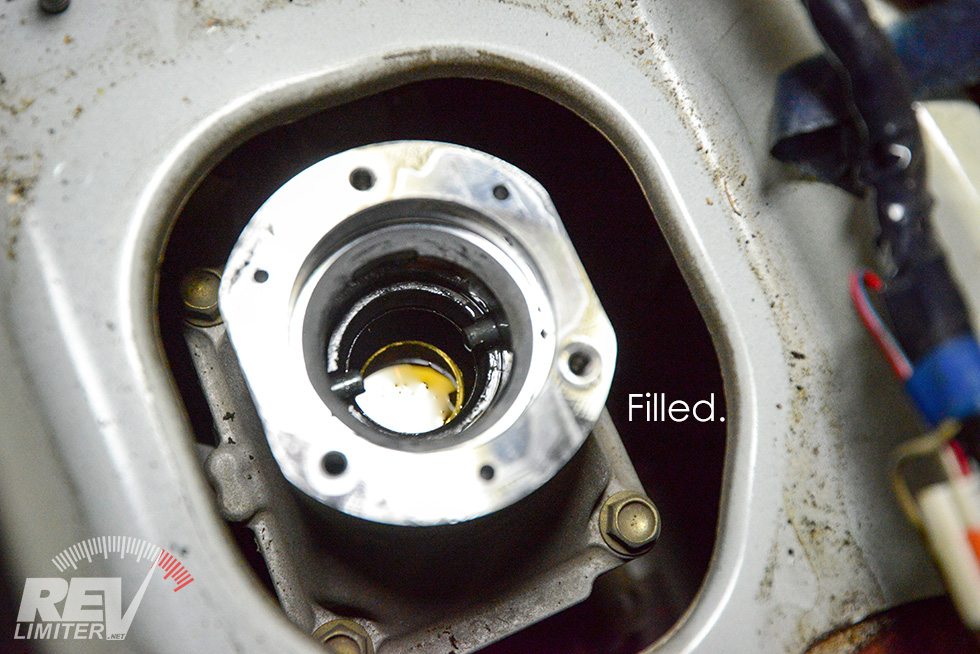
Nice and wet.
The shifter turret takes 80-230cc of GL4 gear lube depending on how much fluid is in there. Mine took the full amount.
You should also grease the top of the shifter above the ball as it is a friction point. Internet wisdom says “use grease.” I had some black moly handy. I’m not sure if that was the right one, but I put a thin film on the top of the ball and reinstalled all of the parts.
After this maintenance shifting was a night and day improvement. The notchy, sticky shifter went away and I was left with a precise Miata shifter similar to any NA or NB I’ve ever driven. I’ve not been locked out of first gear since doing this maintenance either.
Success? I think so.
I hope this guide helps some folks out. And if I’ve forgotten anything or messed up any fluid specs, please leave a note below.


Nice explanations. As neither a Miata owner nor a “car guy”, I’m likely an outlier in terms of your usual visitors. But I’m certainly a Maker and I find reading your site and your explanations fascinating and informative. Enjoyable reads and great photos as always. 🙂
Thanks Jason!!! It’s no R2 unit, that’s for sure. 🙂
That upper shift boot does wonders at keeping both heat and noise from the transmission out of the cabin. Drove the Supra around without the upper boot on for a few days as I was putting the interior back together, and wow, what a difference that boot makes.
Also, I absolutely stand behind the advice to always, 100% of the time, remove the fill plug first. I’ve been “that guy” who nearly couldn’t drive his car because he couldn’t get fluid back into the transmission or diff. Don’t be that guy.
On that note, for the love of all that is holy, do not use a 12-point socket or wrench on large 6-point bolts like the fill and drain plugs. Doing so will increase the chance that you’ll round off the plug. Six point bolt head, six point socket. Those sockets may prove a bit difficult to find, depending on where you are, but trust me on this one folks… do it right.
Well done!
concise and great photos in support.
Question: will filling the turret serve to overfill the trañny?
Would it be better to fill the turret and after doing so
replace the fill plug?
Im using the motorcraft lube to replace the lucas which
gave notchý first gear and at times second gear engagement.
Thanks
Oops – goofed up!
I jacked my 2011 MX-5 up with the front wheels on ramps and the rear lifted onto jack stands under the rear frame. This leaves the rear wheels and axles hanging.
After draining the differential fluid I cleaned and reinstalled the drain plug and pumped fluid until it dribbled out the fill hole.
When I checked the remaining fluid in the pump I found that the differential took more fluid than the “0.7 L (0.7 US qt, 0.6 Imp qt)”the manual says. Should I place the car with its wheels on the floor, undo the fill bolt and see if any fluid comes out?
Does having the rear of the car lifted with the wheels ‘hanging’ allow fluid to stay in the axle tubes. The car is sitting in the middle of the garage so any quick help woud be greatly appreciaated.
Thank you in advance.
Love this write up!!!!
Solid write up just like any other on your blog.
Just one thing to add.After looking at your pictures here and comparing them to my 5-speed equipped base model, it appears the fill plug on the 5-speed is actually a squared off 4-point 14mm bolt with no washer.
Mine had RTV on it when I pulled it off, though when I reinstalled it myself I just torqued it down and called it good.
Here’s hoping there’s no leaks!
Either way, bang up job as always man!
Cheers!
get an EZcarlift it’s worth every penny .
Good write up. Thx for posting.
Hey there! really appreciate the instructions. I have one minor addition I would request:
When removing the shift lever, be mindful of the bushing at the bottom of the shift lever. This will come up with the lever, and if you’re not careful, it can fall INTO the shift turret, which results in a minor heart attack while you wonder if the turret is wholly segregated from the transmission, followed by about a half hour of digging around in the turret with a coat hanger and a pair of needle-nose pliers. Not fun.
Just completed all of the above! Thank you so much for putting all this information together!
Chuck
Thank you, did the diff change today and the gearbox a while ago (UK 1.8 MX5). Instructions are perfect, including the M18 crush washers on the diff (seen other sizes quoted elsewhere but your sizes were correct).
Excellent guide. I’m preparing to change the oils in my car and this guide matches what I’ve been seeing online and on YouTube, but it’s the most concise so far.
I have a question though, see these instructions for the 5 gear or 6 gear manual transmission? I’m asking because I’ve read that the procedures are different but I haven’t found in what ways.
On closer inspection, this car appears to be a 6 speed manual transmission.
Nothing on 2012 nc automatic
– The engine oil change procedure is generally consistent across different vehicles, with variations mainly in the fluid weight depending on the region.
– The automatic transmission procedure is similar, with differences primarily in the type of fluid and a filter used.
– The differential fluid change procedure also follows the same pattern.
These general guidelines apply to the 2012 Mazda MX-5 (NC) with automatic transmission. If you require detailed, step-by-step instructions for your specific year and model, it’s recommended to consult the Workshop Manuals (WSMs), which are readily available online and free. These manuals provide comprehensive details on all procedures. If you’re unsure about performing these tasks yourself, it might be best to seek professional assistance.
Hi
My local independent mechanic doesn’t want to attempt changing the oil in the turret of my 2008 Miata 3sd manual tranny. I am thinking about attempting this task as my shifter has become a little notchy and I am hoping that by changing the turret fluid it will help. Question: does the fluid in the turret connect with the fluid in the tranny? Can I use the same fluid for the turret and the tranny? Some posts on the Miata forum say that the NC 6sp does not need oil in the turret? Can that be true? Thank you all, Brian
The post above above has an error. The tranny in question is a 6 speed manual not a 3 speed.
really great explanation! going to do all these to my miata soon! thank you
Very nice guide! Small correction: Rear diff fill plug is 23mm, not 24mm. In the “What you need” you need to correct when you say:
“I believe both plugs are 24mm”.
Cheers!
Awesome, thanks for the writeup and pics!
Thorough information and tutorial. These are essentially the first steps I accomplished when picking up a used NC2. Thanks!
Changing oils tomorrow on my NC 2.0. This guide is just perfect for doing so, thank you very much for the info (specially the washers sizes, which are a nightmare to find)!
Thanks for making this tutorial . Changed the oil in the diff & tranny yesterday. Until I read your post I had no idea I should be changing the oil in the torret. I did this this morning. I had oil in mine but it was not full, about 1/2 & the shifter had very dirty grease. I cleaned it serviced the resivoir & greased the shifter with white lithium grease which I found published from a page in the Mazda manual. Thanks.
Bro!!!! This post is so dam nice….
Just purchased a NC 2006 54K miles. Thank you for a great explanation.
Thank you for posting this. The motorcraft and redline fluid changes made a big difference. I also changed out the lockout plate when doing the turret fluid replacement.
Would either of those brands make a difference with the motor oil?
Thanks
Great writeup, thanks! One thing I’m curious about is if others had trouble reaching to specified torque for the drain bolts. On both the diff and transmission drain bolt, I felt the torque wrench “slip” a little when they were already at ~20ft-lbs which almost felt like a thread stripping but then it kept tightening. I stopped at probably closer to 25ft-lbs in the end and will monitor them for leaks
I looked in my factory 2007 MX-5 Miata owner’s manual, and for manual 5 and 6 speed transmissions, it says it can accept GL-4 or GL-5 75W-90 fluid. (page 10-4 Specifications) Any temperature = 75W-90, Above 50F = 80W-90
For the Diff it says = GL-5 SAE (90, 80W-90, 75W-90)
I’ve been searching high and low for a 1996 Owner’s Manual, but can’t find the recommendations… Online comments seems to suggest “whatever you do, don’t use GL-5 in your NA manual transmission or you’ll ruin it”, so I assume the ’96 may call for GL-4 specifically, but this is a guess.
Based on the 2007 OM calling for either GL-4 or GL-5 in the gearbox and GL-5 in the diff, I think there could be an argument for using GL-5 in both.
Now off to find a 1996 OM so I can dispell the rumors.
hands down the best auto article i have used. Humble and hands on
And I seee that I drained the transnrather than oil. Glad I did the transfluid was like hershey syrup
Thank you!!
And remember remember and if first and second gear are not shift incorrectly, you might have to change the reverse lockout plate the piece of plastic with the three screws and wears off, especially around first and second by the part from Mazda replace it and your shifting will be and feel amazing