

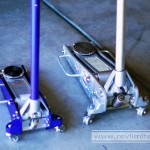
The TDR splitter and mounting parts.
I’ve not done an install and parts review for a while. I figured it was about time. And I’ve got a good one. The brand new Track Dog Racing Radical air splitter for NA Miatas with the factory airdam. It’s so new, TDR doesn’t even yet have it listed on their splitter page. I was lucky enough to receive one of the first ones produced.
And it rocks. It rocks hard.

TDR Radical vs Sharka's old splitter
I’ve had a small splitter on Sharka for years, ever since putting on the factory chin spoiler a decade ago. I remember it very well. I bought the spoiler and spent a weekend painting and striping it. I think I managed to drive 20 miles before I scraped the stripe all up and the paint was horrible. My downtown parking structure was very aggressively inclined.
So, I made something similar to the splitter in the top photo. Nothing like that existed for the NA at the time. TDR made an NB splitter, but nothing for the NA. I bought a sheet of 4’x8′ ABS plastic and carefully created my own splitter. Nothing very big and aerodynamic, just something small that would protect my lower lip’s stripe and paint from damage. Over the years I’ve gone through three or four of them. The one pictured has been on Sharka since after his big wreck.

Turnbuckle.
Lately, I’ve had the desire to upgrade it. My splitter worked fine at protecting the lip, but nothing much more. It really didn’t look great. It wasn’t bad, but it wasn’t great. I was thinking of making up a new design when I next got a break in gauge orders. I’ve always thought the little support turnbuckles were cool, so I wanted to integrate that. And I wanted something less understated than what Sharka was wearing.
And then Track Dog posted this new design on Club Roadster. It was exactly what I’d been dreaming of. I ordered immediately.
The Install

Prepped for installation.
TDR doesn’t require you to remove your airdam for installation, but I thought it would be the easiest way. I needed to remove my old splitter anyway. And man, do I hate laying on my back under the car for things like this.

Splitter clipped on.
They tell you to use binder clips to attach the splitter to the airdam for hole drilling. THAT is a heck of an idea. I’d never thought of that before on any of my previous splitter installs. I always struggled with drilling that first hole and then used that bolt to get things going. Binder clips make things a lot less cumbersome.
Notice how there are already holes in Sharka’s airdam? Yeah, we’ll get to that next.

Seriously bolted on.
The holes in my DIY splitter were offset from the TDR splitter holes by almost exactly half. The 12 holes I drilled were right in the middle of the 13 holes in the TDR splitter. I originally planned to just drill the matching holes in the TDR splitter so I’d not have to have extra holes in Sharka’s airdam. Then I thought a few more holes couldn’t hurt.
As you can see, ever hole has a bolt in it. This is known as extreme overkill. But there should be zero gaps between the splitter and airdam. Gaps were always something that I struggled with on my old versions.
TDR supplies nylon hardware with most of their splitters, but they send regular metal bolts with their Radical versions. Seems logical to me. Still, since I was going overkill with the bolt holes, I decided to use SOME nylon hardware. All of the corner bolts on my installation are nylon. The center area uses metal and the very far paired edge bolts are metal, but those corners that stick out got nylon. Not sure if that was a good, great, or horrible idea. Time will tell.

Splitter and airdam as one.

Get that car a spoiler, STAT!

Binder clips to hold the airdam in place.
The binder clips were perfect for this job too! Usually, I’m left laying on my back with the airdam sorta supported by a spare jack stand and my foot while I try to bolt it in place. This time, a few binder clips made life easy. Huge props to TDR for this idea.
Ignore the coroplast belly pan. That’s something for a future blog post.

Extra bolt #1 in the inside edge of the duct.

Extra bolt #2 in the outside edge of the duct.
Another suggestion in the TDR install document was to drill some extra holes in the bumper to keep it from deforming. Each little duct hole gets a pair of bolts added to it on either edge. Great idea!
TDR supplies bolts for this, but I wasn’t able to drill straight enough to use them. In other words they were too short for the holes I drilled. I grabbed a handful of capscrews from my stash and zipped them on. They look way too long in the above photos, but… eh, they worked. I might swap them out with something shorter next time I have the airdam off.

Remove this plug...

... and install the upper turnbuckle support.
The turnbuckle mounts to the bumper through a convenient hole in the skin. And there just happens to be metal behind that hole. It’s like Mazda designed it for this exact purpose.
One thing – tighten these things down with a wrench. I did them finger tight at first. After about 2 miles, one of them worked its way free and was resting on the lower edge of the mouth. Fortunately, the bolt remained in the hole. A stubby wrench is the tool for this job. TDR supplied bolts with 11mm heads with my kit.

Lower turnbuckle support.
You drill a hole for this one. Since every install will have these holes in a slightly different spot, TDR leaves it up to the owner to drill this final pair of holes. I’d suggest measuring many times. Mine ended up 1.5″ outboard of the corner vertex and 1″ from the outer edge of the lip.
Mounting the supports out at an angle like this is really the best way to do it. The factory airdam will make the splitter want to angle upward slightly on the corners. Putting the turnbuckles on the corners and forcing the splitter back down lets you achieve a nice, flat angle of attack.
And that’s it! Really not much to the install. Nothing tricky.
Installed Photos

Front angle.

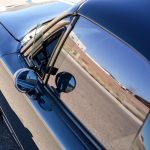
Side view.
I believe I mentioned about how this splitter rocks above? Now you can see for yourself. I love it. It really is exactly what I had pictured in my mind.
I wish I’d been able to do all of the installed shots with film like that side view. I drove out to my chosen photo location with both cameras and discovered I only had three frames left on my film roll. Alas. At least I also brought the digital…

Sharka looks happy.

Driver's side angle.

View from above.
Yeah, it’s a winner.
If you’d like your own TDR Radical splitter, hit their website. If it’s not listed, give them a call.


I really like how this splitter came out on Sharka!
Thanks! I’m pretty happy with it myself.
I finally found something I’m not a fan of on this car lol
It’s mainly the turnbuckles that don’t do it from my point of view ( I don’t like them in general), and the splitter is a bit too wide on the sides to my taste, I would imagine better something that matched the R-lip lines at the end.
But it’s on front above views, I pretty like it viewed from side and side angle. I also think you should photoshop this to see how it would look in flat black.
In all honesty, just wait a little bit. There’s a pretty good chance this splitter will not make it through too many winters. The turnbuckles are, apparently, the first thing that goes. They don’t really flex or anything when they hit something. The just sort of bend or break. 🙁
But I’m gonna see how long it lasts. Got my fingers crossed that it’ll be at least a little while. If it breaks extremely quickly, I’ll probably just make another small one.
Adam,
Great write up. I think the reason you had trouble drilling the holes straight for the corner of the air ducts is because you had the splitter already installed. Without the splitter installed, you could have flexed the R-Pkg spoiler enough to drill them straight. Just a thought.
Great photos. We WILL be using them!
VERY good point. In fact, I was thinking that when drilling those holes. There was zero flex in the splitter/airdam combo. Oh well. At least the holes are in there, in the right spots, and aren’t TOO angled.
Hope you sell a ton of these!
Something about the combination of kick ass photography and clear, frank fully comprehensive text makes this blog a great read.
I love all your posts even when they are not to my taste.
Splitters (on a road car) are only useful as disposable items to protect your low spoiler from being crunched. I think you mentioned this already. LOL
Long may you post.
ha! Thank you sir!
And yeah, I have no allusions to this splitter making downforce or anything. It’s just for 1) looks and 2) lower lip paint protection. Since my last one was only for paint protection, I’m enjoying a slightly different look. I’ve wanted to do a splitter with the little turnbuckles for a while now.
It took a pretty good hit while driving around yesterday afternoon and stood up fine. I’m quite pleased about that! I was worried it would be much more prone to self destruction than my smaller ones.
[…] Track Dog Racing Radical Splitter Review — revlimiter.net Full review by revlimiter. It's not a splitter, just an appearance thing. Granted it looks great on his car, but not really a functional splitter. […]
So does Sharka not have the factory splashguard/belly pan any longer?
Nope. I’ve got a much more efficient DIY ducting in place now. It’s night and day difference from the stock panel.
This looks great! Makes Sharka look more aggressive. Very tempting for me to get one…
Does TDR supply the turnbuckles, or did you have to request some for Sharka’s splitter? Took a quick glance at TDR’s splitter page and they don’t use turnbuckles in their pic.
I just checked and this one isn’t on the TDR page yet. It’s known as the RADICAL splitter. There’s an NB model, but not the NA yet. Looks like you’d still have to call to order this part.
They supply the turnbuckles.
Hey I was looking into getting the TDR splitter but I just feel like its too agressive. How much would you consider to sell me your smaller version of it for? The one in the first picture… I really like it and I feel like it would fit my roadster perfect!
I think TDR offers something similar to that, don’t they? I made mine when they only had the NB version available. Then they came out with an NA one a few years later.
Sorry, but I’d not want to make one. It required a lot of work and forming to the lip to make it flat. The TDR one just bolted up and was perfect from the start. Besides, I don’t have enough ABS in my shop to make a splitter at this moment. But thanks for the complement!
* Sorry I meant the one in the second picture down, next to the TDR one
Love this write up, thinking of purchasing one for my MX5, guessing it will also fit on to a GV lip?