
revlimiter Gauges (Version Stirling) - waiting for some attention.
Your Shopping List
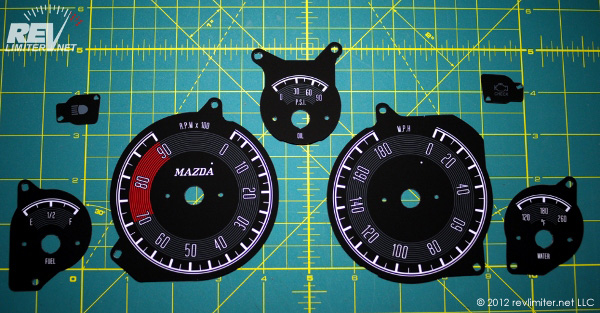
- A set of genuine revlimiter Gauges. - You can buy them right here on this site! Check out the revlimiter.net Store. Other gauges may be of lesser quality or not compatible with the steps below. Don't settle for anything but the best!
- Powder-free gloves - These come with your gauges. Because you'll never be able to wipe off finger prints from most gauges, including your old stock ones.
- Pry tools - These come with your gauges. This is to remove your gauge needles without damaging the old gauge faces.
- Needle Stoppers - These come with your gauges. If you have an old set of gauges before I started shipping needle stoppers, you can follow the steps below to liberate the stoppers from your OEM gauges.
- Dry dust cloth - This comes with your gauges. It's normal for gauges to become a bit dusty while you work on them. This cloth gets them looking good before sealing up your cluster.
- Paper towels.
- 2 Phillips screwdrivers, one fine (#0) and one regular (#2).
- Needle-nose pilers - to nibble out plastic from behind your tach and speedometer faces.
Frequently Asked Questions
- I have an NA. Is it the same process?
It's very close. I did the NA instructions before I wrote up this set and even used a few NA photos below. Hit my NA Gauge Install. - How do I install the needles?
Whoa whoa whoa. Getting a little ahead of things! That section is at the bottom of this document, under Setting the Needles. - I got a smudge on my gauge. Can I wipe it off with rubbing alcohol?
NO!!!! No liquid should ever touch your gauges. Water, rubbing alcohol, spit, nothing. You can wipe the gauges a bit with the included dry dusting wipe, but not with anything else. If you have a smudge, don't worry too much. Try installing the gauges and see if you notice the mark when the plexi is in place. Mistakes like that usually vanish once the gauges are covered and in the shadows of your dashboard. - Where can I get the gauges in these pix???
I sell them here on this site! Check out the revlimiter.net Store. - What's the deal with those funky gauges with non-stock zero positions?
Miatas are quite blessed from the factory in that the tach and speedometer are round with the needle in the middle. The gauges have absolutely no idea where o'clock the needle is pointing. As long as you follow the Setting the Needles section correctly, the gauge will think that zero is zero. It doesn't matter if zero is at the stock 7 o'clock position or anywhere else. It will rotate all the way around and stop before it loops back on itself around the stock 9500ish mechanical hard stop. - How do I know the tach is accurate after doing this?
There are a few tricks, the best of which is using an OBDII scanner with live view to check your gauges against the ECU. Really, a fine way to assure yourself of yourself of tachometer (and speedometer) accuracy is to take some readings before you crack anything open. For example, an NB with the 5 speed and 4.3 diff will have 2500 rpm as the sweet spot. 2500 in 3rd = 30 mph. 2500 in 4th = 40 mph. 2500 in 5th is just a hair over 50 mph. But take these readings for your car and don't take my word for it. Different tire sizes will change even the list I just typed. After you're finished with the gauge face install, check your speed and gearing against your own notes. - Will this make my odometer read wrong?
No. The odometer is not affected by this job. Removing and reinstalling will not change it. But your trip odometer will be reset. Some folks use that to track their mileage (including me) and this fact is nice to know before you put the cluster back in only to see 0 on the trip meter. - What happens if I don't hack out the extra plastic behind the tach?
That area on the bottom will not light up at all. It will be a perfectly black area at night. This is fine for a stock-style gauge with zero at 7 o'clock, but for any other gauge it will look a bit silly. Really, it's very easy to hack out that extra plastic. - What about the little corner indicators (CEL and high beam)?
This is a lot like the relocated check engine light, but with more work. Go to the corner indicator mod section to read about it. - This looks scary. Can you do the install?
Of course! I have an installation service available. Please click this link and read about what the installation covers. NA/NB owners will have to still align 4 of the 5 needles yourselves, but all of the hard work is already done for you. - Some other shop sent me to this page. Is it cool if I use the info here?
Well, sure! The thing I enjoy most is helping out my fellow Miata enthusiast. However, I'd greatly appreciate it if you would drop me a note and tell me about these other manufacturers who are ripping off my hard work. - Why does the bottom part of my tachometer (or area around the high beam light) stay dark at night?
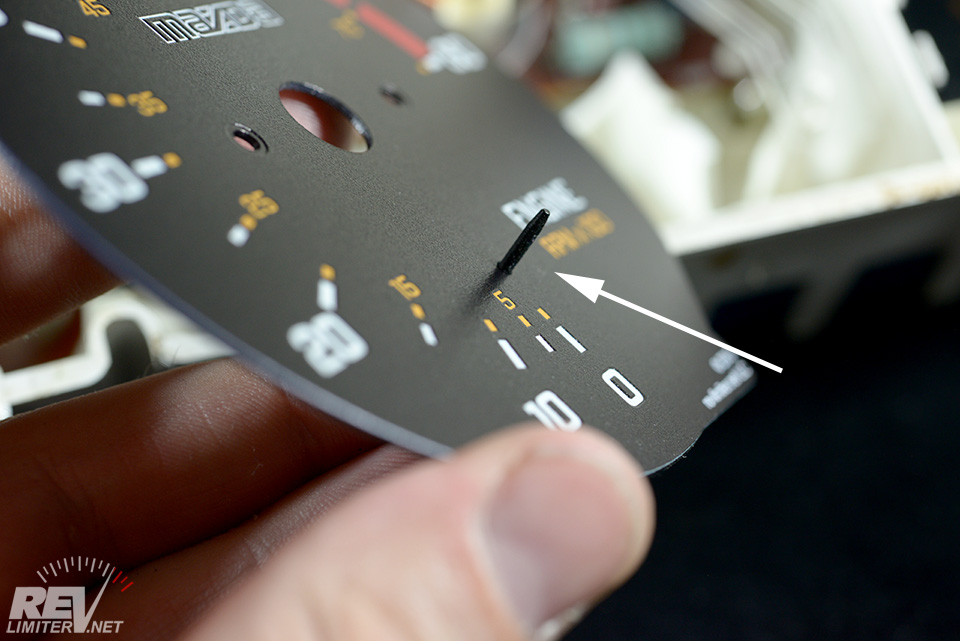
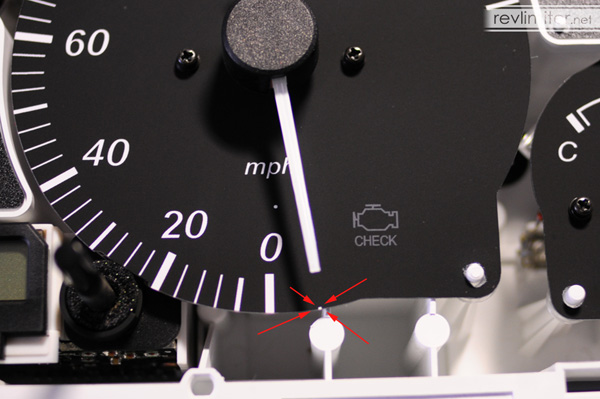
You need to follow the steps below. The partitions around the three indicator lights have to be cut out. It isn't hard to do this, but if you ignore this step, the bottom of your tach and speedometer will not light up. - Calibration mark method:
See the tiny dot with all the arrows pointing to it? This is where you should point the speedometer needle. You can do this with
the needle stopper installed. The needle center "hub" is long enough to contact the pin and still clear the needle stopper. Please
be careful if you have glue-on needle stoppers. Don't bump it and accidentally knock it off.
Point the needle at the calibration mark and very very lightly press it on. Leave room for it to clear the stopper. Wind the needle up to 20 or 30 mph and let it fall back down. Does it go back to the mark? Good. Now lift it back up to around 30 mph, and press the needle center down toward the gauge face. Don't press too hard! You don't want the black center making contact with the face. Just press it down enough so that it makes contact with the stopper and zeroes. - OBDII reader method:
The OBDII reader shows your speed while driving. Factory needle calibration is a couple MPH slower than the ECU reports. So, if your computer is showing your speed at 27-28 mph, set your needle at 25 mph. Very carefully set your needle while driving. It helps to have someone along as a co-driver/passenger. Again, be very careful. I am not claiming responsibility for careless driving. - GPS method:
Another way is to use a GPS app on your phone that displays speed. Get up to an even speed and have your co-driver read from your GPS. Again, factory speedometer calibration is a couple MPH slow. If you're used to this calibration, it's best to reset the needle to that speed. Otherwise, it's far too easy to drive faster than you're used to and get tickets. Been there, done that. - My (speedo/tach/etc) needle seems to get stuck. What's going on?
99% of the time, the problem is too much force being used when you installed the gauges. If the black needle center comes into contact with the gauge face, it won't be able to spin. You don't need Hulk-levels of force to install the needles. Just place it on the needle boss (the metal pin) gently and verify that the gauge is reading right. After that, give it a small extra nudge to seat it. Then look at the gauge at an angle to verify there's space between the face and the needle center. - My speedometer needle jumps all around. And then it died. Help?
The NB speedo is driven by a small generator in your transmission. And that little thing can die at any time. I did a blog post about fixing a dead NB speedometer. You just need a jack, soldering iron, and solder to save yourself $200. - My water/oil gauge needle is droopy after the install. How do I fix it?
All of the 3 small gauges have an internal needle stopper at about 6:00 underneath the needle center. It's a small plastic thorn that pokes out of the clear gauge holder. Your water temp gauge needs to have the needle pressed on just slightly harder so that it can come in contact with this internal stopper. Raise the needle manually to about halfway and press it on slightly harder. Then let it drop. If it's still droopy, do this again. Just don't let the needle center touch the face or it won't be able to move at all. - My fuel gauge needle doesn't go back to zero after the gauge install?
Yup. And it didn't fall back before the install either! The NA and NB Miatas have fuel needles that don't fall back to zero when you turn the car off. It's supposed to work like that. You just never noticed it before the gauge install. - Why does the bottom part of my tachometer and speedometer stay dark at night?
The partitions around the three indicator lights have to be cut out. It isn't hard to do this, but if you don't read the whole tutorial and skip cutting the partitions out, the bottom areas in your tach and speedo will not light up. - Why is there a dark spot in the tach around 10:00?
It's the exact same problem as above - you didn't trim out a partition. Please scroll up and follow the instructions for the high beam silo. It needs to be trimmed a bit.
Gauge Cluster Removal
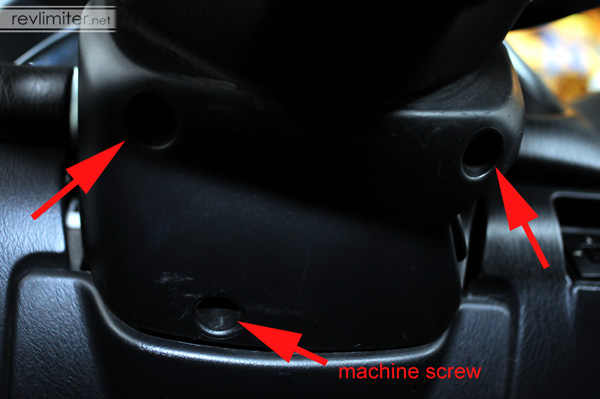
To get access to the gauge cluster, you need to remove two plastic panels - the steering column cover and the gauge hood - and 3 screws. Check out the diagram above and whip out your #2 Phillips screwdriver. Tackle the column cover first.
After removing the 3 screws, just pop the top of the steering column cover off. The bottom half stays in place.
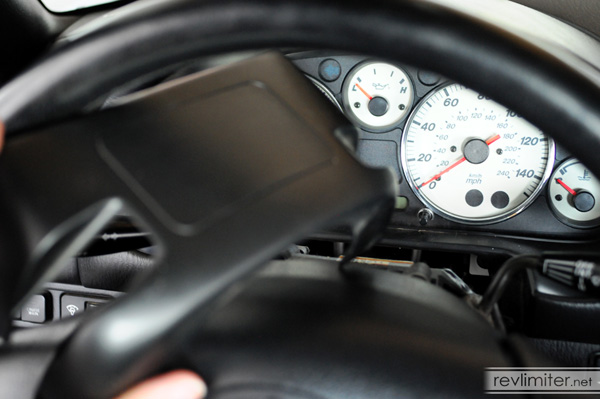
No screws need to be removed to get the gauge hood to come off an NB. It's held in place by 5 little metal pressure fittings - 1 each on the lower front corner and 3 around the far back curve.
This particular plastic piece is notoriously delicate on NA cars. On the NB, Mazda used a slightly more forgiving type of plastic. It bends before it breaks. Still, you should be careful. But not too careful. Prying gently can make the plastic tabs gently tear free from the gauge hood. A forceful yank forward (toward your face) should get the hood off in one piece.
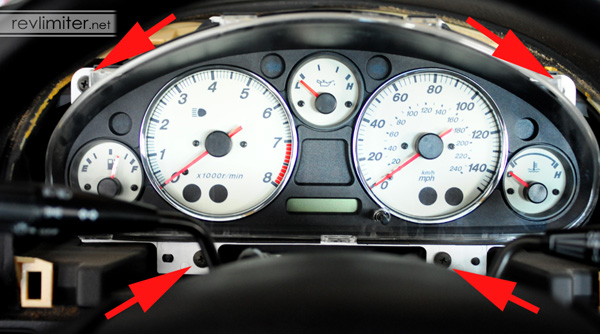
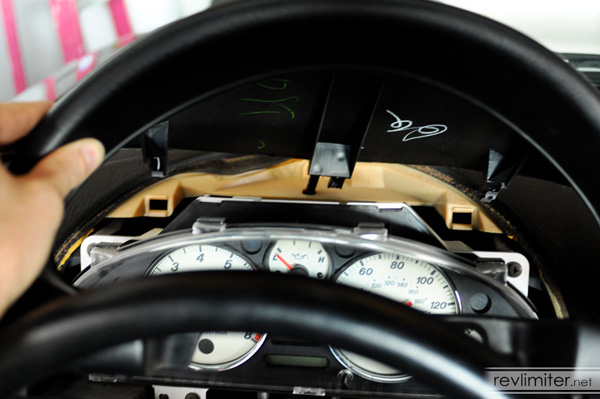
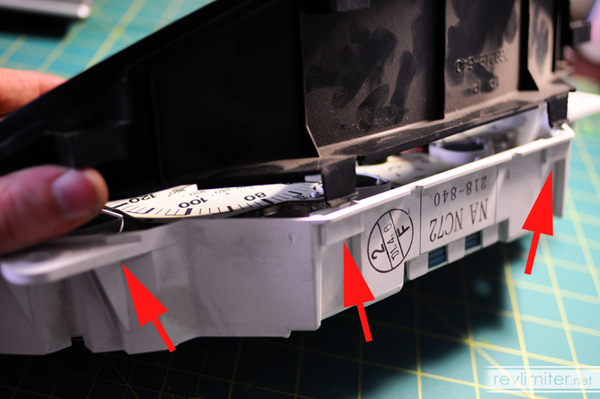
4 screws are holding the cluster in place. Well, 4 screws and 3 plastic clip connections on the back side. We'll get to those in a minute. For now, just remove these screws and set them aside. Then pull the cluster forward slightly (less than 1 inch or 2 cm) to give yourself a little room in the back.
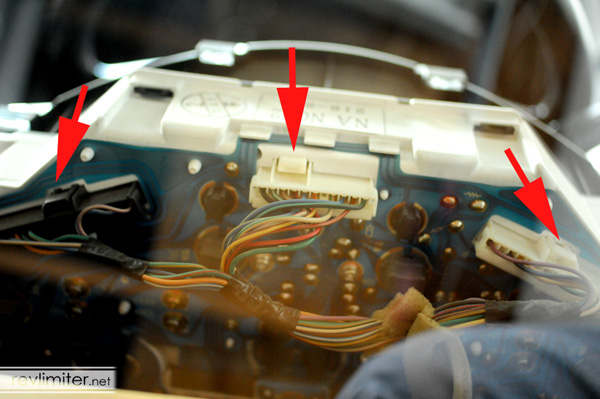
There are 3 electrical connections to remove on the back. There should be enough slack in the wiring harness so that you can pull the cluster forward and see what you're doing. Pull each and either take your cluster inside to swap gauges or continue on to the CEL relocation step.
Stock Gauge Face Removal
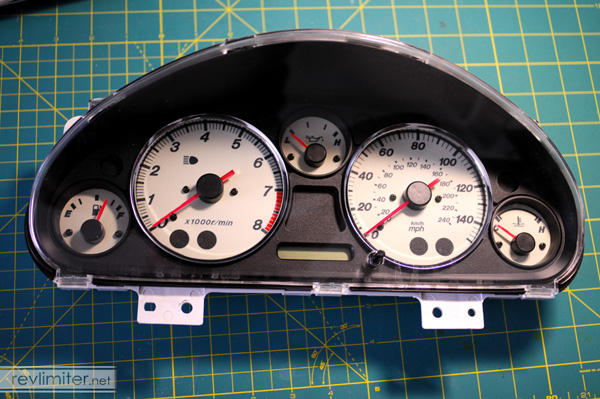
Take the cluster out of the car and to a comfortable, dust-free work area. You might consider putting on your gloves now. No gauge face I've ever seen is able to have finger prints or skin oils wiped clean, not even the stock ones. If you think you'll ever want to go back to stock faces, put those gloves on now.
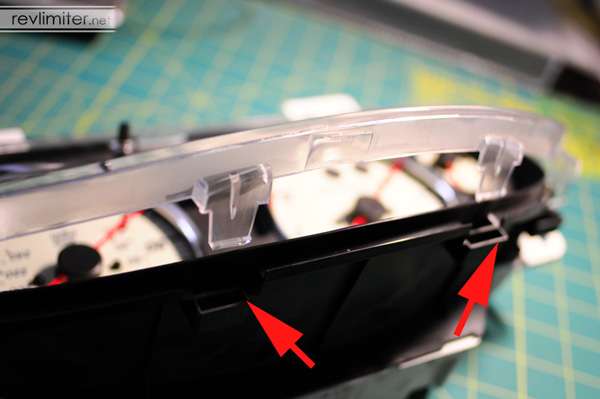
NB clusters have two steps to get the front cover off. You remove the "glass" and then you can remove the plastic gauge bezel. This is really a lot easier than the one-piece NA bezel to remove. The tabs are bigger and more forgiving to your thumbs.
Just take your thumb and press a tab inward. Then sorta hold the bezel up with the other hand and move your thumb to the next nearest tab. Once you get two popped free, you're good. The rest come out easily. And this trick is the same for the clear glass cover and the black plastic bezel.
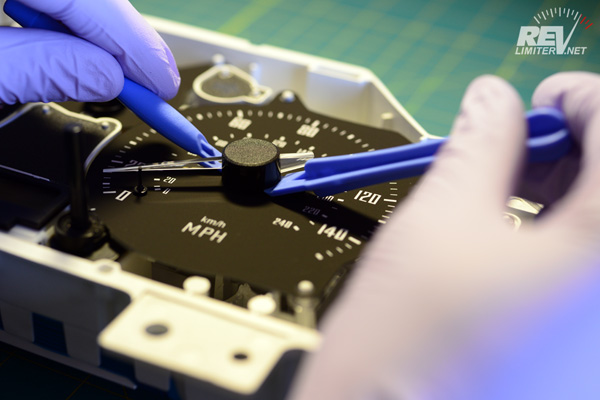
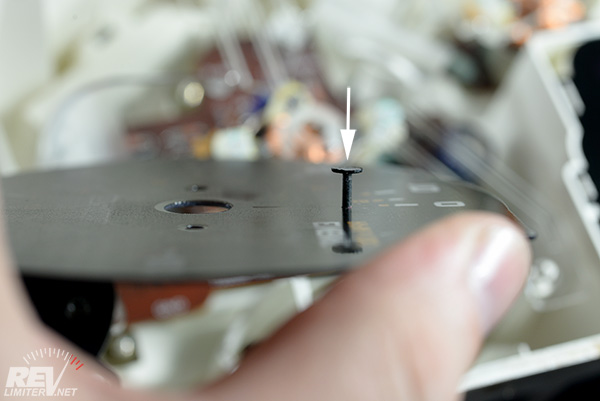
Next, it's time to remove your needles. There are no better tools in the world for this than these small plastic pry tools. I include them with every set of gauges. Using the face mounting screws as a fulcrum, put one pry tool under either side of a needle...
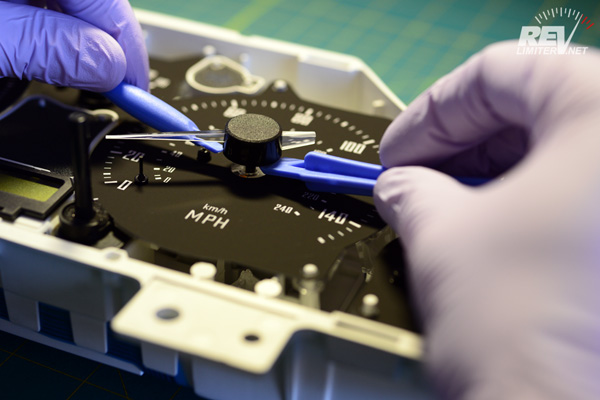
... then just lift up! The most stubborn needle will pop free with very little effort and no damage will come to your gauge face. If you rush, you might scratch the face slightly with the back of the pry tool, but any damage should be under the needle center itself.
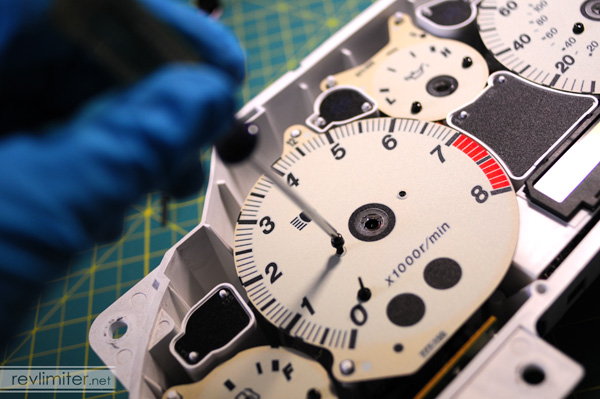
Finally, out come the small screws holding the gauge faces in place. Use both hands when holding the screwdriver to avoid it bouncing off and scratching a face. Be careful, since the metal is quite soft and the screws strip easily. Set the screws aside for re-installation in a moment.
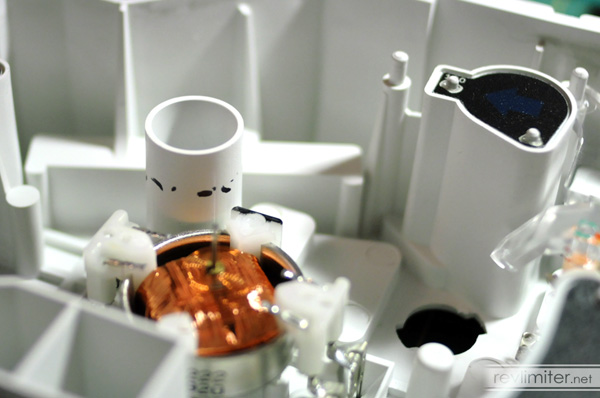
Dummy Light Housing Trimming
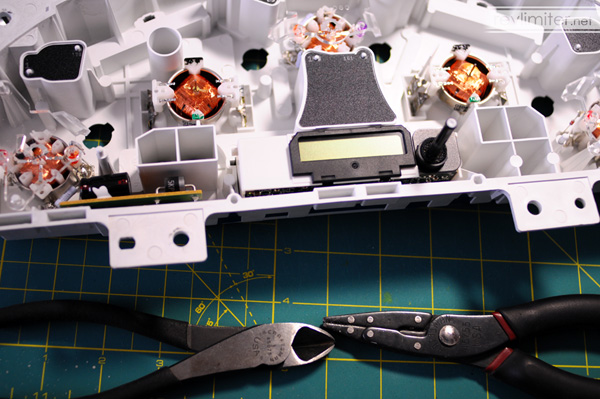
If your new revlimiter Gauges put the tach or speedometer zero position in a different place than the stock 7 o'clock spot, you'll need to modify your cluster a bit. Notice the little boxy sections of plastic at the bottom of the tach and speedo? Those need to get modified. And the big bad tools in the foreground are what you need to do it.

My favorite way to accurately chew away the plastic in an NB cluster is to start with some nice slices like this. Take the wire cutters and take quite a few bites out of the plastic. The more cuts, the better you'll be able to do with the pliers.
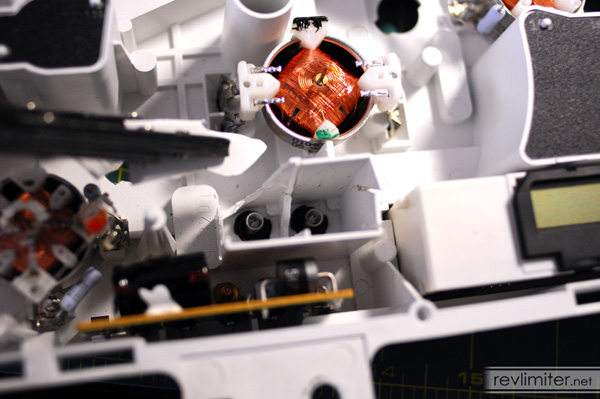
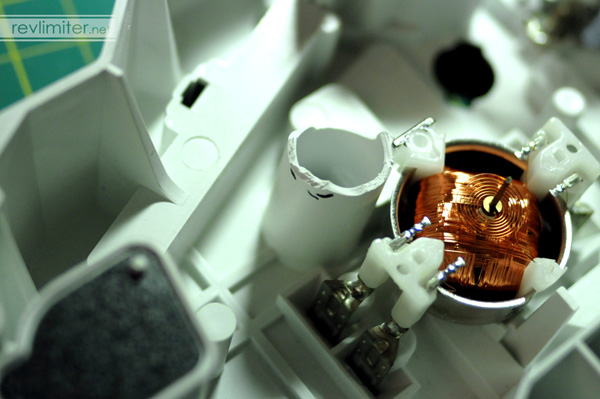
You can see where this is going...
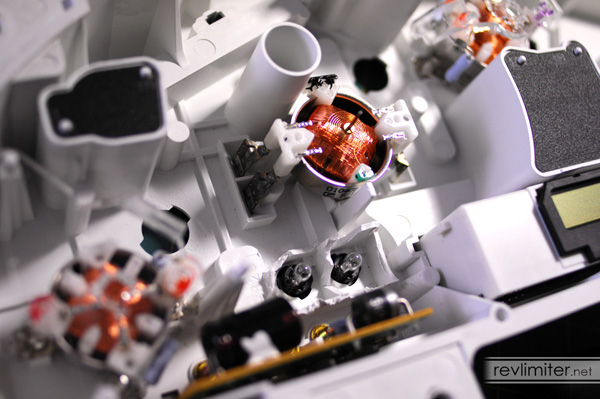
And there we have it. This will enable your tach to light up evenly at the bottom. If you ever want to go back, you can glue or tape a small tube of something in place to make up the space from the cluster to the bottom of the gauge face. A chapstick tube glues on nice, but those little cardboard tubes they pack around a new sparkplug's electrode work great.
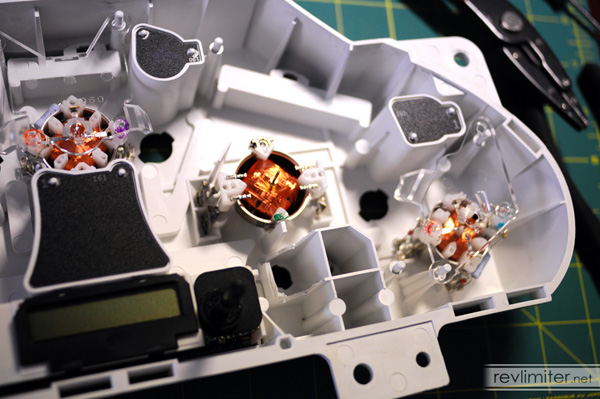
A little extra care should be used with the speedometer indicator lights. If your new gauge style doesn't include a CEL, just hack all of the plastic away like you did with the tach. If your new gauges relocate the CEL to the next spot over, you'll just remove the left side partition. If your gauges came with the corner indicator pieces, trim out all partitions on the speedometer.
Lastly, the high beam indicator. If your revlimiter Gauges came with the corner indicators, you will need to chew away just a little bit in order to get even lighting on your tach face.

I like to just use the wire cutters for this. Pliers just make a mess of it.
And there we go. Just a little off the top. Mine looks a bit jagged here, but it doesn't matter. The light will still shine through nicely and light the surrounding numbers.
Bulb Mods (LED and otherwise)
If you have an NB with the factory green lighting and are wanting to change to something else, you'll need to remove the green condom. And if you have an NB with the factory orange lighting and want to change to something else, you'll need to remove the red condom. Pretty simple, yes?
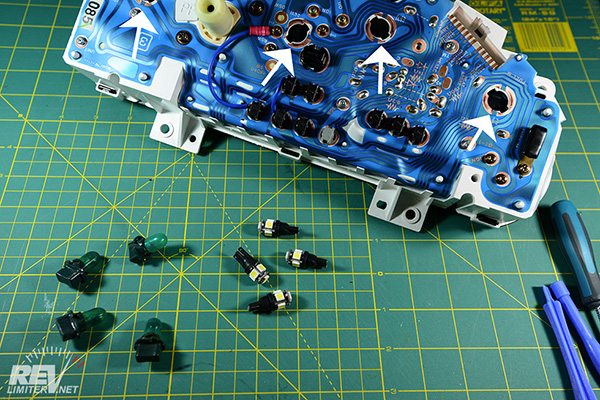
If you ordered LEDs with your gauges, now is the time to install them. You'll have to remove your stock bulbs from the twist bases. This is pretty simple with a couple photos. Without the photos, it can be pretty confusing.
The green or black base and bulb come apart. Just pull! It's easiest with gloves on your hands and the stock green cover on the bulb. The two parts should come apart very easily.

Plug the LED bulb into the base. If the fit is loose, take a small screwdriver and pry the connections inside the base out away from the walls slightly. Just enough to give a good fit.
Lastly, you need to know that LED bulbs have a polarity. They can be installed backwards and not light up. This can be beyond annoying to find out after you've tightened the last screw on your gauge install. You should test-light your cluster before you button the car up. Any LEDs that don't light can just be unscrewed, rotated 180 degrees (no need to remove the bulb from the twist base) and reinstalled in the cluster. On the NB, the plug in the center above the oil gauge is the one that controls the lighting.
Gauge Face Installation
PUT YOUR GLOVES ON. You will working with your new gauge faces a lot now. They are extremely resilient to cleaners and the elements, but it is still WAY easier to wear gloves and not have to clean anything than not wear gloves and spend a half hour carefully cleaning fingerprints off your new gauges.

Hold your new revlimiter Gauge face by the edges. Hold the needle stopper with your free hand. Poke the stopper through the face.
If it's hard to get the stopper through the tiny hole, twist the stopper while you insert it. A drilling motion will let the stopper get through the face without much pressure.
The needle stopper should stay in place by friction. If it doesn't, apply a small piece of clear (Scotch) tape to the back of the needle stopper.
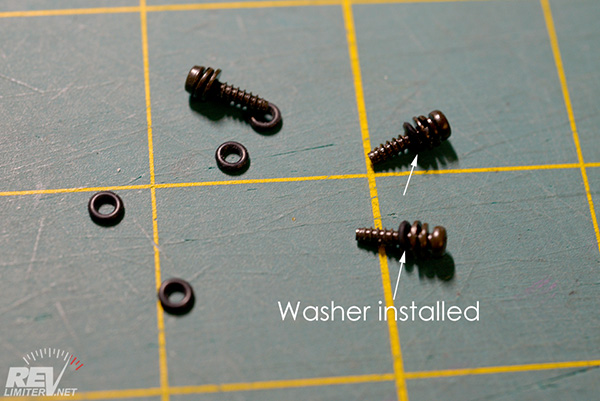
Remove the 10 tiny rubber washers from the bag and install them over each gauge screw. These are VERY important.
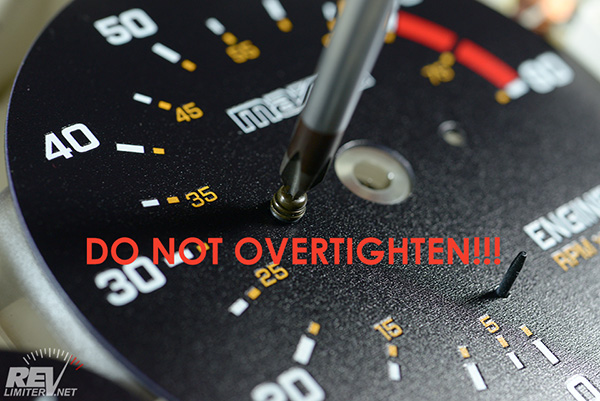
Screw your new gauge faces into place. Do not over tighten the screws!!! Too much force can destroy the finish on the gauge face. Just get the screws barely tight.
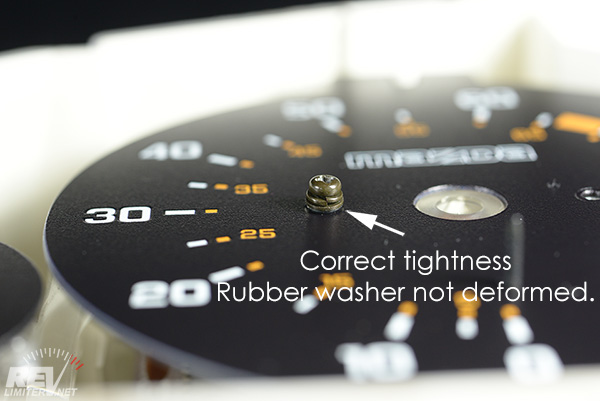
The rubber washers not only allow the gauge face to expand, they also help you to know how much force to apply when screwing the face down. In the above photo, the washer is still round. This is the correct tightness.
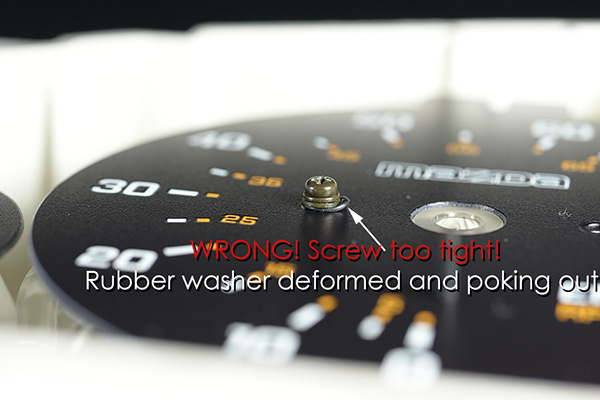
The rubber washer will deform and poke out from the screw if you tighten/torque it down too much. If you see a washer poking out, unscrew the fastener until the washer is round again.
I will say that again as this is very important. DO NOT OVER TIGHTEN THE SCREWS!!! You will destroy the finish on your gauge face if you do this. Just BARELY tighten the screws (1 inch lb) so that the screws barely touch the face.
Wiring the Corner Indicators
This section has a lot of photos for very little work. What you need to do depends on the gauges you ordered. If your gauges have corner indicators (the small plastic panels) for both the CEL and high beam, you'll need to follow all the steps. If you have a CEL but no high beam panel, you'll need to only do the CEL mod. Use common sense and really read the below sections.Do you have a set of older gauges that didn't ship with the wired sockets? Go read the OLD CEL/Beam wiring guide. The wired sockets started shipping with gauges around April 2016, so if you ordered before that and set the gauges aside for a while, you'll need to follow the old CEL/Beam wiring guide.
Indicator Light Overview and Tips
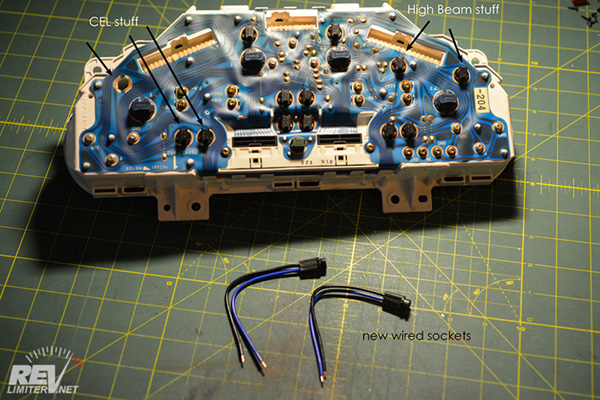
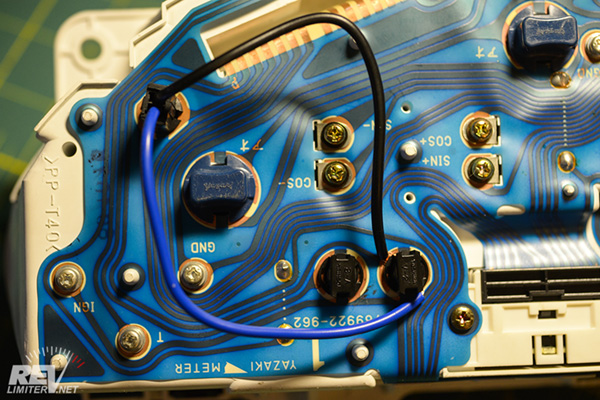
Your gauges shipped with between zero and two of these wired sockets to help you relocate your CEL and high beam lights. With your cluster laid face down, the CEL stuff is on the left and the high beam stuff is on the right.
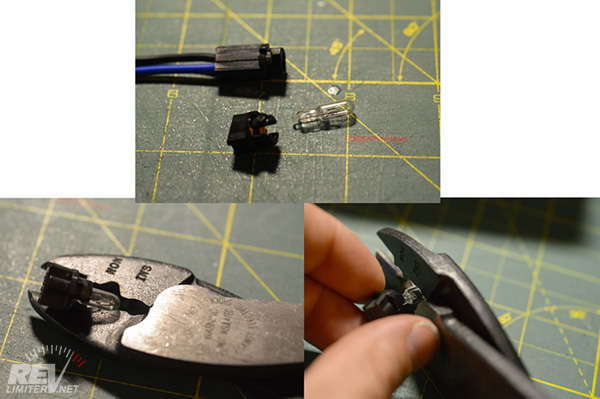
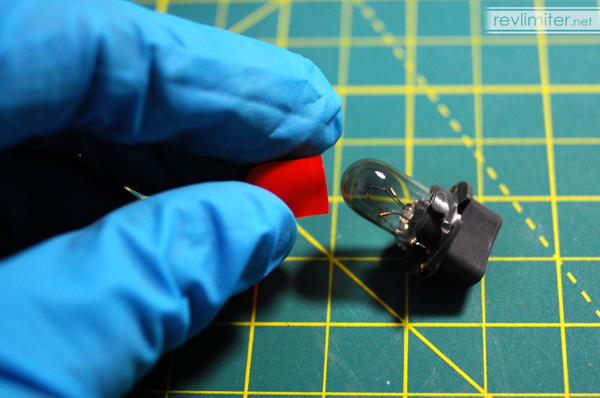
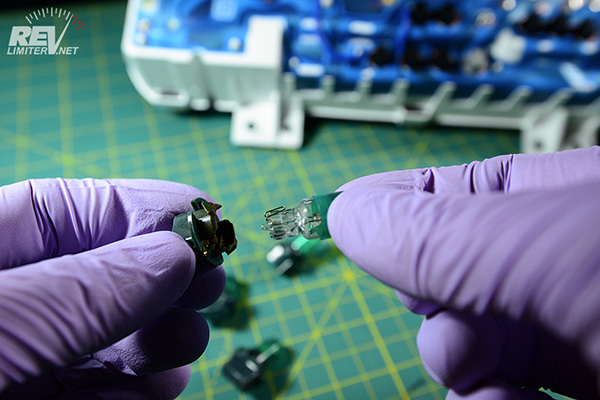
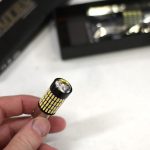
To make the wired sockets work, you need to remove the OEM bulb from its socket and put it in the new wired one. It can be hard to do this. A curved tool like an insulated terminal crimper will help. CAREFULLY grab the bulb with the crimper and wiggle it up and out of the socket. If you grip too hard you'll smash the bulb (it's a #74 that you can get from any auto parts store), so be careful.
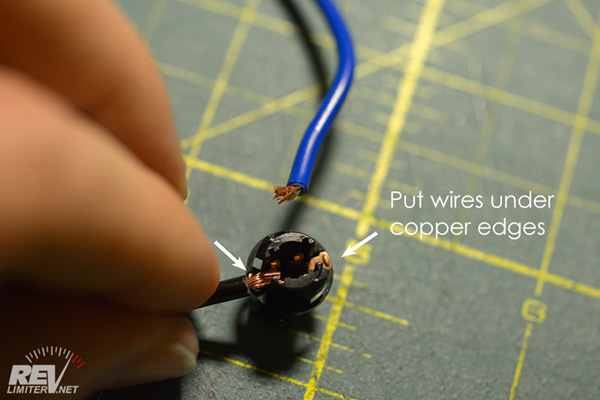
To connect the new wired socket, you place the wires under the copper terminals on your OEM socket (the one you just removed the bulb from) and twist it back onto the cluster. Pressure will hold it in place.
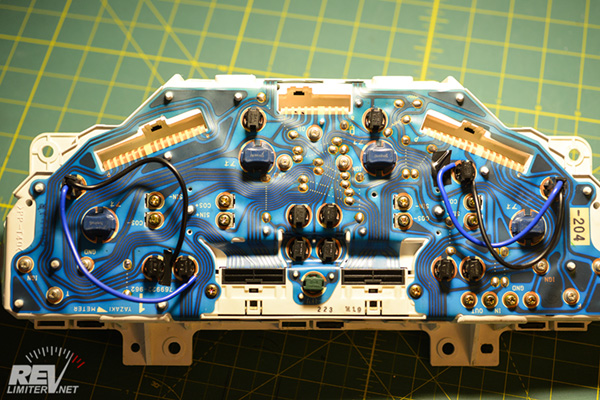
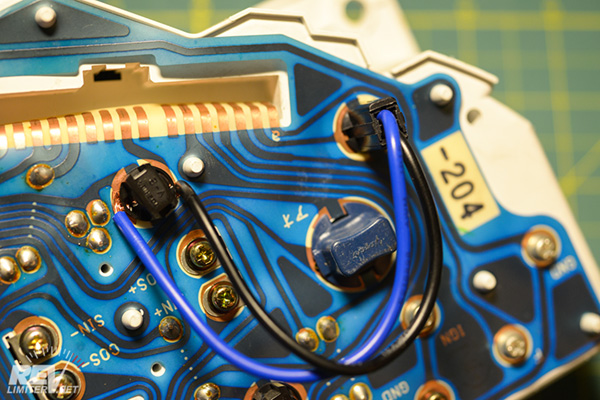
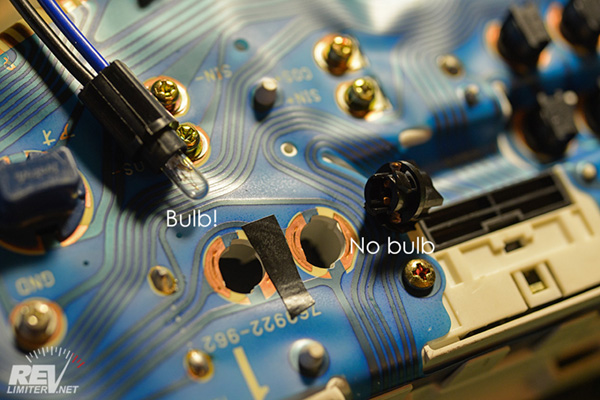
This photo is jumping ahead to the end. It's just here to show you how things will look once you're done installing the wired sockets.
High Beam Indictor Install
If your new revlimiter Gauges features a new indicators piece for your high beam, you'll want to do the work in this section.
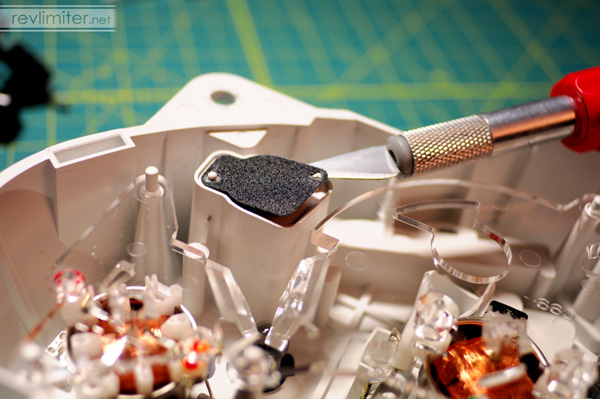
You start out by prying off the small corner indicators. They're held in very tight. A blade or sharp screwdriver will help you get them out.
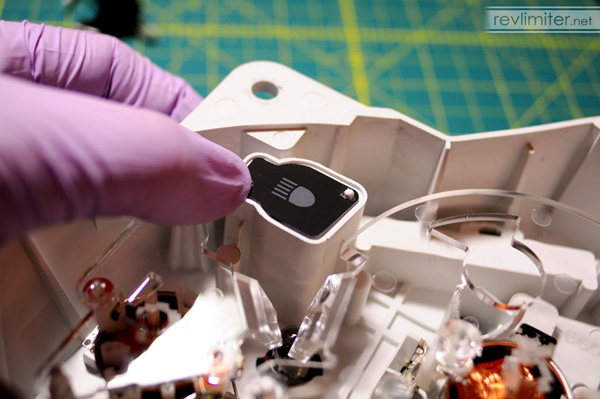
The fit on your new ones will be as tight as the stock indicators. You'll need to apply pressure to get them over the little posts. Do this without touching the face of the indicator. A gloved fingertip directly over the post will work.
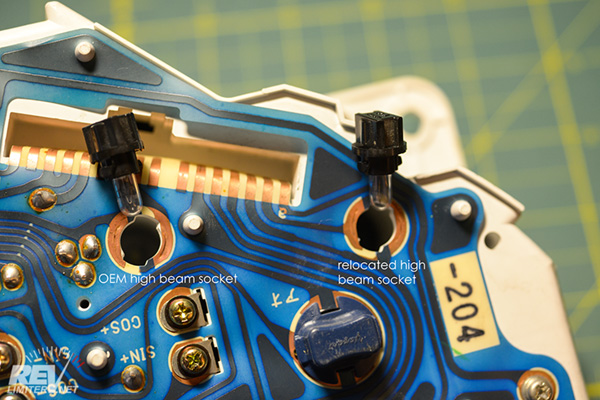
As mentioned above, turn the cluster over and look at the right side. The two upper #74 bulbs are what you'll be working on.
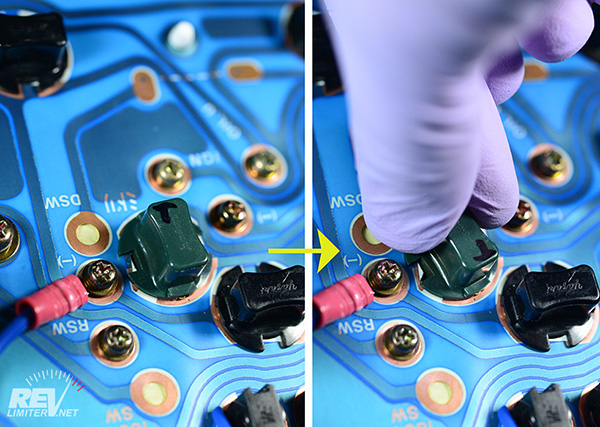
Remove the bulb from the OEM high beam socket and install it in the new wired socket. Keep the OEM socket handy because you'll be using it.
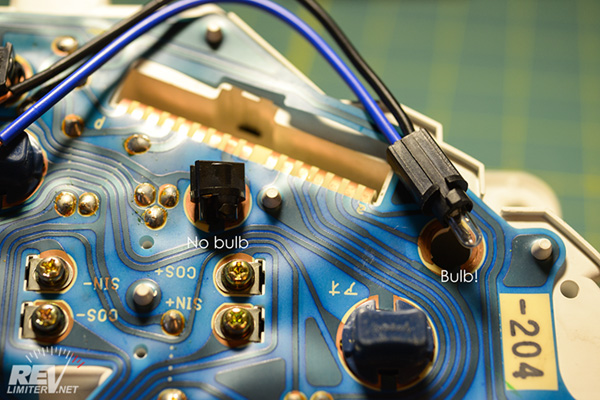
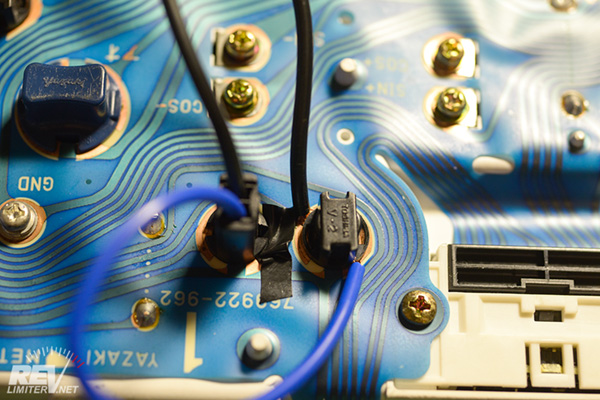
Twist the wired socket into place. Route the wires down and around to connect under the stock high beam connector. Twist the stock high beam connector into place and make sure the wires stay put under it while you're twisting it tight.
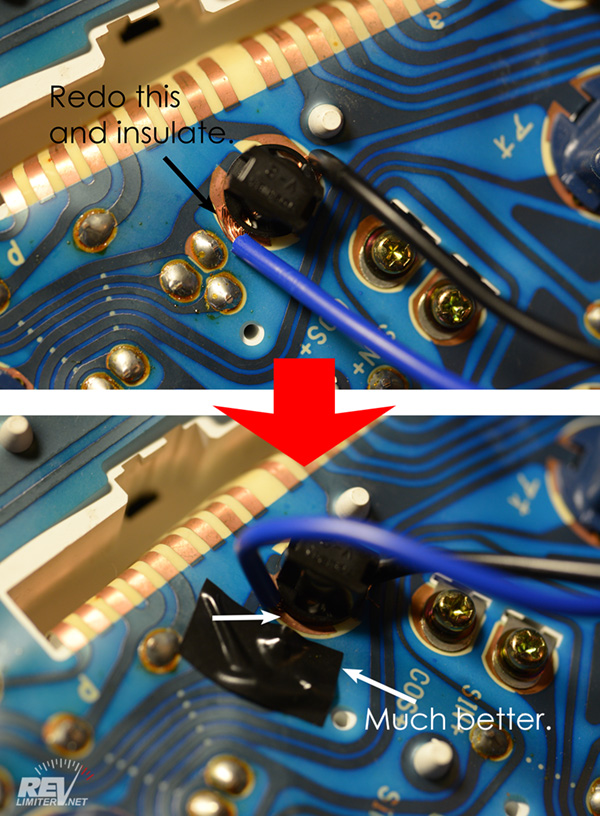
Spend some time to get things perfect. If a wire is sticking out as in the top photo, untwist the high beam socket and re-do it. You might also add some electrical tape to insulate the connection. You don't want to risk burning out your gauge circuit membrane.
CEL Indicator Install
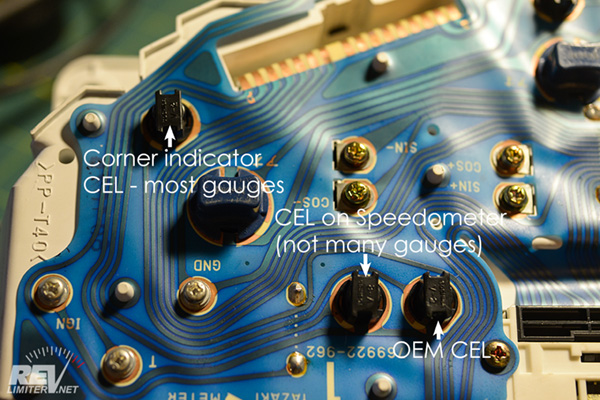
Take a look at your new speedometer face. If it has a CEL indicator on it next to the zero, you'll be putting the wired socket in one place. If you don't have a CEL on the face but it's moved to the corner indicator, you'll be putting the wired socket in a different place.
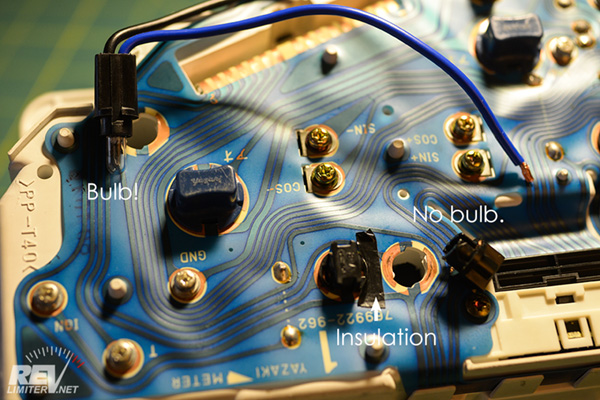
If you have the corner indicator CEL, you'll be following the above photo. Remove the bulb from the OEM socket and put it in the wired socket. Add some black electrical tape immediately beside the stock CEL location to protect the circuit membrane.
Twist the wired socket into place. Route the wires down and around to connect under the stock CEL connector. Twist the stock high beam connector into place and make sure the wires stay put under it while you're twisting it tight.
If you have a set of 6 o'clock zero gauges (zero at the bottom) with the CEL next to the zero, you'll follow the above pic. Remove the bulb from the OEM socket. Add some black electrical tape immediately beside the stock CEL location to protect the circuit membrane.
Routing the wire might be a bit difficult since it's long and the distance traveled is short. Make sure the wires do not come out from under the OEM CEL connector when you install the cluster back in your car.
DONE!
Setting the Needles
Install your cluster in the car. Plug in the connectors. You can screw it in on all four corners and install the black bezel if you want. The bezel and glass can be popped on with the cluster screwed into the car.
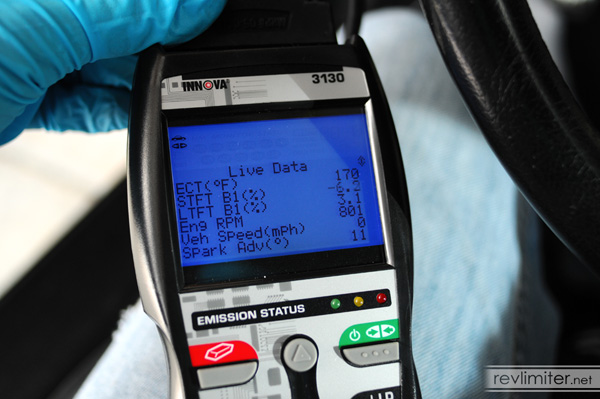
This little tool makes life a whole lot easier. It's an OBDII scanner with a live view screen. No guessing about your tach. No wondering if the car is warm yet. Just read it from the screen. I highly suggest buying, begging, or borrowing one. It'll come in handy for more than just this job in the future.
There is no good way to photograph each step of this. Sorry, but this involves a lot of reading. I'll try to make it as easy to understand as possible.
Do not use a lot of force to press the needles into place. If the black needle center contacts the gauge face, it will not be able to spin. A little shove is all that you need.
Oil Pressure: Start the car. Then pop the oil pressure gauge on anywhere you want. 99% of NBs have dummy oil gauges. If yours has an aftermarket sender to make it actually work, chances are you remember how to reset it correctly. =)
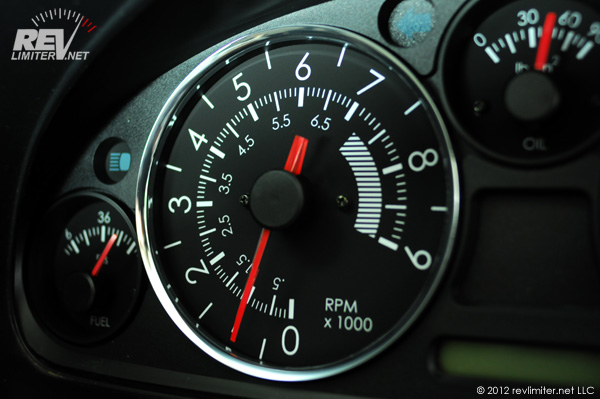
Tachometer: When your engine has warmed up enough and you hear it idling normally, pop the tach needle in place with it pointing somewhere around 850 rpm. Next, rev up to your rev limit. For most NBs, 7200 is the limit. OR save a lot of guesswork and use the OBDII scanner with the car at idle.
Water Temp: Once you've finished messing around with the tach needle, your engine should be warm enough to put the water needle in place. The stock position is approximately 11:30 o'clock. Put the needle in place and then press it down firmly. Of course, you can verify the water temp on your live data screen...
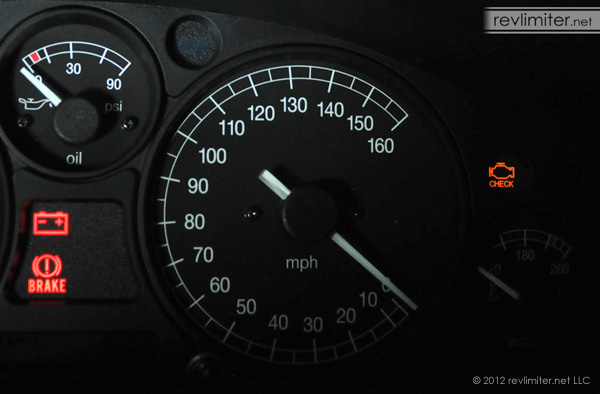
Test drive time. On this test drive, you'll get your speedometer accurate. I suggest driving around in a pretty deserted area for this. You're going to be quite distracted. And you should try to plan it so that you end up at a gas station at the end.
Speedometer: There's three ways to calibrate. 1: calibration mark on your speedometer. 2: using an OBDII reader to display speed. 3: Using a GPS app on your phone.
And that's it. All that's left to do is snap the cluster glass back on and reinstall the gauges into your car. Of course, there's the celebratory test drive (much longer than the needle setting test drive) followed by the celebratory beer, celebratory photos, and celebratory posting to your favorite Miata board.
The After-Install FAQ
Additional Images
My poor NB has worn a lot of gauges over the years. I had to add some pix to the end of this page.
Corner indicator CEL lit.

Corner indicator high beam in action.
Site Navigation
Latest Blog Posts
CarbonMiata Vent Window Install/Review
Posted on Mon, 30 Jan 2023 01:47:44 +0000
 After waiting 23 years, there's finally a pretty vent window kit on the market for the NA/NB Miata. Unfortunately, it doesn't actually work well.
Read more...
Period-Correct 90s Rear Speakers
Posted on Mon, 11 Oct 2021 02:12:26 +0000
 Sharka's rear package tray now holds more than just a rollbar. A set of 90s speakers is the next upgrade for the little blue and white boi.
Read more...
GV Tail Light Upgrade
Posted on Tue, 28 Sep 2021 02:05:06 +0000
 TLDR; LEDs are brighter, who knew?
Read more...
Mona Visits Joshua Tree
Posted on Sat, 26 Jun 2021 03:21:12 +0000
 Mona checks out the curious multi-armed residents of Joshua Tree National Park
Read more...
KINOD 15
Posted on Sun, 20 Jun 2021 22:49:33 +0000
 Mona and I made the pilgrimage to SoCal for the 15th Anniversary KINOD Event.
Read more...

Products sold on this site are for Off-road and Competition use only. This website intended solely to provide general guidance on matters of interest for the personal use of the Reader of this Page, who accepts full responsibility for its use. All products as well as information provided "as is," with no guarantee of completeness, accuracy, or timeliness, and without warranty of any kind, express or implied, including, but not limited to, the warranties of performance, merchantability, and fitness for a particular purpose.