

M2-1002 pedals installed. Wanna see how?
No, your eyes are not deceiving you. This is an install manual for a set of pedal covers.
Really hardcore automotive blogging, huh?
Still, I figure it’s gotta be of use to some people. I could have really used it when I opened up my box of pedals. So… here we go!
Tools:
- A Phillips screwdriver.
- Something like a drop light or flashlight if you’re working in a dark garage.
Text will be sparse for the remainder of this post. I’m gonna let my photos do most of the talking. You can click on any of them for a larger view. And if you have any questions, just leave a comment.

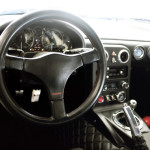
The Before shot - Leave all the rubber covers in place.

This is the brake and clutch pedal hardware - 2 small screws each.

You'll slide the clutch and brake pedals over the rubber covers.

But first, get the screws started before sliding these on.
Let me just emphasize how hard it is to line up these damn little screws from the back. It’s so hard, I took the brake cover right back off and got the screws started. Then I took the above shot.
Then I decided to write this blog post.

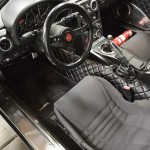
Brake and clutch pedals installed. Shiny, no?

Gas pedal hardware. Each screw gets a washer, lock washer, and nut.

The gas pedal cover uses these two holes (blue arrows).

Just use your hand to hold the nut in place on the back of the pedal.
Some folks might be tempted to reach for a wrench to hold the tiny nut onto the back of the pedal. It’s totally unnecessary. You can hold the nut with your hand. The lock washer will keep the nut from turning once everything starts to get tight.

Dead pedal hardware.

Dead pedal screw holes - only use the top 2.
The dead pedal plastic is soft enough that you can easily screw straight into it. No drilling is necessary. Just put a little weight behind your screwdriver and you’ll do fine.
And leave that bottom screw out. There’s nothing to put it into anyway. Once you’re done, the dead pedal edge should be very near the floor mat. I left just enough room to let me slide the mat in and out.

All done! Now for a test drive.
And that’s pretty much it. What other blog would give you an even dozen photos for something as simple as a pedal kit install? I can’t think of one.
Keep those tops down.


Nothing wrong with being thorough!
I’m nothing if not thorough. 🙂
Great write up
As usual clear text and stunning photos. Loved it.
Thanks! I does what I can.