

Don't ya wanna hop in?
I’ve been planning, gathering parts, and working on this silly door panel project for about 6 weeks. Various parts took a while to come in. I realized I wanted other parts. It was crazy scope creep. But here we are! Super-vintage-retro doors.

Stock 95 door panel
So bland. I hate this. I swapped them out with my slightly-prettier 97 door panels back in January when I first got the 95. Sorry for the angle of the sun. This is the only shot I ever took of these hideously boring things. And NO arm rest!!!! GAH. I rest my elbow on that thing almost constantly while driving.

Click any of these pix for a larger gallery view.
So here’s step 1. You buy some vinyl. You MEASURE how much you need first. I didn’t do that and got lucky. There was juuuuust enough to cover both panels with the diamonds going long-ways.

Getting ready to cut - Click for a larger view
Step 2 – Remove the stock vinyl from the door card. That gives you an instant pattern. I stuck it down with some of my wife’s sewing pins and cut my precious new vinyl.

Pattern cut! - Click for a larger view
And there we go! Old and busted on the bottom, new hotness on the top. Gotta love that orange padding.

Click the shark for a larger view
Once we have the vinyl cut out, all that’s left to do is staple it down. The stock vinyl was held with a combination of spray adhesive and staples. I used all staples. I had this small helper, see. He wanted to get “jiggy” with the staple gun. It was cute till he went after the cat.

Smooth corners are good - click for a larger view
Following the stock vinyl pattern for the corners really helped. I got perfect fitment and no bunching. And I used a LOT of staples.

All stapled! Click for big size.
Not much to it. At this point I was somewhat amazed at just how easy it is to recover these Miata door cards. It’s definitely not a modern car with big plastic bolsters. Just a piece of fiberboard…

The shark approves!
I couldn’t help but flip the panels over and lay the speaker covers on top. Things are looking good! I just used my straight 95 door tops in this shot. They’ll not be going on the final product. I love the look of the more bolstered 97 tops.

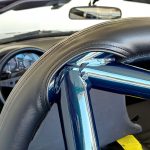
Which one is plastic and which one is aluminum?
A quick break from vinyl. I’ve had the KG Works door handles for a couple years and love them dearly. They feel awesome when you wrap your fingers around them. Very much worth the money. But they’re plastic. I’ve always worried about them breaking. When I found a set of Aerodramatics aluminum ones on ebay for $40, I jumped. They look EXACTLY the same. They’re indeed identical except from the material used. But it was worth it to me to not worry about ever having to go back to the stock handles.
Back to vinyl.

Well there's your problem...
Yes, this is the next thing to modify. The 95 door cards have smaller speaker openings than the 93LE speaker covers. I traced the hole, cut the vinyl with scissors, and then went to work on the wood with my dremel. The house smelled like a camp fire when I was done. Yes, the 100 degree heat drove me inside for this project.

Dremels make life easy.
One round hole, no waiting! After cutting this, I took a black sharpie to the orange vinyl padding so as to hide it a bit better behind the grille. It worked. You can’t see it anymore.

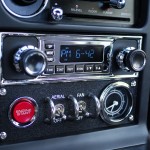
Ta-da!!!
Done! Looking not bad at all in my very humble opinion. Mounting the 97 door tops on the 95 door cards was easy. I just drilled a couple extra holes at the right spot (in the back where the bolster is thicker) and was able to screw them down. Why go to this trouble? I like my 97 door cards still. I might want to swap back to them.

Before and After (click it for God sake!)
On the top: 97 door panels with KG Works plastic-chrome handles, Aerodramatics door cups, and Home Depot-sourced speaker rings. Not bad.
On the bottom: The Door Panel Project. 97 door tops, 95 door cards, 97 armrests, 93LE speaker covers with new grilles, diamond stitched vinyl from EZ Boy Interiors, and Aerodramatics aluminum door handles and cups.

Sharka gazes in quiet awe
So worth all the effort. Hope you liked the show.


First of all, as awesome as your interior looks here, it looks even better in person. Seriously, yo. Blown away by the quality of your handiwork.
Secondly, this is a fantastic how-to, and I’d put good money on this turning up in the top of your search logs for a good long while.
You’ve done good — twice over!
pshaw. But it DOES look good, huh? Thanks for putting up with me decorating the dining room with little bits of vinyl and fiberboard. 🙂
Where did you find that diamond stitched vinyl?
As I said in the post, EZ Boy Interiors. It’s but a google away.
http://www.rodinteriors.com/
I am not new to blogging and really treasure your web site. There is much original subject that peaks my interest. I am going to bookmark your internet site and keep checking you out.
hello. I am very challenged with doing anything myself, which tends to turn out as though Homer Simpson did the work. I want to remove the driver’s side door panel in order to lubricate the power window mechanism. I am afraid of damaging the panel during removal because, like I said, I am pretty dangerous with a tool in my hand. Can you offer me any advice on doing this safely? Mine is a ’92 – I’ve had since ’94 and I’m pushing 80,000 miles.
man, do I love this car. My friend said to me: “If you could have any car, which one would you take?” I am sure he expected me to answer with some exotic machine but I simply told him the truth: “I already have the car I want.” Anyway, great job on your doors and any help you could provide would be welcome. Regards, Duke Dosik
Sure thing! It’s really quite easy.
1: Remove the screws around your armrest. I think your 92 has real arm rests and not just the pulls, right? If so, there are three of them. The one at the top corner is under a little piece of plastic that you can remove with a flat blade screwdriver.
2: Remove the screw behind your interior door opener. It’s just a small one. Then, you lock the door, open the clasp, and remove the door cup. I think you have to lock the door to get the lock button to be out of the way.
3: Now you can start popping the panel off. It’s held on with little plastic fasteners that pop on and off. You can wedge your fingers under a corner of the door panel and pull straight out. You’ll hear a POP! as the fastener near your hand releases. Then you just go all the way around popping the fasteners off.
4: The door card lifts off on the same plane that your window goes up and down on. It goes into some slots at the top of the metal door itself.
Hope that helped!
thanks Rev – will plunge in this weekend and at least I won’t be plunging blind!
Your diy interior looks great,I like it.And i want to do this also .but i can find the vinyl on the website you post anyywhere i can buy the vinyl except the website you post.
I’d recommend you call them. Great company, that EZ Boy, but their website is more of a showcase of the stuff they can sell than an online catalog.
http://www.rodinteriors.com/contact.htm
You want the diamond stitched vinyl by the yard.
how many yard i should buy if only diy the two panel.
I don’t know. Measure your panels and call the company. Not sure what sizes they’re selling.
Such a cool article. Thank you for the time you put into this
How much material did you need for this project? Someone on one of the forums said one yard seems like that would not be enough? Also I wonder if you could use this material on the black shelf and transmission tunnel?
Thanks
I ordered one yard without measuring. It was sold on ebay per yard at the time, so I figured why not just order one and try it. I think it was 50″ tall by 36″ wide. And it happened to be juuuuust enough, as you see above.
EZBoy has been sold and bought since I posted this article. They’re under new management. Not sure if they’ll be offering this stuff on ebay ever again. Best to call them (they’re old school).
E-mail a couple of weeks ago and Kelly replied yesterday. So when ordering should make sure at least 50×36.
Thanks
I ordered some more back in October. I finally got it in January. Mostly the delay was due to the changing hands of the company, but still. If you’re not in a rush, you’ll not be too angry.
And I ordered two yards for my trans tunnel project. 🙂
continue with the the great work on the site. I love it.
Finally shipping my order this week, can not wait to see your trans tunnel project was thinking of doing that just wondering if your would need a heavy duty sewing machine to close the edges? I also have been looking for a roll bar for my car and was thinking replacing the existing rug in the back with this diamond stitched vinyl since I order extra for the door panels but not enough for the trans tunnel rather than cut the rug up.
Thanks
Not sure about the kind of sewing machine needed. I’ve been dragging my feet and haven’t gotten started on the tranny tunnel yet. All I’ve done is make the patterns.
On the photography, have you done backup tests with a polarizer? You may want that glare. I use a very old Minolta, Canon high-end in 1987 all film, and one Lumix DMC5. It’s really nice in low light.
I always wanted full-on Leica, film only, but Canon did yoeman work inside the pyramids, tunnels and underground. I used to drive over to Chaco Canyon. Should go again. It’s so very spiritual.
I just received the chrome door pulls and first had difficulty getting the old ones off and not trying to get the new ones on. What type of fastener did you use to reassemble the new handles at the hinge?
Mine shipped with fasteners. Little pop rivet thingys. I call them thingys because they don’t resemble standard pop rivets so much. They’re more like little posts with split rings to hold them in place.
Did yours not have any hardware shipped with it?
Great job! I am currently in the process of doing the same thing (different design). How did you attach the new speaker covers since they have screw holes?
You referenced “home depot resourced” speaker rings (door panel) I have been unable to find them, any help? What should I be asking for at the Depot? For my ’94 NA.
One more thing, I am looking for better looking window cranks (no electric windows, sadly), the black plastic one look bad, any ideas of ones that will fit that may have some chrome/bling to them?
Adam,
How were the original door tops held onto the 95 door card! Did they snap on?
Rich
Sorry but I don’t really remember. I did this project many years ago. No idea how they were held on. Seems like maybe glue was involved? And bits that can break off?
Hi, what stapler/staples did you use for your door panel?
Thanks